
A Practical Guide to Anchoring Posts to Concrete
- Eric Lafleche
- Jan 19
- 15 min read

Anchoring a post to concrete isn't just about digging a hole and pouring mix; it's about building a foundation that will keep your fence standing strong against Canadian weather. Your starting point determines the right technique. For a new fence, embedding the post directly into wet concrete is the strongest method. If you're working with an existing patio or walkway, you'll need to use surface-mounted anchors or a core drill and epoxy.
Getting this first step right is critical for a stable, long-lasting fence.
Why Proper Post Anchoring Is Crucial in Ottawa-Gatineau
In the Ottawa-Gatineau region, the ground is not static. Our intense freeze-thaw cycles can turn a new fence into a leaning, heaving disaster in a single season. This isn't a minor issue; it's a structural failure.
Properly anchoring your posts is your primary defense. It's not just about setting a post upright; it's about creating a foundation so solid it can resist the immense pressure of frozen, expanding earth. If you skip this, your posts will lift, lean, and eventually fail, destroying your entire fence line.
Understanding Frost Heave
Frost heave is the primary threat to any outdoor structure in our climate. When soil moisture freezes, it expands with enough force to push anything upward. A post set in a shallow concrete base acts as a handle for the frost to grab and lift.
This is why local building codes are strict. In Ottawa-Gatineau, the frost line can reach 1.2 to 1.5 metres (4 to 5 feet) deep. Your anchoring strategy must go deeper. To be effective, Canadian standards require fence post footings to extend well below that frost line. For corner and gate posts, which handle more stress, you may need to dig as deep as 1.8 metres to ensure they remain stable.
Choosing the right anchoring method is what separates a fence that stands for decades from one that needs expensive repairs after its first winter. It's a non-negotiable investment in longevity and your own peace of mind.
Ultimately, proper anchoring is about structural integrity, a core idea in the principles of structural engineering. Your approach will be dictated by whether you're pouring a fresh concrete base or dealing with an existing slab. A new pour allows for direct embedment—by far the strongest method. An existing surface, however, calls for specialized hardware like surface mounts or core drilling.
To plan your project properly, check out our complete breakdown in our guide to frost depth in Ontario. Making the smart choice now ensures your fence is built on a foundation of solid strength.
Choosing the Right Anchoring Method for Your Project
When anchoring fence posts to concrete, the how is as important as the why. The right choice from the start prevents a leaning fence after the first Ottawa winter. The main question is this: are you pouring new concrete, or working with an existing slab like a patio or walkway?
Let's break down the three primary methods. We'll cover direct embedment for new builds, surface-mounted anchors for existing patios, and the heavy-duty core drilling method for when strength is non-negotiable. By looking at real-world scenarios, you'll be able to confidently select the right approach for your project, whether it's a simple deck railing or a heavy gate post.
This quick guide helps you see the two main paths right away.
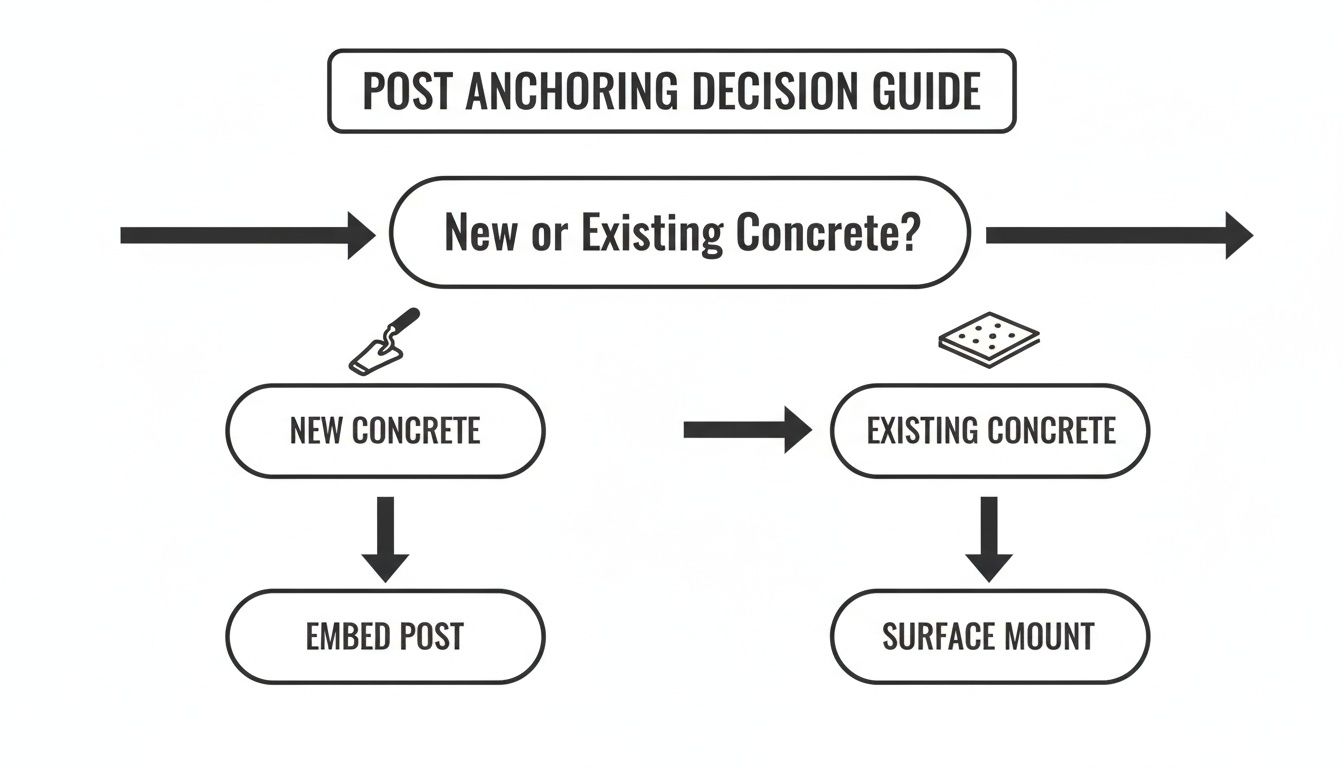
As you can see, new concrete projects almost always mean embedding the post directly. For existing slabs, you’re usually looking at some kind of surface mount. Now, let’s get into the nitty-gritty of each one.
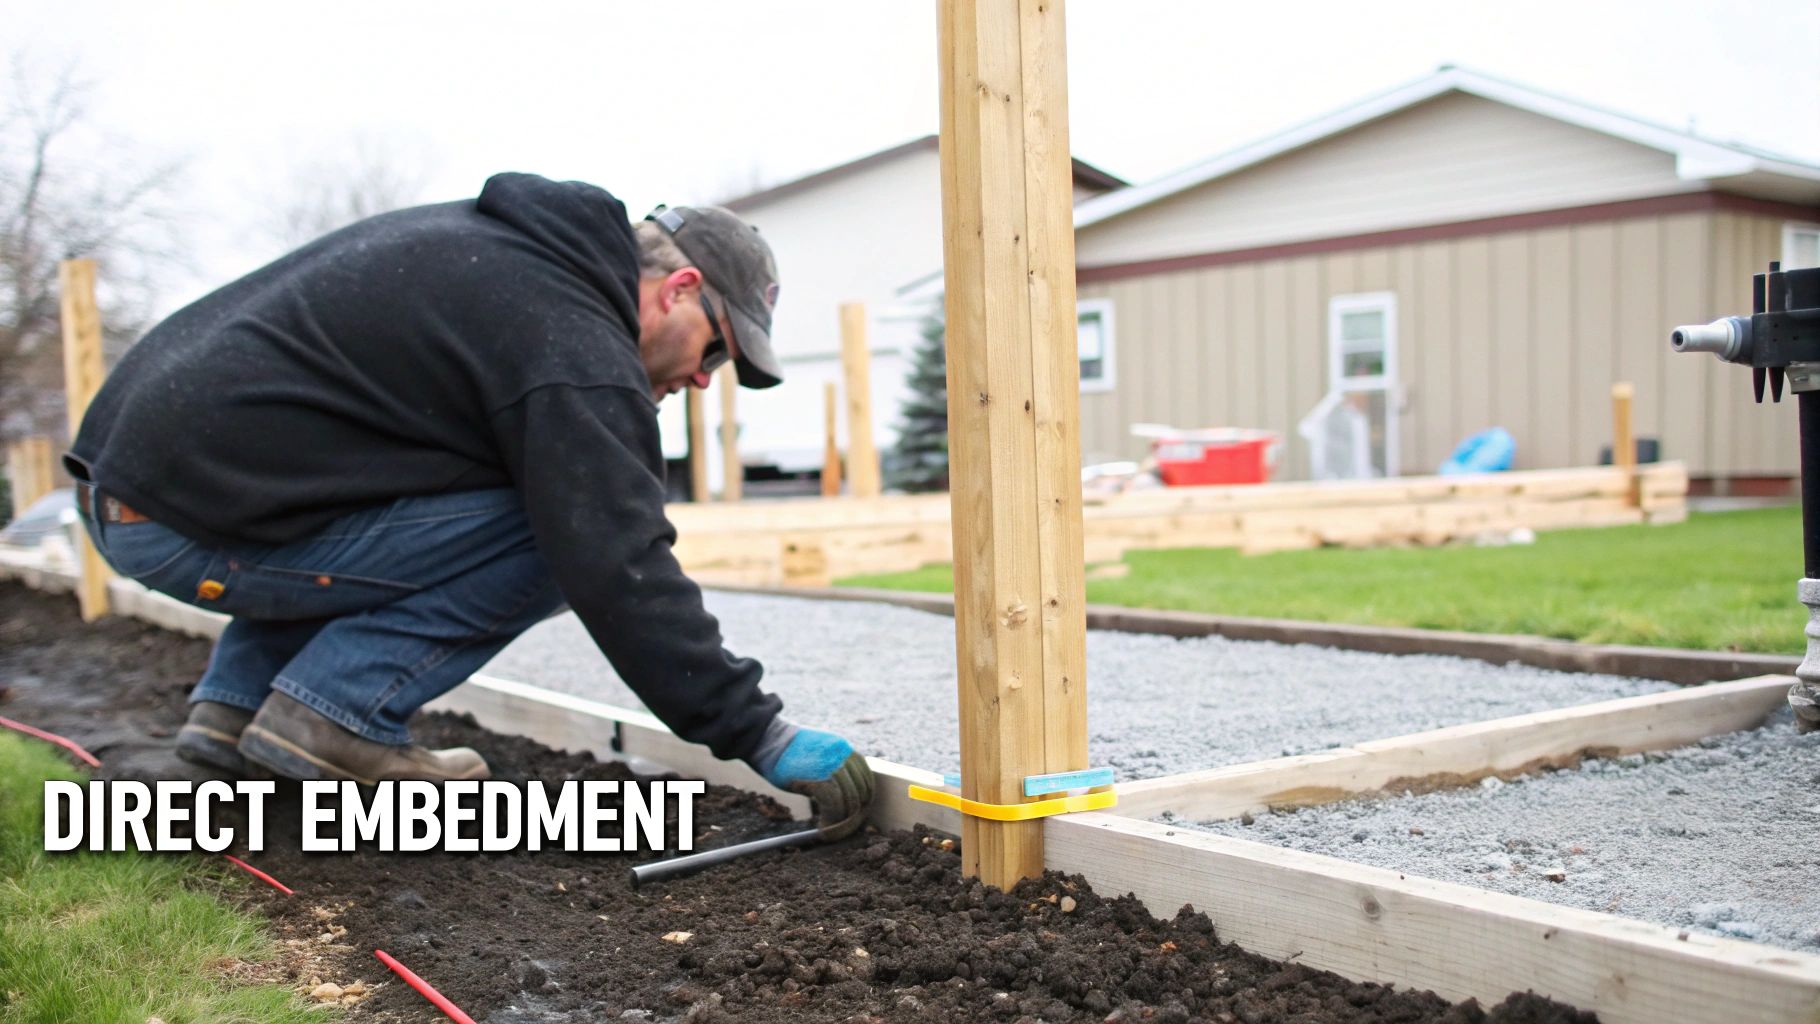
Direct Embedment: The Gold Standard for New Fences
For a new fence, setting posts directly into wet concrete is the most robust method. It's the strongest and most reliable way to build a foundation.
By digging a hole deep enough and sinking the post into a fresh footing below the frost line, you create a single, solid structure. This provides superior resistance against wind, frost heave, and the stress of a heavy gate. It is the preferred method for any significant fence project, especially the tall privacy fences needed to handle Ottawa-Gatineau's wind.
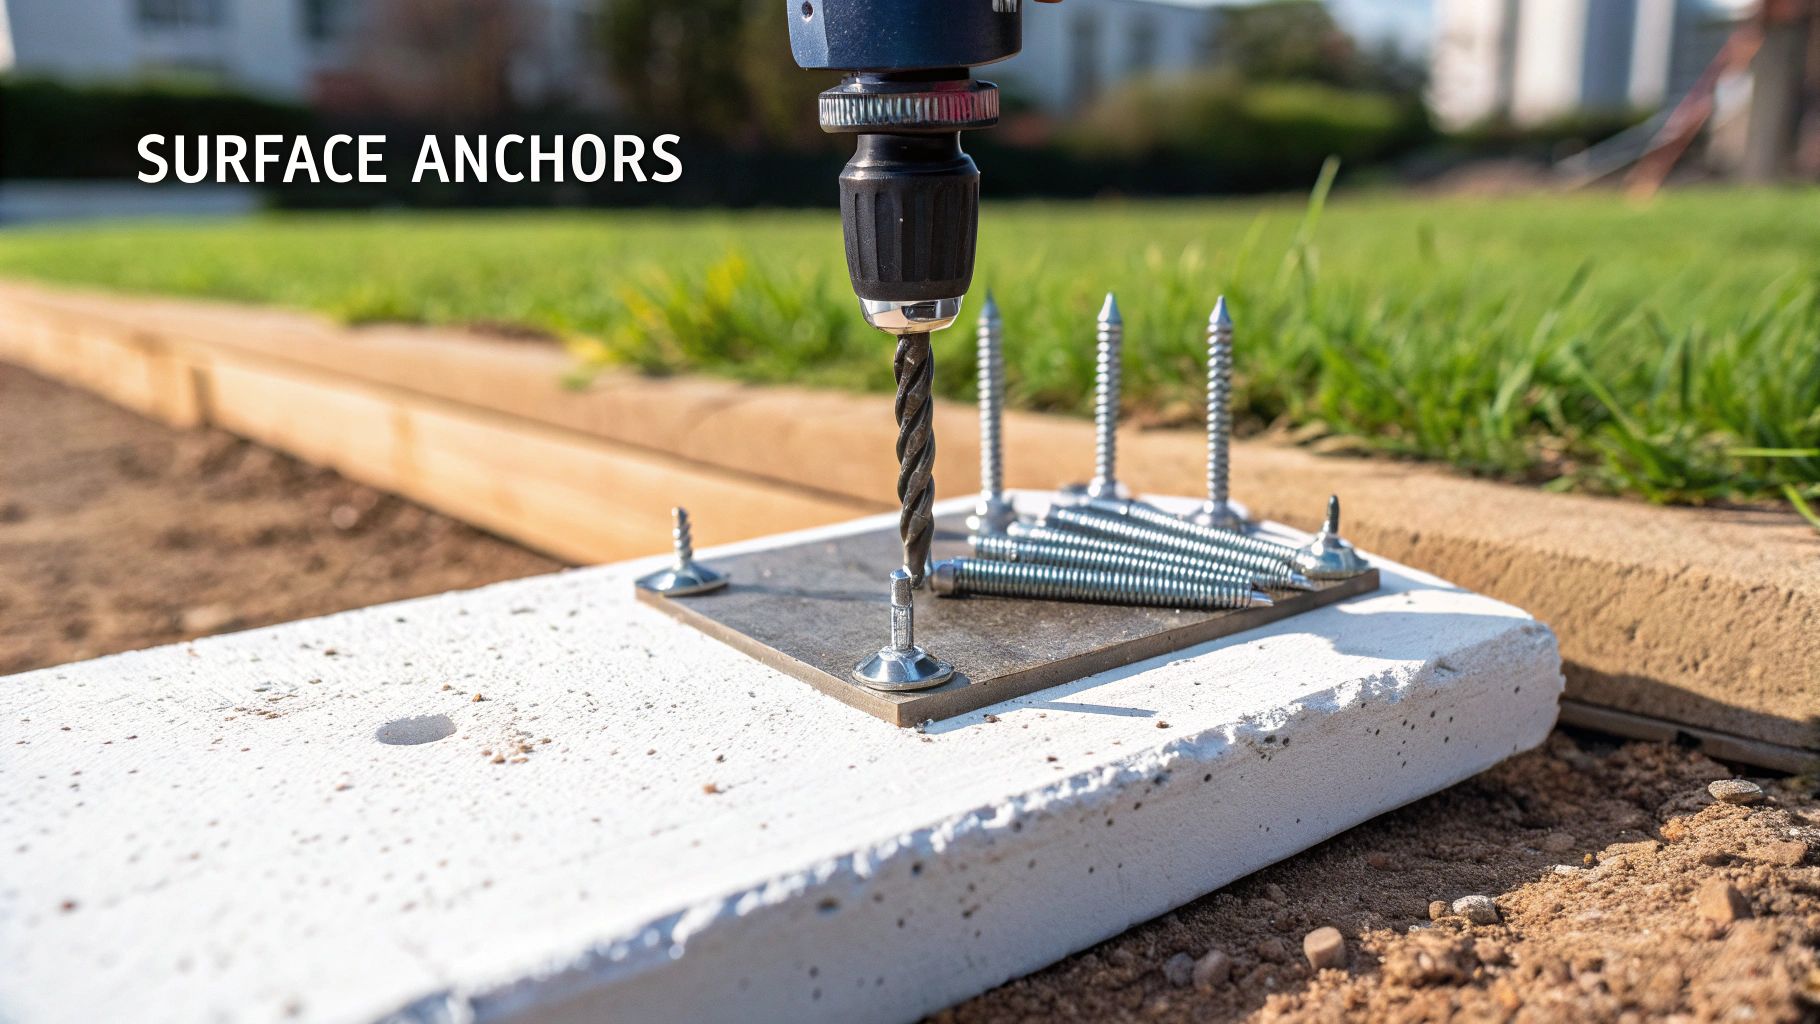
Surface-Mounted Anchors: A Practical Fix for Existing Slabs
If you're adding a railing to a concrete porch or a fence along a driveway, you need a different solution. This is where surface-mounted post anchors are ideal.
These are heavy-gauge steel brackets that bolt directly onto the concrete using fasteners like wedge anchors. The primary benefit is convenience—it’s fast, clean, and requires no concrete mixing.
However, there's a trade-off. The post's strength is entirely dependent on the quality and mass of the existing concrete. A standard 4-inch patio slab lacks the mass to resist the leverage from a 6-foot fence post during a windstorm.
Use surface mounts for:
Shorter decorative fences (under 4 feet)
Deck and patio railings
Light-duty applications without significant wind load
A Word of Caution from the Field: Always check the concrete first. If your slab has major cracks, is crumbling at the edges, or feels thin, it’s not a candidate for surface mounting. You’ll be fighting a losing battle from day one.
Core Drilling: The Pro Move for Unbeatable Strength
When you need maximum strength on an existing slab, core drilling is the solution. This technique is used when a surface mount is insufficient, but demolishing the old concrete isn't practical.
A specialized drill cuts a clean, deep hole through the slab. The post is then set inside the hole with a high-strength anchoring epoxy or hydraulic cement. The resulting bond is often stronger than the surrounding concrete, providing the stability of direct embedment without the demolition.
Core drill when:
Anchoring a tall privacy fence onto an existing concrete pad.
Hanging a heavy, frequently used gate.
You need structural support that a simple bracket cannot provide.
While it requires specialized tools and more labor, core drilling delivers professional-grade strength for demanding applications.
Choosing the right method comes down to your specific situation. This table provides a quick comparison.
Comparing Post Anchoring Methods
Method | Best For | Stability Level | Relative Cost | DIY Difficulty |
|---|---|---|---|---|
Direct Embedment | New fence lines, tall fences, heavy gates | Highest | Moderate | Moderate |
Surface Mount | Existing slabs, short fences, railings | Low to Moderate | Low | Easy |
Core Drilling | Maximum strength on existing slabs | High | High | Difficult |
Ultimately, whether you're setting a post in a brand-new footing or finding a way to work with what you've got, the goal is always the same: a secure foundation that lasts.
Mastering Direct Embedment in Fresh Concrete
For a new fence designed to last, setting posts directly into fresh concrete is the gold standard. This direct embedment method creates a single, solid foundation by fusing the post and concrete footing into a powerful structure capable of withstanding Ottawa-Gatineau's weather. It's the professional choice because it delivers unmatched stability for everything from tall privacy fences to heavy custom gates.
To do this correctly, you must be precise with excavation, achieve the right concrete consistency, and use a smart layering technique. This process is also your best defense against rot at the ground line. Let's walk through the actionable steps to master this crucial skill.
Preparing the Perfect Post Hole
A strong fence starts with a properly dug hole. The depth and diameter are your primary defense against frost heave.
In our region, you must dig below the frost line, which means a minimum depth of 1.2 metres (4 feet). This anchors the footing in stable ground that won't shift during winter. For width, make the hole about three times the post's diameter. For a standard 4x4 post, this means a 12-inch (30 cm) diameter hole. This provides ample space for concrete to fully encase the post, creating a thick, supportive collar.
The Three-Layer Footing Technique for Longevity
A common mistake is filling the entire hole with concrete, which creates a "bucket" that traps water against the wood, guaranteeing rot. The solution is our three-layer footing method, designed for drainage and durability.
Here’s the step-by-step process:
Gravel for Drainage: Add a 10-15 cm (4-6 inch) layer of 3/4-inch clear stone or gravel to the bottom of the hole and tamp it down firmly. This creates a drainage bed, allowing groundwater to escape instead of pooling around the post.
Concrete for Strength: Mix and pour your concrete, filling most of the hole but leaving the top few inches empty for the final layer.
Soil for Breathability: Backfill the top with soil, sloping it away from the post. This prevents a concrete collar at the surface where moisture collects, allowing the post to breathe where it is most vulnerable.
This layering system is the key to setting posts that maximize both strength and the life of the wood.
Getting the Concrete Mix Just Right
Your concrete's consistency is critical. Too wet, and it will be weak when cured. Too dry, and it will be difficult to work with, leaving air pockets. Aim for a thick oatmeal or peanut butter consistency—stiff enough to hold its shape but wet enough to flow into every gap.
Always add water to your dry mix slowly; it's easier to add more water than to fix a soupy mix. For a typical 4x4 post in a 1.2-metre deep hole, plan on using about two 30kg bags of standard concrete mix.
In our experience, the number one failure point for wood posts is rot right at ground level. This happens because the concrete footing traps moisture against the wood. The three-layer technique is your best defence, creating a system where water can drain away, and the wood can breathe.
Ensuring a Plumb Post and Proper Curing
Once the concrete is in the hole, you must work efficiently. Set the post, ensure it is perfectly plumb, and brace it before the mix begins to set.
Lower the post into the wet concrete until it rests firmly on the gravel base. Use a level on two adjacent sides to confirm it's perfectly vertical. Do not rush this step—even a slight lean will be obvious once the fence panels are installed.
Next, brace the post. Use scrap 2x4s. Drive stakes into the ground a few feet from the hole and screw braces from the stakes to the post. This creates a rigid triangle that holds the post steady while the concrete cures.
Finally, be patient. Concrete needs time to reach full strength. While it may feel solid in hours, wait at least 24-48 hours before attaching rails or panels. For a heavy gate post, allow a full 3-7 days for curing to ensure the long-term health of your fence.
While setting posts in concrete is non-negotiable for stability in Ottawa-Gatineau's climate, it does create a challenge. The concrete that provides all that strength can also trap moisture, leading to up to 90% of rot failures right at the ground line if you're not careful. This has led to hybrid techniques that can add 15-20 years to a post's life. Pros in our region often avoid encasing the post all the way to the surface. Instead, they'll use a 10 cm gravel base, fill with concrete to about two-thirds of the depth (roughly 2 bags/90-100 lbs for a 4x4 post in a 30 cm x 1.2 m hole), and then leave a 5-10 cm air gap at the top. You can fill this gap with more gravel or soil to improve airflow, all while still respecting the local 1-1.2 metre frost line. You can learn more about how to protect wood posts set in concrete.
Securing Posts to Existing Concrete
So, you're looking to add a fence or railing to an existing concrete patio or walkway? This is a common project, but it’s a bit different than starting from scratch. You can't just dig a hole and pour a new footing. Instead, you have to work with the slab you've got.
Luckily, there are a couple of solid methods for anchoring posts to cured concrete. The right choice really depends on what you're building. For lighter jobs, surface-mounted anchors are usually perfect. But for anything that needs to withstand serious force—like a tall privacy fence catching the wind—you’ll want to look at core drilling. Let's break down how both work.
Using Surface-Mounted Post Anchors
This is the go-to method for most DIY projects, and for good reason. Surface-mounted anchors are just heavy-gauge steel brackets that bolt right onto the concrete surface, giving your post a secure footing. They're quick, straightforward, and get the job done when high structural loads aren't an issue.
Think about a railing on a concrete porch or a short, decorative fence bordering a garden. The forces on those posts are pretty minimal, so a surface mount provides all the stability you need.
The real secret to a solid installation is twofold: using the right hardware and making sure your concrete is in good shape. The strongest anchor in the world won't hold if the concrete it's attached to is weak.
Selecting the Right Hardware
At the hardware store, you'll find several fastener options. Your choice directly impacts the anchor's strength.
Wedge Anchors: These are almost always the best choice. Drill a hole, tap the anchor in, and as you tighten the nut, a clip expands to wedge itself tightly against the concrete, providing excellent pull-out strength.
Sleeve Anchors: These expand along their entire length. They are suitable for lighter-duty applications but have less holding power than wedge anchors.
Concrete Screws: Though easy to use, they offer the lowest pull-out strength. Use them only for very light applications where the post will not experience significant stress.
For a standard 4x4 post anchor, use fasteners at least 3/8 inches in diameter and long enough to sink 2.5 to 3 inches into the concrete. Always follow the manufacturer's specifications for both the post base and the anchors.
Pro Tip: Take a hard look at your concrete slab before you even think about drilling. If it's less than four inches thick, has major cracks, or is crumbling (a sign of spalling), it’s not going to work for surface mounting. Your fasteners need solid, healthy concrete to get a proper grip.
The Superior Method: Core Drilling and Epoxy
For situations requiring absolute strength, core drilling is the professional standard. Use this method for a six-foot privacy fence, a heavy gate post, or any application where failure is not an option. It is the closest you can get to the stability of a new footing.
Core drilling uses a special rig to cut a perfectly round hole—typically 2 to 4 inches in diameter—directly through the existing slab. This allows you to set the post into the concrete, not just on top of it.
After drilling and thoroughly cleaning the hole of dust, set the post and fill the gap with a high-strength anchoring epoxy or hydraulic cement. This creates a rock-solid unit, bonding the post directly to the slab. The result is a rigid connection that can handle significant lateral forces, like wind or the swing of a heavy gate.
When Is Core Drilling Necessary?
While overkill for a simple deck railing, core drilling is essential in these scenarios:
Fences Taller Than 4 Feet: A tall fence acts like a sail, putting tremendous leverage on the post base. A surface mount could fail under this load.
All Gate Posts: The dynamic forces of a swinging gate put unique stress on the post. Core drilling ensures it remains stable for years.
Structural Supports: If a post supports a pergola or small roof, its stability is a safety issue. Core drilling is non-negotiable.
Yes, core drilling means renting some specialized gear and a bit more work, but the peace of mind you get is worth it for these high-stress jobs. It’s the definitive way to turn an existing slab into a foundation you can truly count on.
Anchoring Chain Link and Ornamental Iron Fences
Moving from wood to metal fences like chain link or ornamental iron introduces different structural demands. These systems are engineered for security and tension, requiring exceptionally solid foundations. While the principle of setting posts in concrete is similar, the forces involved are much greater.
A chain link fence is under constant tension, pulling inward on the corner, gate, and end (terminal) posts. Unlike a wood fence where the load is distributed, this tension places immense strain on these key posts. Without robust concrete footings, they will lean, and the fence will sag.
Why Terminal Posts Need a Stronger Foundation
A terminal post anchors an entire fence line, resisting the constant pull of the tensioned mesh. Line posts merely hold the mesh up. This functional difference means you cannot treat all posts equally.
A weak footing under a terminal post is a setup for failure. Over time, tension will exploit the weakness, causing the post to pull inward. This is especially critical for gate posts, which must also support the weight and dynamic force of a swinging gate.
To counteract these forces, terminal post footings must be deeper and wider than those for line posts. The extra concrete volume provides the mass and leverage needed to resist the pull, keeping your fence taut and straight.
The success of a chain link or ornamental iron fence installation rests almost entirely on the strength of its terminal posts. Skimping on concrete for these critical points is the most common and costly mistake you can make.
Concrete Specifications for Metal Fences
For a proper chain link fence that meets Canadian standards, terminal posts require significantly more concrete—often 50% to 100% more than a standard line post. The guidelines are clear, and you can learn more about the specifics in our step-by-step guide to chain link fence installation.
Here are the actionable specifications for a typical installation:
Spacing: Posts should be no more than 3 metres (10 feet) apart.
Concrete Strength: Use concrete with a minimum strength of 20 MPa after a 28-day cure.
Post Depth: The post should sit on a gravel base for drainage, with at least 150 mm of concrete below it at the bottom of the hole.
For a standard 2-3/8 inch terminal post, you need a hole around 20-25 cm in diameter and 75-90 cm deep, requiring about 1 to 1.5 bags (50-75 lbs) of concrete mix per post. However, in the Ottawa-Gatineau region, you must dig deeper to get below the 1.2+ metre frost line to prevent heaving. For more on the math, you can find some great insights on calculating concrete needs for fence posts.
Properly anchoring these critical posts is the key to a secure, durable, and long-lasting metal fence.
Common Anchoring Mistakes and How to Fix Them
Even with careful planning, small mistakes can lead to wobbly, leaning posts. When anchoring posts to concrete, precision is essential. The good news is that most common errors are entirely preventable.
From underestimating our local frost line to grabbing the wrong fasteners at the hardware store, these little mistakes can compromise your entire fence. Let's walk through the most frequent pitfalls we see and, more importantly, how to get it right the first time.
Overlooking Frost Depth and Drainage
This is the most critical mistake in Ottawa-Gatineau. Setting footings too shallow is a guarantee of failure. If you don't dig below the 1.2-metre frost line, frost heave will push your posts out of the ground.
You must anchor your footing in stable, undisturbed soil. For more details, consult our practical guide on fence post depth.
Forgetting drainage is another common error. Placing a wood post directly in concrete creates a "bucket" that traps water, causing rot.
The Fix: Add a 10-15 cm layer of gravel at the bottom of the hole before pouring concrete. This simple step provides drainage, keeping water away from the post base and extending its life.
Using the Wrong Fasteners for the Job
When mounting an anchor to an existing slab, the entire structure relies on a few small fasteners. Using undersized concrete screws or weak sleeve anchors for a tall fence or heavy gate is a critical error. They lack the pull-out strength to resist the leverage from strong winds.
For light-duty jobs: Concrete screws may suffice for a small railing or decorative element.
For structural strength: Wedge anchors are the correct choice. As you tighten the nut, the anchor expands, creating a powerful grip that won't budge.
A good rule of thumb: if the post is going to take any real force—from wind, a gate, or people leaning on it—use wedge anchors. Trying to save a few dollars on fasteners is a false economy that will almost certainly lead to expensive repairs down the road.
Knowing When to Call a Professional
DIY pride is great, but knowing when to call an expert is smarter. Recognizing your limits can save you time, money, and frustration. For anyone managing a build, implementing construction quality control checklists is a great habit to get into, whether you're DIYing or hiring out.
Consider calling a professional like FenceScape when dealing with:
Sloped or Difficult Terrain: Setting posts perfectly plumb on uneven ground requires specialized techniques and experience.
Large-Scale Projects: Aligning dozens of posts perfectly over a large area is a major challenge without professional equipment.
Need for Core Drilling: For tall, heavy-duty fences on an existing slab, core drilling offers superior strength. This requires specialized equipment and expertise.
Sometimes, a project is too big for a weekend. Hiring a professional ensures the work is done correctly, safely, and to code, resulting in a secure fence that will last for decades.
Your Top Questions About Anchoring Fence Posts
When you get down to the nitty-gritty of anchoring fence posts, a few common questions always pop up. Let's tackle them head-on with some straight-to-the-point answers based on what we see in the field every day.
Can I Anchor a 6x6 Post Onto a 4-Inch Concrete Slab?
While you technically could do this for a short, purely decorative element, we strongly advise against it for any functional fence. A typical 4-inch patio slab lacks the weight and depth to counteract the leverage a fence post creates, especially in high winds.
For lasting stability, the footing must go below the frost line. Anything less is a recipe for future problems.
How Long Should I Wait for Concrete to Cure Before Attaching Panels?
Patience here is crucial. While new concrete may feel hard in a few hours, it's still curing internally.
Wait a minimum of 24-48 hours before hanging fence panels or applying any significant load. For high-stress applications like a heavy gate post, the professional standard is to wait 3-7 days.
Rushing the curing process is one of the biggest mistakes you can make. Letting the concrete properly cure is what gives it the compressive strength needed to hold up your fence for decades.
Do I Really Need Gravel in the Bottom of the Post Hole?
Yes, absolutely. This is a non-negotiable step for setting posts directly in concrete, yet it's often skipped.
A 10-15 cm (4-6 inch) layer of clear gravel at the base of the hole is essential for drainage. It allows water to escape instead of pooling against the bottom of your wood post, which is the primary cause of rot.
What’s the Best Concrete Mix for Fence Posts?
Keep it simple. For most backyard fences, a standard pre-mixed concrete from a hardware store is perfectly adequate. You can also use a fast-setting mix if time is a concern.
These mixes are designed for this type of application, removing the guesswork of achieving the correct strength. Just follow the mixing instructions on the bag.
Whether you’re building a small privacy fence or a large-scale enclosure, starting with a solid plan is key. If you're in the Ottawa-Gatineau area and want to make sure your project is built right from the ground up, the team at FenceScape is here to help.
Head over to the FenceScape website to get your free estimate today.
Comments