
How Deep Should a Fence Post Be: A Practical Guide
- Eric Lafleche
- Dec 5, 2025
- 13 min read

The secret to a fence that stands straight for decades isn't the panels—it's buried underground. Before you pick up a shovel, commit this principle to memory: at least one-third of your fence post's total length must be in the ground. This isn't just advice; it's the physics that stops your fence from leaning, sagging, or failing after a few tough seasons.
Getting the Foundation Right for a Fence That Lasts
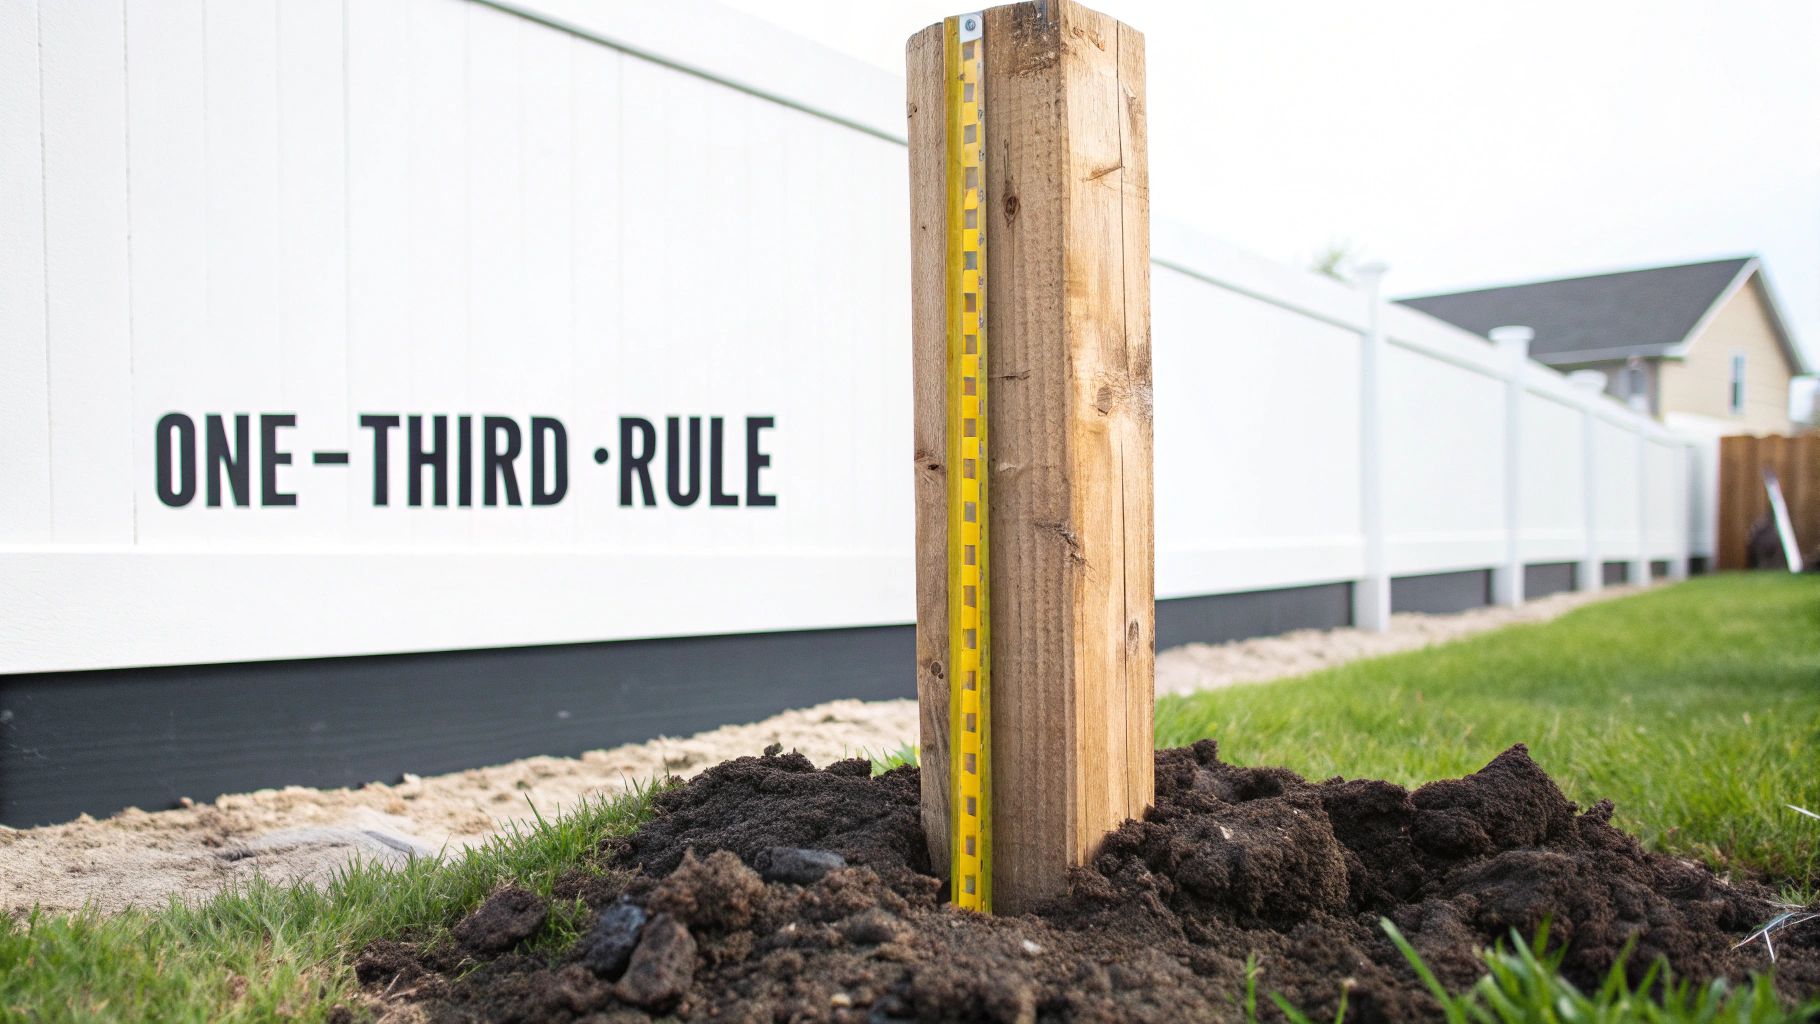
Think of the buried section as an anchor. It provides the leverage needed to fight back against high winds and shifting soil. Like the root system of a sturdy tree, the deeper it goes, the better it weathers a storm. A post set too shallow is a guaranteed recipe for a leaning, wobbly fence down the road.
But hitting that one-third mark is just your starting point. To determine the perfect depth, you must account for several key factors that dictate the final measurement.
Key Factors That Dictate Post Depth
Getting these details right from the start is what separates a professional job from a project you'll have to fix in a couple of years.
Fence Height: This is the most direct influence. Taller fences act like a sail in the wind and carry more weight, so they need a deeper foundation. A 6-foot privacy fence demands a significantly deeper hole than a 4-foot decorative one.
Local Frost Line: In the Ottawa–Gatineau region, this is non-negotiable. As the ground freezes, expands, and thaws, "frost heave" can literally push shallow posts right out of the ground. You must dig below the frost line to anchor your post in stable, unfrozen soil.
Soil Conditions: The ground you're working with makes a huge difference. Loose, sandy soil offers far less grip than dense clay. You’ll have to dig deeper in soft soil to give the post enough friction to hold firm.
Post and Fence Material: Heavy materials like thick cedar posts or ornamental iron put more stress on the foundation than a lightweight vinyl fence. If you're using metal, understanding options like galvanised fence posts helps you account for how material choices affect the entire structure.
Actionable Tip: The one-third rule is your starting point, not the final word. Always adjust that baseline for your specific climate, soil type, and fence design to build a structure that will stand strong for years.
While depth is crucial, it's only half the equation. It works in tandem with how far apart you set your posts. For a complete picture, see our practical guide to fence post spacing. Nailing both depth and spacing is the key to a balanced, professional fence line.
Why Fence Post Depth is More Than a Simple Rule
Anyone can recite the "one-third in the ground" rule. But what separates a fence that lasts a few years from one that stands for decades is understanding why that rule exists—and when to go deeper. Your fence is in a constant battle with two powerful forces, especially here in Ottawa: wind and frost.
Think about a tall privacy fence with solid panels. To the wind, it's a giant sail. During a storm, that wind exerts incredible force, creating leverage that tries to push the structure over. A shallow post is like a lever with no anchor. It doesn't have enough ground holding it to fight back, and that’s how you end up with a frustrating lean.
The Real Fence-Killer: Frost Heave
Wind is the obvious enemy, but the most destructive force in our climate works silently underground: frost heave. If you're building in the Ottawa–Gatineau region, you ignore this at your peril.
When water in the soil freezes, it expands by about 9%. That might not sound like much, but it’s powerful enough to lift foundations and push your fence posts right out of the earth. The frozen soil grips the post and lifts it, season after season, until it's wobbly.
Actionable Tip: There's only one way to beat frost heave: dig below the frost line. This is the specific depth where the ground no longer freezes. By setting the base of your post's footing below this line, you anchor it in stable, unfrozen soil that won't move.
In our area, guessing won’t cut it. The frost line is a hard number you need to know before you dig. To understand what this means for your project, review our guide to frost depth in Ontario. It’s essential reading for ensuring your fence survives our winters.
How Soil Conditions Dictate Your Strategy
The type of ground you're working with is a huge factor. You must be ready to adapt your strategy based on what you find when you start digging.
Dense Clay: Common in our area, clay is fantastic for holding posts tightly once they’re set. However, it also holds water, making it a prime candidate for frost heave. A gravel base for drainage is absolutely critical in clay soil.
Sandy Loam or Gravel: This soil offers excellent drainage, which helps prevent rot and minimize frost issues. The trade-off is less natural grip. You’ll need to dig a bit deeper or pour a wider concrete footing to give the post a solid base.
Loose or Soft Soil: If you hit soft, silty soil, the standard rules go out the window. This ground offers almost no resistance. You must dig deeper and create a wide, bell-shaped concrete base to spread the load and create the stability the soil itself cannot provide.
Mastering these three factors—wind load, frost heave, and your specific soil type—is the secret. It’s what turns setting a post from just digging a hole into a calculated process that guarantees a long-lasting fence.
Setting Your Posts for Maximum Strength
You've done the planning; now it's time to build the foundation that will keep your fence standing strong. This is where the real work begins, and getting the details right is what separates a durable fence from one that starts leaning after the first big storm.
We’re not just digging holes; we're building a fortress for each post. Let’s walk through the exact steps to guarantee maximum strength.
Perfecting the Post Hole Dimensions
First, the hole itself. Its size is a huge deal—both width and depth matter equally. Digging a hole that’s too skinny means you won't get enough concrete around the post to resist lateral forces from wind.
As a rule, aim for a hole diameter that is three times the width of the post. For a standard 4x4 wood post (which is actually 3.5" x 3.5"), you’ll want a hole that's about 10 to 12 inches across. This creates a thick, heavy "collar" of concrete around the post base, which is crucial for locking it in place.
Actionable Tip: Don't dig a narrow hole to save a few dollars on concrete. That wider footing provides your fence's backbone. A skinny column of concrete is far more likely to crack or shift, especially when the ground freezes.
When using a power auger, an 8-inch or 10-inch bit is perfect for a 4x4 post. A manual post-hole digger will naturally create a hole in this ideal size range.
This image drives home why that strong foundation is so critical.

As you can see, everything from wind to frost is trying to push that post over. A properly sized footing is your only defence.
The Critical Role of a Gravel Base
One of the biggest DIY mistakes is placing a wood post directly on the dirt at the bottom of the hole. This creates a pocket for moisture, leading to rot that destroys the post from the bottom up—even if it's pressure-treated.
The fix is simple but makes a world of difference: a gravel base.
Before placing the post, pour 4 to 6 inches of 3/4-inch clear stone or similar all-purpose gravel into the hole. Tamp it down hard. This step accomplishes two vital things:
It provides excellent drainage. Water filters through the stones and away from the post instead of soaking into the wood's end grain.
It creates a solid platform. Tamped gravel gives the post a firm, level base, preventing it from sinking as the soil beneath shifts.
This isn't optional for wood posts and is a smart move for steel and vinyl posts, too. Think of it as cheap insurance that adds years to your fence's life.
Concrete vs. Tamped Gravel: Making the Right Choice
With the gravel base in and the post ready, you need to lock it in. For almost every residential fence in the Ottawa–Gatineau area—especially wood privacy fences, vinyl fences, and anything supporting a gate—concrete is the only reliable choice. The unshakeable footing it provides is what stands up to our winds and heavy snow loads.
If you were installing a simple wire farm fence, tamped gravel might suffice. For anything else, use concrete. When mixing, aim for a consistency like thick pancake batter. Too watery, and it will be weak; too dry, and you'll get air pockets.
Achieving a Perfectly Plumb Post
Now for the final, crucial step: getting the post perfectly straight while the concrete sets. A post that's even slightly off will be glaringly obvious once the fence panels go up.
Here is a step-by-step process for a perfect set:
Place the post in the hole on your gravel base.
Use a level on two adjacent sides to get it perfectly plumb (vertically straight). This is a two-person job: one holds the post, the other handles the concrete.
Pour the concrete, stopping a couple of inches below ground level. This leaves room for topsoil later. As you pour, use a scrap piece of wood to poke the concrete and remove air bubbles.
Brace the post immediately. Screw two scrap 2x4s to adjacent sides of the post, angled down to the ground. Anchor them with stakes.
Fine-tune with the level. Tap the stakes to make tiny adjustments until the post is perfectly plumb from both directions.
Now, wait. Concrete needs at least 24 to 48 hours to cure properly before you hang any weight on it. Rushing this step will ruin the solid foundation you just worked so hard to create.
For a deeper dive into this stage, our practical guide to cementing fence posts covers every detail from mixing to curing.
Troubleshooting Common Problems When Setting Posts
Even with careful planning, you can hit a snag once you start digging. The ground holds plenty of surprises, from rocks to uncooperative soil. This is your field guide for tackling the real-world obstacles that can stop a project in its tracks.
Before you break ground, the most important step is safely locating underground utilities. Hitting a buried gas or power line isn't just an expensive mistake; it's a dangerous one. Always call before you dig.
Dealing with Hardpan or Large Rocks
You’re digging away and then… CLANG. You've hit something that won’t budge. This is usually a large rock or a layer of compacted soil called hardpan, which feels like concrete.
Don’t abandon the hole. Your best tool here is a heavy-duty digging bar. Use the pointed end to shatter hardpan and the flat, chiseled end to pry out rocks. Work your way around the obstruction, chipping away until it breaks apart or you can pry it loose.
If the obstacle is too big, you have two options:
Move the post location: Shifting the post six inches in one direction is often the simplest fix, as long as it doesn't disrupt your fence line.
Rent a power auger: A gas-powered auger with a carbide-tipped bit can chew through obstacles a manual digger can't handle.
Actionable Tip: Never sacrifice depth because you hit a tough spot. A shallow post is a weak post. Taking an extra hour to break up a rock will save you from re-doing the entire fence in a few years.
Managing Soft Soil and Collapsing Holes
The opposite problem can be just as frustrating: the soil is so soft or sandy that the hole keeps caving in. This is common in areas with loose loam and makes it impossible to set a solid footing.
The solution is to give the hole structure. A great technique is to flare out the very bottom of the hole, creating a bell shape. This gives your concrete footing a much wider base—like a snowshoe—preventing it from shifting in the soft ground.
Another effective solution is to use a concrete form tube (like a Sonotube). Slide the cardboard tube into the hole to act as a permanent wall. When you pour concrete inside it, you get a perfect column without the surrounding soil collapsing in.
Adapting Post Depth for Different Fence Types
Not all fences are the same, so their foundations can't be one-size-fits-all. The real craft is in tailoring your approach to the specific fence you're building. The forces on a tall privacy fence are a world away from those on a short decorative one, and your post depth must account for that difference.
True expertise comes from knowing how to adapt the rules to handle the unique stresses of your project, whether that's wind load on a solid panel or the constant torque from a heavy gate.
Taming the Wind with Privacy Fences
A 6-foot wood or vinyl privacy fence acts like a giant sail. When a strong gust hits that solid surface, it creates incredible leverage. In open, windy areas, the simple one-third rule often isn't enough.
For a 6-foot high privacy fence, the actionable recommendation is to dig down to a minimum depth of 3 feet (36 inches). That extra depth gives the post the anchor it needs to resist the relentless push of the wind.
Fortifying Posts for Heavy Gates
Gate posts are the workhorses of a fence line. A gate isn't just dead weight; it's a dynamic load that pulls down and outward every time it opens and closes. That repetitive, cantilevered force is surprisingly powerful.
Because of this constant stress, gate posts demand a much beefier installation.
Dig Deeper: Set your gate posts at least 6 to 12 inches deeper than the adjacent line posts. For a 6-foot fence, that means digging down 42 to 48 inches.
Go Wider: The concrete footing must be wider to create a massive anchor. A hole diameter of 12 to 16 inches provides a solid base that resists twisting and sagging.
Upgrade the Post: For heavy wood or ornamental iron gates, use a bigger post (like a 6x6 instead of a 4x4) or a heavier-gauge steel post that won't flex under the strain.
Actionable Tip: A leaning gate is almost always caused by a shallow or undersized post footing. Don't cut corners here. The extra time and concrete are non-negotiable for a gate that swings true.
Special Considerations for Pool Fences
When building a pool enclosure, safety is the only thing that matters. Installation standards are, and should be, much stricter. The entire point is to create an unshakeable barrier, which means the posts have to be set without compromise.
Local bylaws will have specific rules for height and post stability. These are not suggestions; they are there to save lives. Pool fence regulations often demand a height of at least 5 feet, with posts set deep enough to create a rigid, child-resistant barrier. As an example, safety-focused guidelines often specify post depths of 18 to 24 inches with concrete footings at least 10 to 12 inches wide to ensure total stability. You can learn more about these regulations by reviewing typical fence permit requirements.
Decorative and Ornamental Fences
What about lighter-duty fences? A 4-foot ornamental aluminum fence won’t catch the wind like a solid privacy fence, so you might think you can get away with a shallower hole.
While they face less wind load, they’re still up against the biggest threat in our climate: frost heave. You absolutely must dig below the local frost line, which in the Ottawa–Gatineau region is typically 4 feet (48 inches). Even for a short fence, getting the footing base below the frost line is the only way to guarantee it won’t be pushed up and out of alignment.
The key takeaway: always start with the frost line as your absolute minimum depth. From there, add more depth based on the fence's height, weight, and function.
Post Depth Quick Reference Guide
To make it easier, here’s a quick-glance table breaking down the minimum depths and key considerations for common fence projects.
Fence Type / Use Case | Typical Height | Recommended Minimum Depth | Actionable Insight |
|---|---|---|---|
6-ft Wood Privacy Fence | 6 ft | 36 inches (or below frost line) | High wind load is the primary concern. A wider footing (10-12 in.) adds stability. |
4-ft Picket/Ornamental | 4 ft | 48 inches (Ottawa-Gatineau frost line) | Frost heave is the main enemy, not wind. Depth is for stability, not leverage. |
Heavy Driveway Gate Post | 6 ft | 42 - 48 inches | Must be deeper and wider than line posts to resist sagging and torque from movement. |
Pool Enclosure Fence | 5 ft | As per local code (often 24-36 in.) | Safety is paramount. Always check and follow your specific municipal building codes. |
This table illustrates how the "why" behind the depth changes with each application—from fighting wind, to resisting frost, to handling the dynamic load of a gate.
Got a Few More Questions About Post Depth?
Even with the best plans, a few questions always surface right before you break ground. Here are answers to the most common queries to help you dig with confidence.
Can You Actually Dig a Fence Post Hole Too Deep?
Technically, yes, but it’s rarely a problem. The biggest downside to going too deep is the extra labor and the cost of more concrete. A post that’s a foot deeper than necessary doesn't gain much extra stability once you're past the frost line and have met the one-third rule.
A hole that’s too shallow, on the other hand, is a critical failure. If you have to choose, always err on the side of going a little deeper. A bit more concrete is a cheap insurance policy against a fence that heaves or leans.
Does the Post Hole Diameter Really Matter?
Yes, it matters a lot. A wider hole allows for a thick, strong concrete "collar" around the post, which is where the real stability comes from. The industry standard is to dig a hole with a diameter three times the width of the post. For a 4x4 post (3.5 inches square), aim for a hole that's 10 to 12 inches wide.
Actionable Tip: Don't cut this corner. A narrow hole might save a half-bag of concrete, but it creates a serious weak point. That heavy footing is what anchors your fence against wind and soil pressure.
A wider base is especially crucial in softer soil, as it spreads the load and prevents the post from shifting.
How Do I Find My Local Building Code?
Building codes can vary significantly between municipalities. While these guidelines are an excellent starting point, your local code is the final authority. Some jurisdictions have very specific rules on footing depth. For instance, many cities mandate footings go at least 24 inches deep into stable soil, no exceptions. You can find examples in municipal standards like these from the City of Poway.
For anyone in the Ottawa–Gatineau region, contact your local municipal building department. A quick call or a search on their website will give you the precise specs for post depth, hole diameter, and permit requirements. Five minutes of research can save you a world of trouble.
Should I Put Gravel at the Bottom of Every Hole?
For wood posts, putting 4 to 6 inches of gravel in the bottom of the hole is an absolute must. It is the key to preventing rot. This layer allows water to drain away instead of pooling around the end grain of the wood, which is where rot always starts.
Even for steel or vinyl posts, it’s a smart move. The gravel gives the post a solid, level base to rest on, preventing it from settling while the concrete cures. It’s an inexpensive step that makes a huge difference in the longevity of any fence.
At FenceScape, we are obsessed with getting the foundation right because we build fences to last a lifetime. If you're in the Ottawa–Gatineau area and want a professional installation where every detail is handled correctly, we're here to help. Get your free, no-obligation estimate today. https://www.fencescape.ca
Comments