
How to Set a Post for Fence: A Pro DIY Guide
- Nicka Marzzz
- Feb 5
- 14 min read

To set a fence post correctly, you need to dig deep, add a gravel base for drainage, and keep the post perfectly plumb while the concrete sets. Master these three steps, and you won't just be setting a post; you'll be creating a solid anchor that ensures your fence stands strong for decades.
Your Foundation For A Lasting Fence
A fence is only as strong as its foundation. The way you set your posts is the single biggest factor that determines whether your fence will stand straight for years or start leaning after the first winter. It's not just about digging a hole and adding concrete—it's about building a permanent, stable anchor for your entire fence line.
This guide provides the actionable techniques pros use. We'll cover everything from site preparation to concrete curing, focusing on the critical details that prevent common DIY failures. Understanding why each step is necessary—like digging below the frost line—is the key to avoiding a wobbly, short-lived fence.
Why Proper Post Setting Matters
The stability of your fence directly impacts its longevity, safety, and appearance. A poorly set post creates a chain reaction of problems that are costly and time-consuming to fix.
Here are the key factors to focus on:
Frost Heave Prevention: In regions like Ottawa-Gatineau, the freeze-thaw cycle can push shallow posts out of the ground. Digging to the proper depth is non-negotiable to prevent this.
Structural Integrity: Each post supports the weight and tension of fence panels, especially against wind. A solid concrete footing distributes this load safely into the ground.
Longevity and Value: A correctly installed fence enhances your property's value and curb appeal, saving you from premature replacement costs.
The secret to a durable fence isn't just the materials; it's the meticulous effort put into its foundation. Take the time to set each post perfectly to ensure your investment pays off.
Our goal is to create a base that will not budge. Follow these precise steps for measuring, digging, and securing your posts so they can withstand harsh seasons. For a deeper dive, learn more about how deep a fence post should be in our detailed guide.
To give you a quick overview, here's a look at the critical stages of setting a fence post that can withstand our local climate.
Fence Post Setting at a Glance
Stage | Key Action | Why It Matters |
|---|---|---|
1. Below-Frost Digging | Excavate the hole to a depth of at least 36 to 48 inches to get below the frost line. | Prevents the freeze-thaw cycle from pushing the post upwards (frost heave), which is the number one cause of leaning fences in Ottawa. |
2. Drainage Base | Add 4 to 6 inches of ¾” clear stone or gravel at the bottom of the hole before placing the post. | Allows water to drain away from the bottom of the post, preventing wood rot and ice formation that can damage the concrete footing. |
3. Perfect Plumb & Brace | Use a level on two adjacent sides of the post to ensure it's perfectly vertical. Secure it with temporary braces. | Ensures the post is perfectly straight while the concrete cures. A post that sets even slightly off-kilter will throw off the entire fence line. |
4. Concrete & Curing | Fill the hole with concrete, sloping the top away from the post to shed water. Allow it to cure for 24-48 hours before attaching rails. | Creates a solid, immovable anchor that locks the post in place and provides the structural strength to support the fence against wind and impact. |
Following these steps isn't just about building a fence; it's about making a long-term investment in your property's security and appearance.
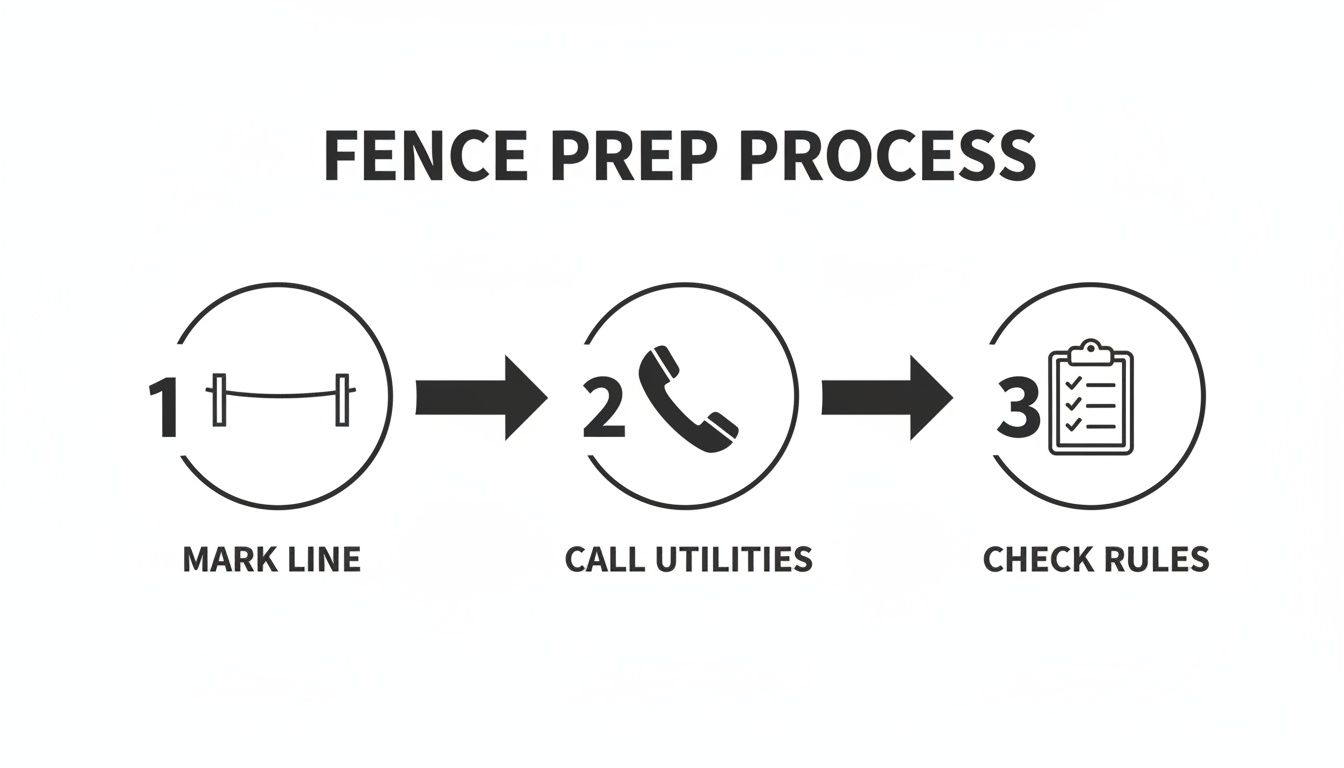
Preparing Your Project Before You Dig
A strong fence requires a solid foundation, which starts with proper preparation. Completing these prep steps ensures a smooth, safe, and professional-looking installation and prevents future headaches.
First, clear the workspace. This often requires more than mowing the lawn. Perform thorough fence line clearing to remove overgrown brush, low-hanging branches, and debris. A clear area is safer and more efficient to work in.
Once the area is clear, establish a perfectly straight line for the fence. Do not eyeball this step. Use batter boards and a mason's string line for professional results.
Mapping Your Fence Line
To set a straight line, drive two stakes into the ground a few feet beyond each planned corner or end post. Nail a horizontal board (the batter board) across each pair of stakes. Stretch a mason's string tightly between these boards, adjusting it until it marks the exact face of your future fence. This setup provides an unwavering guide for aligning every post perfectly.
The Most Important Phone Call You'll Make
With your fence line marked, your next step is non-negotiable: contact your local utility locating service. In the Ottawa area, call Ontario One Call.
Never dig without knowing what's buried in your yard. Hitting a gas, electrical, or water line is dangerous and can result in massive repair bills. Utility locates are free and required by law.
Schedule your locate at least a week before you plan to dig. Crews will mark all underground lines with paint or flags, showing you exactly where it is safe to excavate.
Checking Local Fencing Bylaws
Before building, check your local municipal rules. Cities like Ottawa and Gatineau have specific bylaws that dictate:
Maximum Height: Permitted height often varies for front, side, and backyard fences.
Property Line Setbacks: You may be required to build your fence a specific distance inside your property line.
Material Restrictions: Some neighborhoods have covenants limiting material choices. For wood options, review our homeowner's guide to pressure-treated fence wood.
Check your city’s website or call the planning department to avoid the costly mistake of having to tear down a non-compliant fence.
Assembling Your Tools and Materials
Avoid mid-project trips to the hardware store by gathering everything you need beforehand. An organized workspace makes the entire process smoother.
Use this checklist to prepare:
Tools | Materials |
|---|---|
Post-Hole Digger or Auger | Fence Posts |
Level (at least 4 feet long) | Bags of Concrete Mix |
Tape Measure & String Line | ¾” Clear Stone or Gravel |
Wheelbarrow or Mixing Tub | Scrap 2x4s for Bracing |
Shovel & Tamper | Wood Stakes |
Safety Glasses & Gloves | Marking Paint or Flags |
With your site prepped, lines marked, utilities located, and tools ready, you have laid the groundwork for a successful project. You are now ready to dig with confidence.
Digging Deep for a Fence That Lasts a Lifetime
To build a fence that stands straight for decades, you must dig the holes correctly. This work is critical to defeating the biggest threat to fences in the Ottawa–Gatineau region: frost heave.
Frost heave occurs when soil moisture freezes, expands, and pushes fence posts out of the ground, turning a straight fence line into a jagged mess. The only way to prevent this is to dig deeper than the frost can reach.
Before digging, complete these three non-negotiable first steps: mark your fence line precisely, call for utility locates, and check local bylaws.
Completing these tasks first will save you from headaches, fines, and costly mistakes.
The Frost Line Isn't Just a Suggestion
In our region, the frost line is typically 48 inches (4 feet) deep. The bottom of your post hole must be below this mark. No exceptions.
To ensure your fence is secure, dig holes that are 4-5 feet (1.2–1.5 metres) deep. We've seen fences heave nearly a foot in one season due to shallow posts. Over 65% of DIY fence failures result from holes less than 42 inches deep. The heavy clay soil common in the area increases the force of frost heave by 20-30% compared to sandier ground. You can get more insights on optimal fence post spacing and depth on Fencescape.ca.
Choosing Your Weapon: Digger vs. Auger
You have two main tools for digging: a manual post-hole digger or a gas-powered auger. Your choice depends on your soil type, the number of holes, and your physical capacity.
Manual Post-Hole Digger: This "clamshell" digger is ideal for soft soil and projects with fewer than 10-12 posts. It's inexpensive and offers precise control, but it is labor-intensive in rocky or clay-heavy ground.
Powered Auger: For larger projects or difficult soil, renting a power auger is a significant time-saver. However, these machines are powerful and should be operated by two people for safety. If an auger bit hits a rock or root, it can kick back violently.
Pro Tip: If you're new to using a powered auger, start slow to get a feel for the machine. If you hit an obstruction, stop the auger, remove it from the hole, and use a heavy digging bar to break up the obstacle.
Consistency Is King: Digging the Perfect Hole
Dig each hole to a consistent size and shape. The goal is a uniform cylinder that allows the concrete footing to grip the earth effectively. A reliable rule is to make the hole's diameter approximately three times the width of the post.
For a standard 4x4 post (actual dimensions 3.5" x 3.5"), dig a hole 10 to 12 inches in diameter. This provides ample space for a thick concrete collar, locking the post securely. A hole that is too narrow offers insufficient support, while one that is too wide wastes concrete.
The Most-Skipped Step: Don't Forget the Gravel
Before placing the post, complete this critical step: pour a 4 to 6-inch layer of ¾” clear stone or gravel into the bottom of the hole. Tamp it down firmly with the end of a post. This creates a drainage pad, allowing water to escape instead of pooling at the base of the wood. Without proper drainage, the post will rot, and trapped water can freeze, expand, and push the post upward.
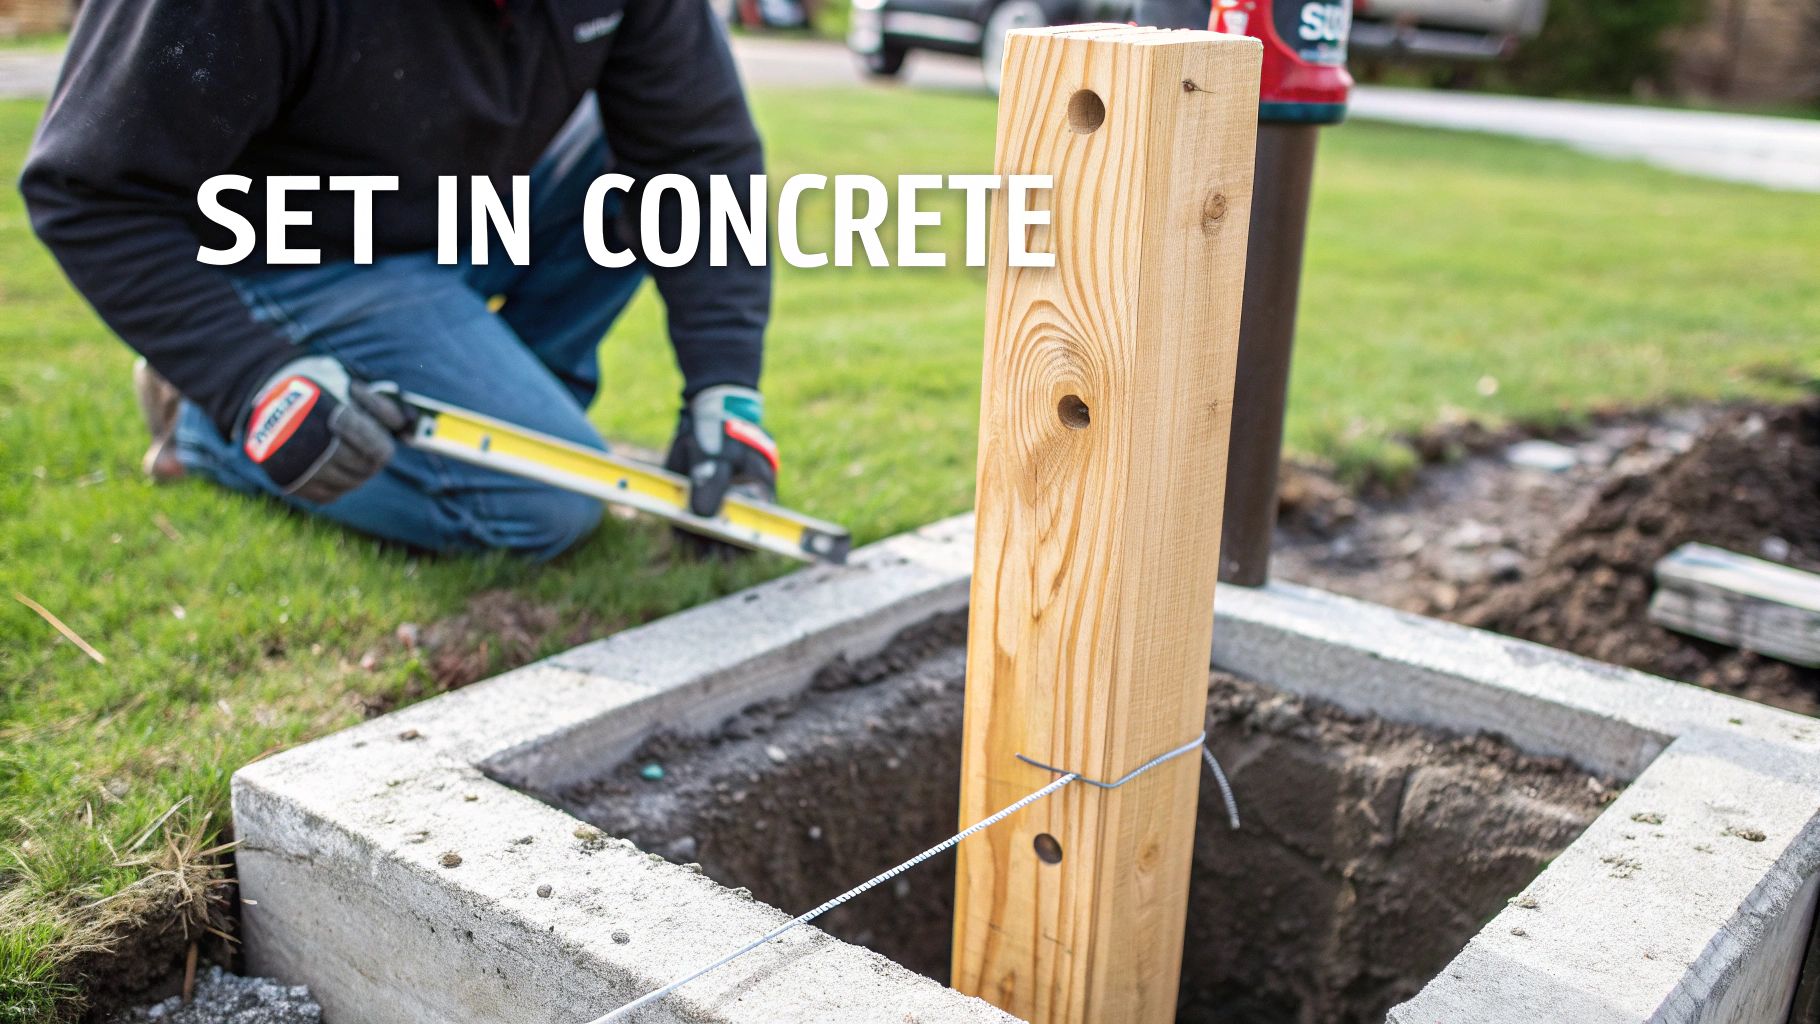
Anchoring Your Posts with Concrete
With your holes dug and the gravel base in place, it's time to set your fence posts in a permanent concrete foundation. This step transforms a simple hole into a rock-solid anchor that will keep your fence standing tall for years.
Success here depends on attention to detail. Every action—from achieving the right concrete consistency to bracing the post perfectly plumb—is critical for the final strength and appearance of your fence line.
Mixing Concrete to the Right Consistency
Aim for a consistency similar to thick, chunky peanut butter. It must be sturdy enough to hold the post yet wet enough to fill all gaps around the post and gravel. A mix that is too wet will be weak, while a mix that is too dry will create air pockets, compromising the footing.
Follow these steps for mixing:
Go Easy on the Water: Pour the dry mix into a wheelbarrow. Add water gradually—it is much easier to add more water than to correct a soupy mix.
Get a Good Mix: Use a shovel or hoe to fold the water into the dry material. Scrape the bottom and sides to ensure all powder is incorporated.
Do the "Mound Test": The concrete should hold its shape when mounded on a shovel. If it immediately slumps flat, you have added too much water.
Before you begin, determine how much concrete to pour to ensure you purchase the correct amount and avoid interruptions.
Positioning and Pouring with Precision
With the concrete mixed, place the post in the center of the hole, resting it firmly on the gravel base. Have your level ready.
Hold the level against one side of the post until the bubble is perfectly centered. Then, check an adjacent side and repeat. You must check for plumb on two neighboring faces to confirm the post is truly vertical.
While holding the post steady, shovel concrete into the hole, distributing it evenly. Fill the hole completely, leaving only the top few inches empty if you plan to cover it with soil. As you fill, use a scrap piece of 2x4 to poke and tamp the concrete, which removes air pockets and prevents weak spots.
A common mistake is only partially filling the hole with concrete. For maximum stability against wind, the concrete collar must extend from the gravel base to just below ground level, fully encasing the buried portion of the post.
As a final step, shape the top of the concrete into a small dome that slopes away from the post. This simple technique sheds water and prevents it from pooling at the base, the most vulnerable area for rot.
Bracing Your Post for a Perfect Set
This step is non-negotiable for a straight fence. No matter how perfectly you level a post, it will shift as the concrete cures if it is not braced. Use scrap 2x4s and stakes for this task.
Follow this foolproof bracing method:
Drive two wooden stakes into the ground a few feet away from the post on adjacent sides.
Attach a 2x4 from each stake to the fence post using screws or clamps.
Gently adjust the boards or tap the stakes, re-checking with your level until the post is perfectly plumb on both sides again.
This support system locks the post in place, preventing any movement while the concrete sets. It is the key to a professional-looking fence line. For more details on this process, read our guide on cementing fence posts the right way for a lasting build.
Leave the braces in place for at least 24 to 48 hours. Do not attach rails or panels any sooner. Allowing the concrete adequate time to cure and reach full strength is essential for a durable fence.
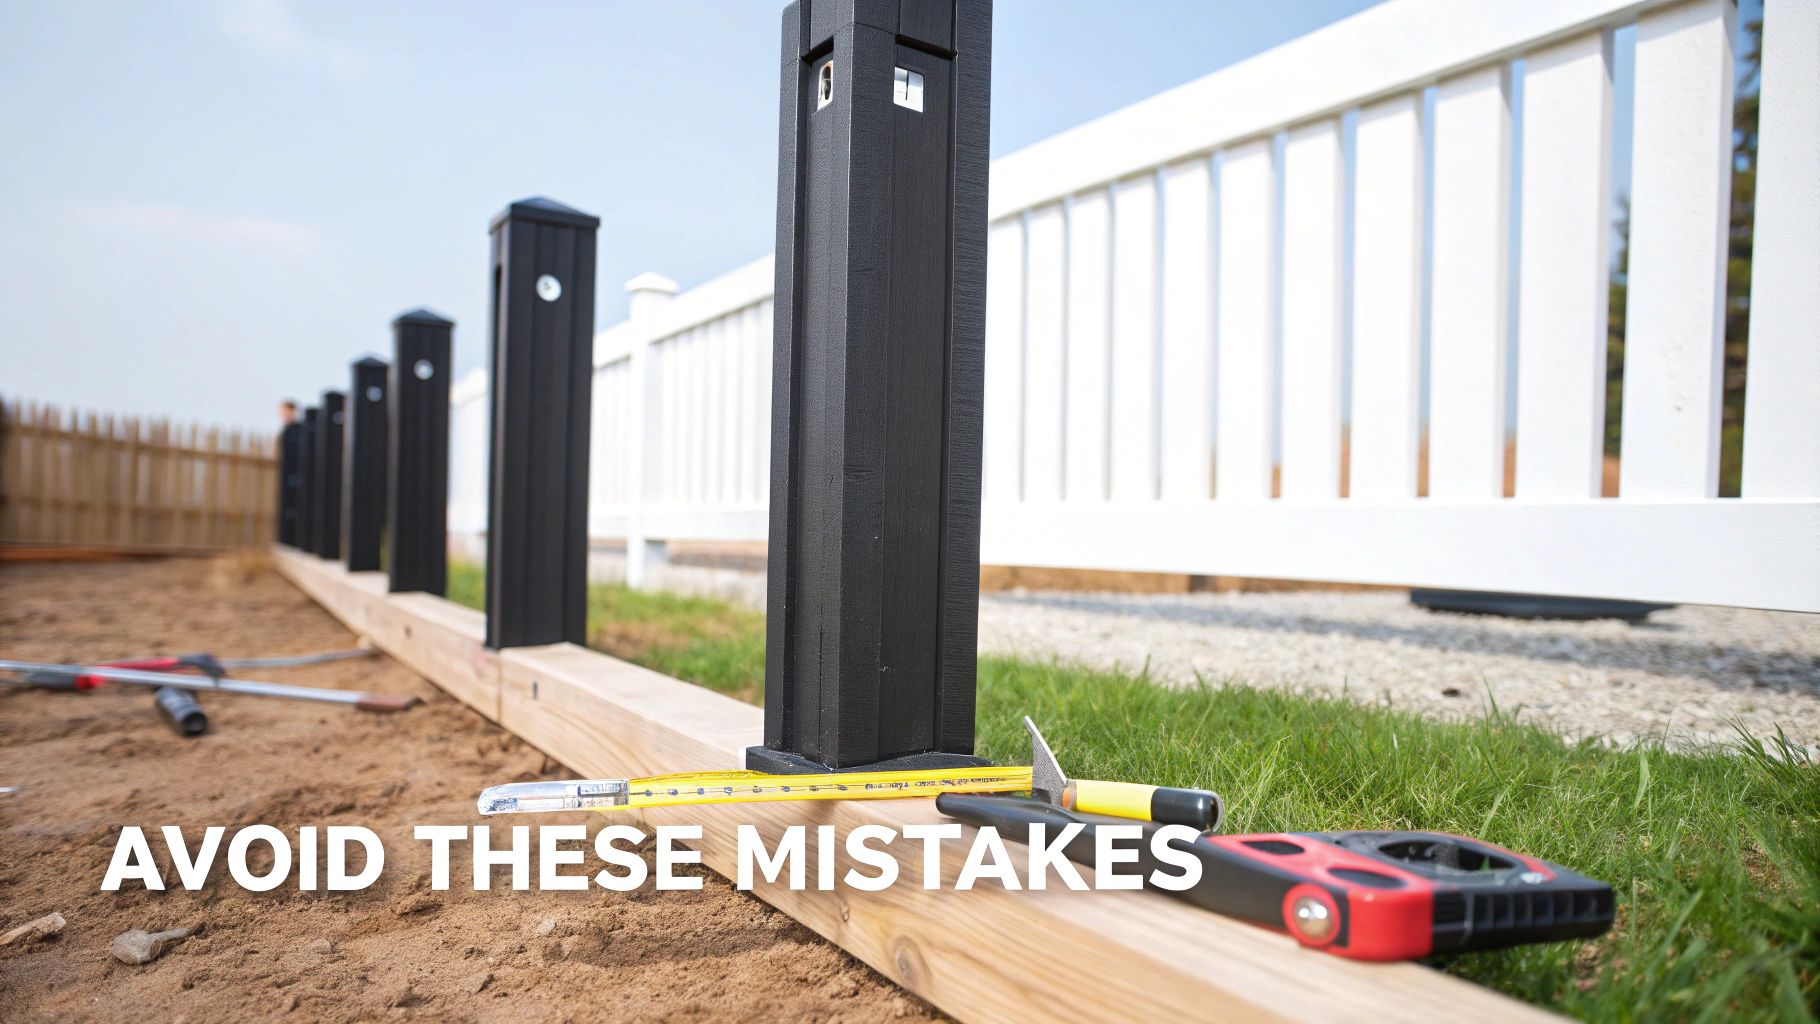
Common Mistakes and Pro Troubleshooting
Even with careful planning, you can encounter problems when setting fence posts. Knowing how to troubleshoot these issues will keep your project on track.
This section is your field guide for common challenges, from mixing concrete incorrectly to discovering a large boulder exactly where a post needs to go. For every problem, there is a practical solution.
Unforeseen Underground Obstacles
This is the most common setback. You are digging a hole and hit something solid that will not move.
Hitting a Large Rock: Use a heavy-duty digging bar to try and work around the rock or pry it loose. If the rock is immovable, the most practical solution is often to move the post location. Shifting it six inches along the fence line is far easier than battling a boulder, and the minor spacing adjustment will be unnoticeable.
Encountering Thick Roots: Cut smaller roots with a reciprocating saw equipped with a pruning blade or a sharp axe. If you encounter a large root system from a nearby tree, your best option is to shift the post location to avoid damaging the tree and your tools.
The moment you hit an obstacle, stop and assess the situation. Trying to force your way through can result in broken tools or injury. A patient and flexible approach will save you significant frustration.
Correcting Common Setup Errors
Small setup mistakes can lead to major problems later. It is crucial to identify and correct them early. Common errors include digging holes that are too shallow, mixing concrete too wet, or failing to brace posts securely while they cure.
Another frequent mistake is skipping the gravel base. Without 4 to 6 inches of clear stone, water cannot drain properly, leading to post rot and making your fence vulnerable to frost heave.
When things go wrong, a quick fix is usually all that is needed. Here is how to handle common issues on the spot.
DIY Fence Post Troubleshooting Guide
Problem | Likely Cause | How to Fix It |
|---|---|---|
Leaning Post | The post was not braced properly and shifted before the concrete fully cured. | If the concrete is still wet, immediately re-plumb the post with your level and secure it with sturdy 2x4 braces. Do not remove them for at least 48 hours. |
Soupy Concrete | Too much water was added to the mix, resulting in a weak footing. | If already poured, you may need to dig it out and start over. To prevent this, add water slowly until you achieve a thick, peanut-butter-like consistency. |
Post Is Too High | The hole was not dug deep enough, or too much gravel was added. | If the concrete is not yet set, pull the post out, remove some gravel, and reset it. A post set at an improper depth is a structural weak point. |
Slightly Off-Level | The post settled or was nudged after being set. | While the concrete is still workable, use gentle taps with a rubber mallet to make minor adjustments. Keep a level on the post and secure it with braces once it is perfect. |
This table can help you quickly diagnose and solve issues as they arise. Being prepared for these small setbacks is key to a successful project.
Adapting to Different Terrains
Most yards are not perfectly flat with ideal soil. You will likely need to adapt your technique for slopes and different soil types.
When setting posts on a slope, keep every post perfectly plumb (vertical), even as the ground angles away. Install them one at a time, creating a stepped effect down the hill. Never install posts at an angle to match the slope; this is both aesthetically unpleasing and structurally weak.
Soil type also plays a significant role.
Loose, Sandy Soil: This soil offers poor grip. Dig wider holes (12 inches or more in diameter) and use more concrete to create a larger, more stable footing that resists shifting.
Dense Clay Soil: Clay holds posts firmly but has poor drainage. In the clay common to Ottawa-Gatineau, a deep gravel base is non-negotiable to prevent water from pooling, which causes rot and frost heave.
By anticipating these challenges, you can adapt your approach and build a fence that is strong, straight, and built to last.
Knowing When to Call a Professional
Building your own fence is a rewarding project, but it requires a significant investment of time, money, and physical effort. Recognizing when to hire a professional is often the smartest decision you can make to ensure the job is done right the first time.
First, assess your project's scope. A short, straight fence on flat ground is a great DIY project. However, complexity increases dramatically with challenging variables. If your property has steep slopes, heavy clay soil, or numerous rocks, you will struggle without specialized equipment.
Knowing the theory of how to set a post is different from executing it perfectly dozens of times. A professional crew brings an efficiency and level of experience that is difficult to replicate.
When to Seriously Consider a Pro
Certain situations strongly indicate the need for professional help. Attempting these scenarios on your own can result in a weak fence, wasted materials, and significant frustration.
Consider hiring a contractor if you are facing:
Challenging Terrain: Steep grades, rocky soil, or thick tree roots often require hydraulic augers and other heavy machinery that are impractical for a DIYer.
Large-Scale Projects: For fence lines spanning hundreds of feet, the labor involved can be overwhelming. A professional team can complete in days what might take you weeks.
Complex Layouts or Permits: Navigating property lines, creating intricate designs, or managing local permit requirements in Ottawa or Gatineau can be difficult. Fence installers handle these tasks daily.
The value of a professional service like FenceScape extends beyond labor. It includes the peace of mind of guaranteed workmanship. An expert installation ensures your fence is built to code, structurally sound, and backed by a warranty, protecting your investment.
Ultimately, the decision comes down to balancing your time, skills, and the job's complexity. For a straightforward project, DIY is a great option. For anything more demanding, partnering with an expert is the surest way to get a perfect, long-lasting fence.
Your Fence Post Questions Answered
Even with a solid plan, questions can arise during the project. Here are answers to some of the most common inquiries from homeowners setting fence posts.
What's the Right Length for a Fence Post?
A common guideline is the one-third rule: one-third of the post's total length should be buried. For a 6-foot fence, this suggests an 8-foot post (2 feet buried, 6 feet above ground).
However, in the Ottawa–Gatineau region, this is not deep enough due to the frost line. Ground here freezes deep, and any post buried less than 48 inches is at risk of frost heave. For a 6-foot fence, you need a 10-foot post to ensure you can bury it a full 4 feet deep while maintaining 6 feet of height above ground.
Do I Absolutely Have to Use Concrete?
While you can set a post with only compacted gravel, it is not recommended for our climate. Concrete creates a solid, immovable anchor that withstands high winds and, critically, resists the powerful force of frost heave.
A gravel-only setting might suffice for a short, decorative fence in well-draining sandy soil. For any fence providing privacy or security, concrete is the only method that guarantees long-term stability.
Your fence is only as strong as its foundation. Setting posts in concrete is the single most important action you can take to ensure it remains straight and solid through harsh Canadian winters. A gravel base alone does not provide the same long-term security.
How Long Before I Can Hang the Fence Panels?
Patience is crucial at this stage. Rushing can compromise all your hard work. You must wait at least 24 to 48 hours for the concrete to set before attaching rails or panels. Attaching them too soon can push the posts out of alignment, and once the concrete has hardened, the mistake is permanent.
In cool or damp weather, allow for extra curing time. Waiting 72 hours is a smart precaution to ensure the concrete has reached sufficient strength to handle the load without shifting.
Setting the posts correctly is the most critical part of building a fence that will look great and last for decades. If you feel overwhelmed or prefer to have the job done right the first time, the team at FenceScape is ready to help. We dig deep and set every post perfectly to withstand Ottawa's seasons, giving you a fence that stands the test of time.
Comments