
How to Install PVC Fence Post: Frost Guide

The most popular advice about installing a PVC fence post is also the advice that causes trouble in Ottawa–Gatineau: dig a standard hole, drop in the hollow post, pour concrete, and move on. That approach may suit a mild climate, but it ignores frost movement, drainage, wind exposure, soil conditions, and the reinforcement hidden inside many PVC systems.
A fence that looks straight in autumn can lean after the first freeze-thaw cycle if its footing doesn't resist uplift. Learning how to install a PVC fence post in this region means treating the work as a structural installation, not a simple landscaping task. The dependable sequence is straightforward: confirm the rules and underground services, choose a locally appropriate depth, build an anti-heave footing, reinforce exposed posts, and check every alignment before the concrete sets.
Why Generic Installation Guides Fail in Canadian Winters
A standard DIY sequence can produce a fence that looks solid in October and moves noticeably by spring. The failure usually starts underground, where freezing soil grips the concrete footing and lifts it unevenly. The visible PVC panels may remain intact, but the posts lean, twist, or finish at different heights after repeated freeze-thaw cycles.
Frost heave does not lift every footing evenly. Water freezes in the surrounding soil, expands, and pulls against the footing's sides. If the footing has poor drainage, loose backfill, or a shape that gives frozen soil too much grip, one edge can rise first. Thawing does not reliably return the post to its original position, so small movements accumulate through the winter.
The other weak point is the PVC post itself. Hollow vinyl is lighter and more flexible than a solid structural member. A line post may perform acceptably in sheltered conditions, while a corner, gate post, or exposed end takes concentrated wind and hardware loads. Those locations often need an internal steel insert or another stiffener approved for the fence system. Concrete supports the post, but it cannot compensate for inadequate reinforcement or a footing that moves.
Fence height does not determine winter performance
A short privacy section can still fail if its footing remains in active seasonal soil movement. The relevant design question is how the underground assembly handles frost, water, wind, and soil conditions. Copying a mild-climate installation pattern ignores those forces.
The post layout also affects the risk. Gate posts carry repeated opening and closing loads, corners change the direction of panel forces, and end posts receive loads that a standard line post does not. A cylindrical hole that holds a post upright while the concrete is fresh may provide little resistance once frozen ground begins pulling on the footing.
Cold-climate rule: Treat the footing as the structural part of the fence, then choose the PVC installation method around it. The visible vinyl profile cannot make up for underground movement.
Depth, drainage, and reinforcement work together
Depth is only one part of the winter installation. Water trapped beside concrete can freeze and shift it, while poorly compacted soil leaves voids that allow additional movement. The footing needs a stable base, suitable drainage for the site, and enough resistance to uplift. The exact depth belongs in the project's frost-protection design, rather than being copied from a generic guide.
Use the same decision process at every post location:
Assess the soil and water: Identify soft fill, clay, saturated areas, and places where runoff collects.
Separate post types: Give gate, corner, end, and wind-exposed posts more attention than ordinary line posts.
Match reinforcement to the system: Confirm whether the manufacturer specifies an internal stiffener, concrete fill, or another support method.
Protect alignment during the pour: A post that shifts before the concrete sets can freeze in the wrong position.
A generic three-foot hole copied from a mild-climate guide is a common reason Ottawa posts heave after the first winter. The dependable installation responds to the site and the fence's load paths, rather than treating every post as an identical hole and concrete pour.
Navigating Permits and Utility Locates Before You Dig
The first mistake on a fence project often happens before excavation. Homeowners measure the fence line, buy materials, and start digging without confirming buried services or municipal requirements. That shortcut can damage a service, interrupt the project, or force an otherwise finished enclosure to be altered.
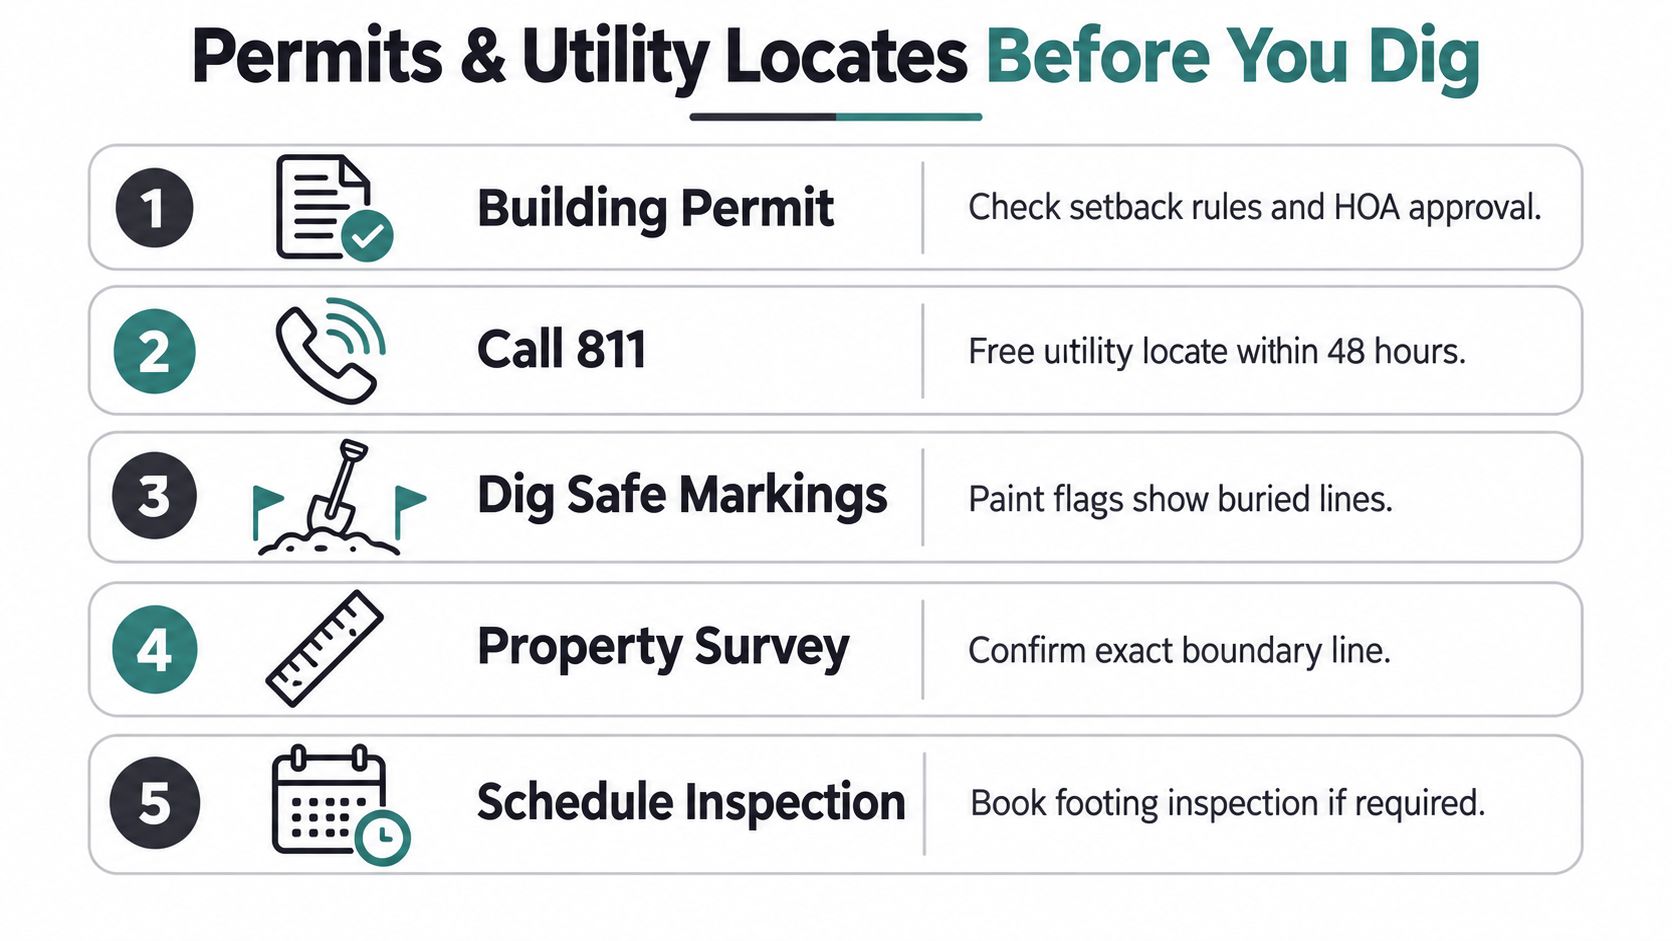
Schedule underground utility locates through the appropriate Ontario or Quebec service, such as One Call or Info-Excavation, at least 5 business days before digging, as noted in Ottawa fencing and construction guidance. The locate request should cover the actual work area, including post holes, gate openings, widened footings, and any bell-shaped excavation. Markings only help when you keep the planned fence route consistent with the request.
Resolve the property line before the layout
A string line doesn't establish ownership. It only transfers the line you've chosen onto the ground. Check your survey, confirm setbacks, and discuss the boundary with adjacent owners when the fence will sit near the property line. A post footing can extend beyond the visible PVC profile, so the excavation needs room without crossing into land you don't control.
Municipal rules can also affect height, placement, gates, and pool enclosures. For broader background on how approvals and local requirements can shape residential work, consult this practical building codes and permits guide from Aureli Construction. It isn't a substitute for Ottawa or Gatineau requirements, but it can help you identify the questions to raise before ordering materials.
Pool fencing needs a separate approval check
In Ottawa, a permit is required for a new pool enclosure, a replacement enclosure, or an existing fence being used around a new pool, according to the regional fencing guidance cited above. Don't assume an existing boundary fence automatically satisfies the requirements for a new pool. The municipality may need to review the enclosure, and inspection sequencing can affect when the pool can be filled and when the fence work is considered complete.
Use this pre-dig sequence:
Confirm the fence route: Mark the intended line, corners, gates, and any changes in direction.
Check municipal rules: Ask whether the project needs a permit, especially if it forms part of a pool enclosure.
Request locates early: Allow the full five-business-day locate window before scheduling excavation.
Verify the markings: Walk the site and compare the markings with your planned holes.
Plan inspection timing: Ask when footing or enclosure inspections must occur, and don't cover work that needs to remain visible.
Paperwork and locates aren't administrative clutter. They determine whether you can dig safely and whether the completed fence can remain where you installed it.
Determining the Correct Post Depth for Frost Protection
Post depth in Ottawa–Gatineau is a frost-protection decision, not a rule-of-thumb measurement. Southern Ontario commonly uses a frost-depth benchmark of about 1.2 metres, or 4 feet, while regional Ottawa guidance starts around 42 inches and may extend to 48 to 60 inches for taller or wind-loaded fence sections. The local difference matters because Ottawa's freeze-thaw conditions and soils do not always match a generic southern Ontario installation. This Ontario fence-post depth guide explains why local frost depth should determine embedment.
Southern Quebec reinforces the same point. References commonly place Montreal and southern Quebec frost depth near 1.4 metres, or 4.5 feet, with footing depths often ranging from 1.2 to 1.8 metres. An APCHQ-referenced column cited a recorded frost depth of 2.35 metres at a downtown Montreal intersection. That example does not set a universal fence standard, but it shows why soil, drainage, and the exact site deserve more attention than one national number. These Quebec figures are summarised in this regional guide to leaning fence-post repair.
Use exposure to refine the depth
Begin with the local frost benchmark, then account for the forces carried by each post. A sheltered decorative run sees less wind pressure than a tall privacy fence across open ground. Gate posts absorb repeated hinge and latch loads, while corner and end posts carry concentrated tension from adjoining rails and panels.
For Ottawa–Gatineau, the practical choice is often closer to 4 feet than the 30-inch depths used in milder regions. Taller or wind-loaded sections may justify 48 to 60 inches, following regional guidance instead of treating the minimum as the target. Unusual soil, groundwater, fill, or buried construction debris changes the footing problem. Stop and reassess rather than forcing a standard hole through unstable or obstructed material.
Match the footing to the PVC system
PVC fences do not all transfer loads through the same structure. Some use a steel post-and-sleeve approach, with the steel member providing stiffness and the PVC profile supplying the finished appearance. Other systems include a bottom collar that sits below grade and accommodates some frost movement.
Check the manufacturer's post dimensions, sleeve requirements, rail elevations, collar position, and approved concrete method before digging. A hole sized for a standalone hollow post may not fit a steel sleeve. Unapproved material inside the profile can obstruct rails, restrict drainage, or affect warranty coverage.
Mark the intended finished grade on every post before placement. Transfer that reference to the excavation plan, allowing for footing geometry and any drainage material. Measure embedment from the final ground surface, not just from the post top. A later change in grade can reduce the depth protecting the post from frost movement.
Practical decision: When frost depth, wind exposure, and the manufacturer's system point in different directions, use the more demanding structural requirement. Confirm the detail with a qualified installer or the system supplier before excavation.
Digging and Pouring an Anti-Heave Concrete Footing
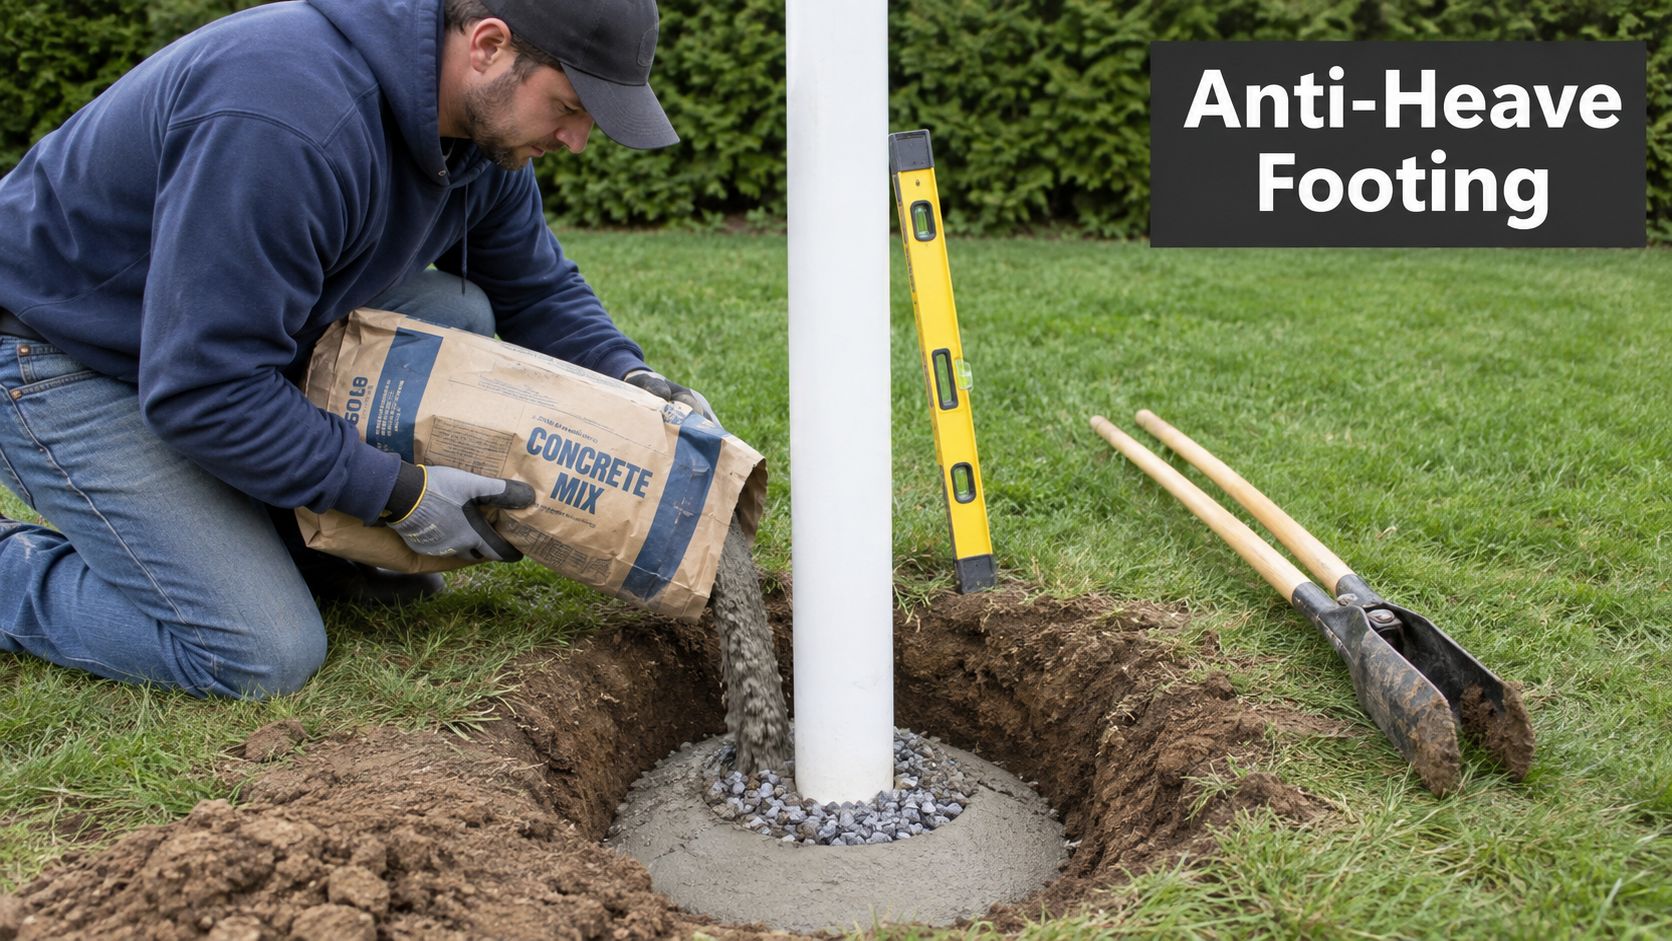
A straight cylindrical concrete collar is easy to pour, but it can provide a poor defence against uplift when frost grips the footing. A more deliberate Ottawa–Gatineau method digs the post hole to 5 feet and forms an 18-inch bell-shaped base, with the concrete flared 4 inches wider than the post. This creates a mechanical key below the narrower shaft, helping the footing resist upward movement during freeze-thaw cycles. The method is described in this guide to preventing frost heave.
Form the bell without damaging the excavation
Lay out the post centres first, then excavate carefully. A power auger may reach depth efficiently, but it can smear wet soil against the sides or enlarge the hole unpredictably. A post-hole digger and digging bar give better control for the final shaping, particularly where the bell must be formed at the base rather than near grade.
The base should be firm and free of loose spoil. If the hole contains water, remove standing water where practical and identify whether it is entering from groundwater or surface runoff. Pouring concrete into moving water can wash cement paste away and weaken the footing. In difficult wet ground, the correct response may involve temporary casing, a revised drainage design, or professional excavation rather than more dry mix.
A concrete contractor's overview of residential concrete services can also help clarify the difference between placing concrete and creating a properly supported footing, although local frost conditions and the PVC manufacturer's system must govern this fence project.
Pour in a controlled sequence
Set the post or sleeve in the excavated hole only after confirming its orientation and approximate height. Place concrete so it fills beneath and around the post without leaving voids. Work the mix with a rod or suitable consolidation tool, but don't strike or twist the PVC aggressively while the concrete is fluid.
Build the bell-shaped base deliberately. The bottom should spread beyond the post, while the upper portion remains controlled around the shaft. The flared concrete must be continuous, not a loose shelf made from disturbed soil. That wider base is what gives the footing a mechanical resistance to uplift.
A deep pour needs more attention than a bag of quick-set concrete dumped into a hole. Mix consistently, maintain a workable consistency, and follow the product's curing instructions. Keep soil and rainwater from washing into the fresh footing. Brace the post before the concrete begins to stiffen, then leave the footing undisturbed during the initial cure.
The following demonstration shows the basic relationship between a post and a wet concrete footing. The local anti-heave geometry described above is more demanding than a routine shallow collar, so use the video as general placement context rather than as a substitute for the regional method.
Backfill without creating a water trap
Once the concrete has cured according to the product directions, backfill in manageable lifts and compact each lift. Don't bury loose chunks of excavated clay beside the post and expect winter movement to stop. Keep the final grade shaped so surface water drains away from the post rather than collecting at the concrete edge.
The visible transition should be neat, but appearance comes after stability. A carefully formed bell, sound concrete, controlled backfill, and positive drainage give the PVC post a better chance of staying in position through repeated freezing and thawing.
Setting, Plumbing, and Reinforcing the PVC Posts
Set the end posts first, because they establish the reference for the entire run. Stretch a tight string line between them at a consistent height above finished grade, then use it to position intermediate posts. The line should guide the face of the fence, while a level controls the vertical plane. Don't rely on sighting down the row, especially on a long boundary where small errors accumulate.
Place each post or steel sleeve in its footing with the correct face oriented toward the fence line. Check plumb on two adjacent faces, rotate the post before the concrete stiffens, and confirm the top elevation against the end posts. A post can read level on one face while leaning along the run, so take both measurements before bracing it.
The PVC fence post installation guide provides useful context on layout, excavation, drainage, and post preparation. The exact dimensions still need to match your chosen PVC system and the footing design selected for the site.
Brace before the concrete moves
Use temporary braces fixed to stakes outside the fence line. Place them where they won't interfere with the panel, gate opening, or locate markings. A brace should hold the post in position without crushing the PVC profile or pulling it out of alignment.
Check the following while the concrete remains workable:
Plumb: Verify two adjacent faces with a reliable level.
Line: Compare the post face with the string, not with an uneven property feature.
Height: Match the post top and rail openings to the established run.
Orientation: Keep rail slots and finished faces consistently aligned.
Spacing: Confirm the panel or rail will reach the next post without forcing the profile sideways.
Reinforce where the fence works hardest
End, corner, and gate posts deserve more structural attention than ordinary line posts. Wind acting on a privacy panel transfers force into those locations, while hinges and latches repeatedly load a gate post. A hollow PVC post may need an internal galvanized steel stiffener, steel sleeve, or another reinforcement approved for that product.
Don't automatically fill every post with improvised wood or steel. The insert must fit the profile, leave room for rails and hardware, resist corrosion, and comply with the manufacturer's instructions. Pressure-treated wood can behave differently from steel as moisture and temperature change, and an oversized insert may prevent proper panel assembly.
For a gate, align the reinforced post before the concrete sets, because later corrections are difficult and often involve removing hardware or disturbing the footing. Keep the reinforcement centred and supported so it doesn't shift while the concrete surrounds it.
At the top, install caps only after alignment and post stability are confirmed. Use the fastening method specified for the system. A removable cap can make future inspection and repair easier than a permanently bonded cap, particularly where the post contains reinforcement or gate hardware.
Avoiding Common Installation Mistakes and Final Checks
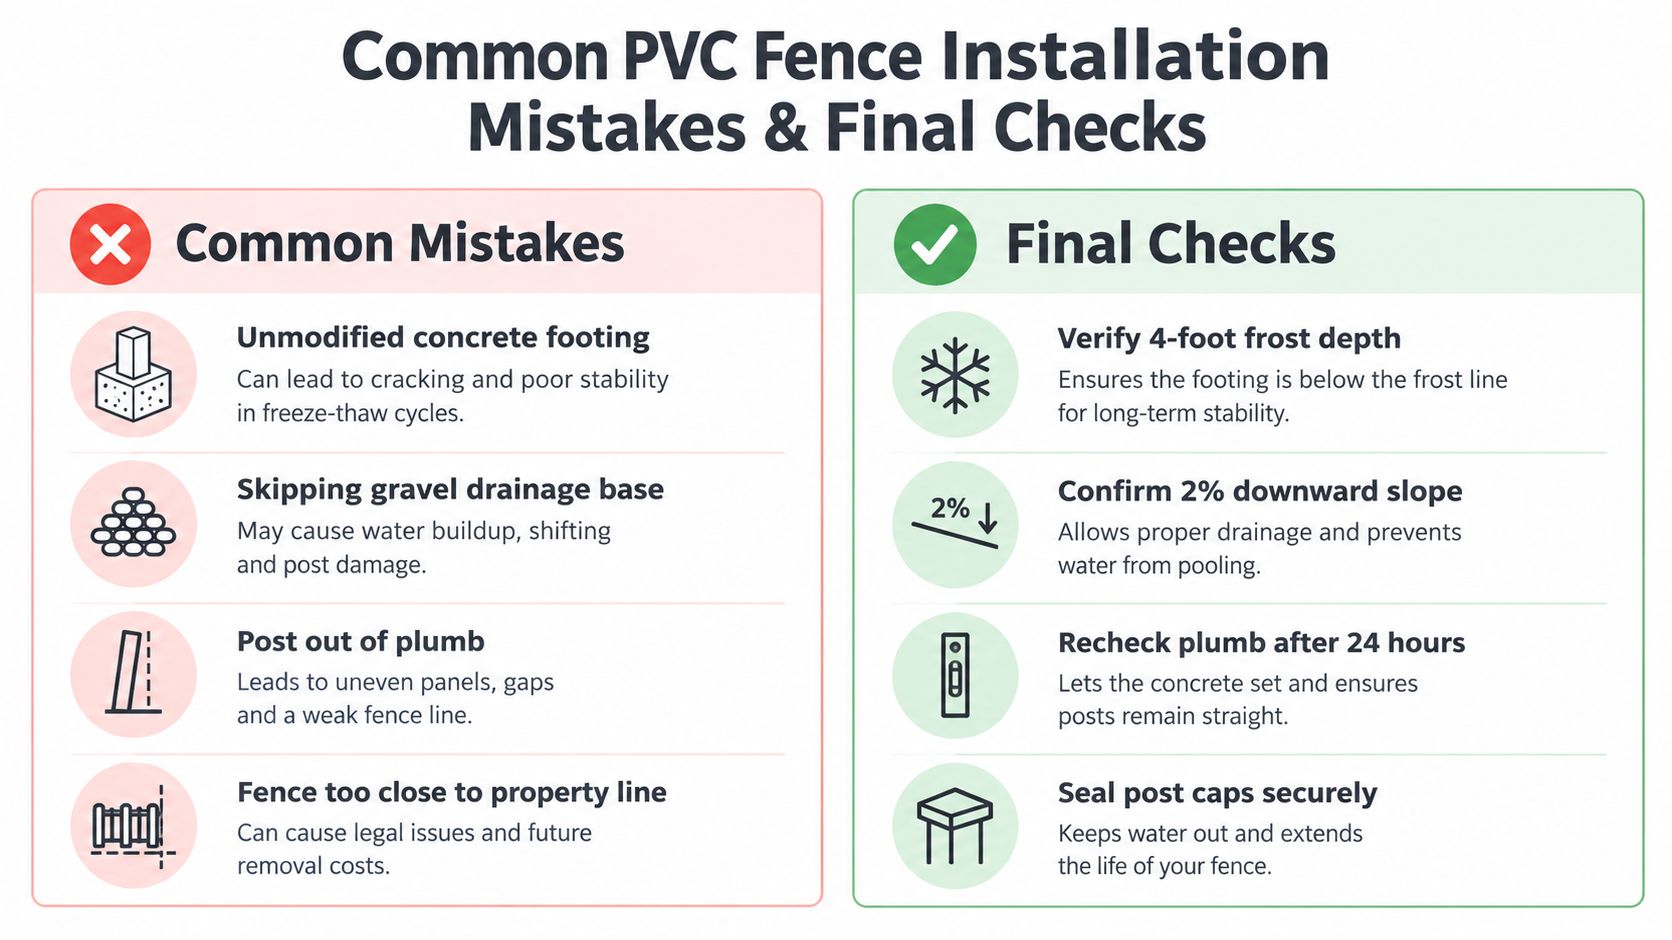
The most common failures aren't caused by PVC alone. They come from treating every post as identical, pouring a narrow collar without considering uplift, leaving water trapped around the footing, or skipping reinforcement at the points where the fence carries concentrated loads.
A cylindrical footing can hold a post upright during installation and still offer limited resistance to frost uplift. A clean drainage base and controlled backfill matter because water and loose soil change how the ground moves around the concrete. End, corner, and gate posts need a structural plan, not just extra optimism.
Check the work before the concrete locks in
Run the checks in this order while adjustments remain possible:
Confirm depth: Measure from finished grade and verify that the planned embedment matches the local frost requirement and the system instructions.
Inspect the base: Remove loose spoil and confirm that the footing design provides the intended support and drainage.
Verify the bell: Make sure the flared concrete base is continuous and wider than the post where the anti-heave design calls for it.
Check plumb twice: Test adjacent faces, correct the post, and test again after bracing.
Sight the line: Compare every post with the string and check that corners change direction cleanly.
Test the panel fit: Confirm rail openings, post spacing, and finished height before the concrete hardens.
Review reinforcement: Confirm steel sleeves or stiffeners are correctly positioned at gates, corners, ends, and exposed sections.
Protect the cure: Keep posts braced and prevent disturbance, runoff, or premature backfilling.
Don't attach panels just because the posts look stable. Let the concrete cure as required, then recheck the line and plumb before loading the fence. Small corrections are manageable before rails and panels are installed, but a misaligned gate or corner can force substantial rework later.
The finished installation should shed water, hold its line, and provide the right reinforcement where wind and hardware act on the system. That combination is what separates a winter-ready PVC fence from a fence that only looks finished.
FenceScape plans and installs PVC, hybrid, wood, ornamental iron, chain link, and glass fencing in the Ottawa–Gatineau region, including post footings, reinforcement, gates, pool enclosures, and property-line finishing. If you're unsure about frost depth, utility timing, or the right footing for your site, visit FenceScape to discuss the layout and request a project estimate.
I found this article about MUSE cell exosomes very interesting and easy to understand. The explanation https://ways2well.com/blog/muse-cell-exosomes-potential-benefits-and-uses of how exosomes differ from living Muse cells was especially helpful. I had not realized that exosomes are small extracellular vesicles carrying proteins, lipids, and genetic material rather than actual stem cells. The article also does a good job explaining why researchers are interested in their potential regenerative and immunomodulatory effects while making it clear that the science is still developing.