
4x4 Fence Post Guide for Ottawa–Gatineau Projects

The usual advice to bury a fence post by a fixed fraction of its length misses the decisions that matter most in Ottawa–Gatineau. A bigger post won't correct inadequate preservative treatment, and extra concrete won't make a shallow footing resistant to frost movement.
Start with the exposure below ground, then the loads above it. The right 4x4 fence post is the one that's properly treated, supported at an appropriate depth, and strong enough for the panel or gate it carries.
What a 4x4 Fence Post Really Is
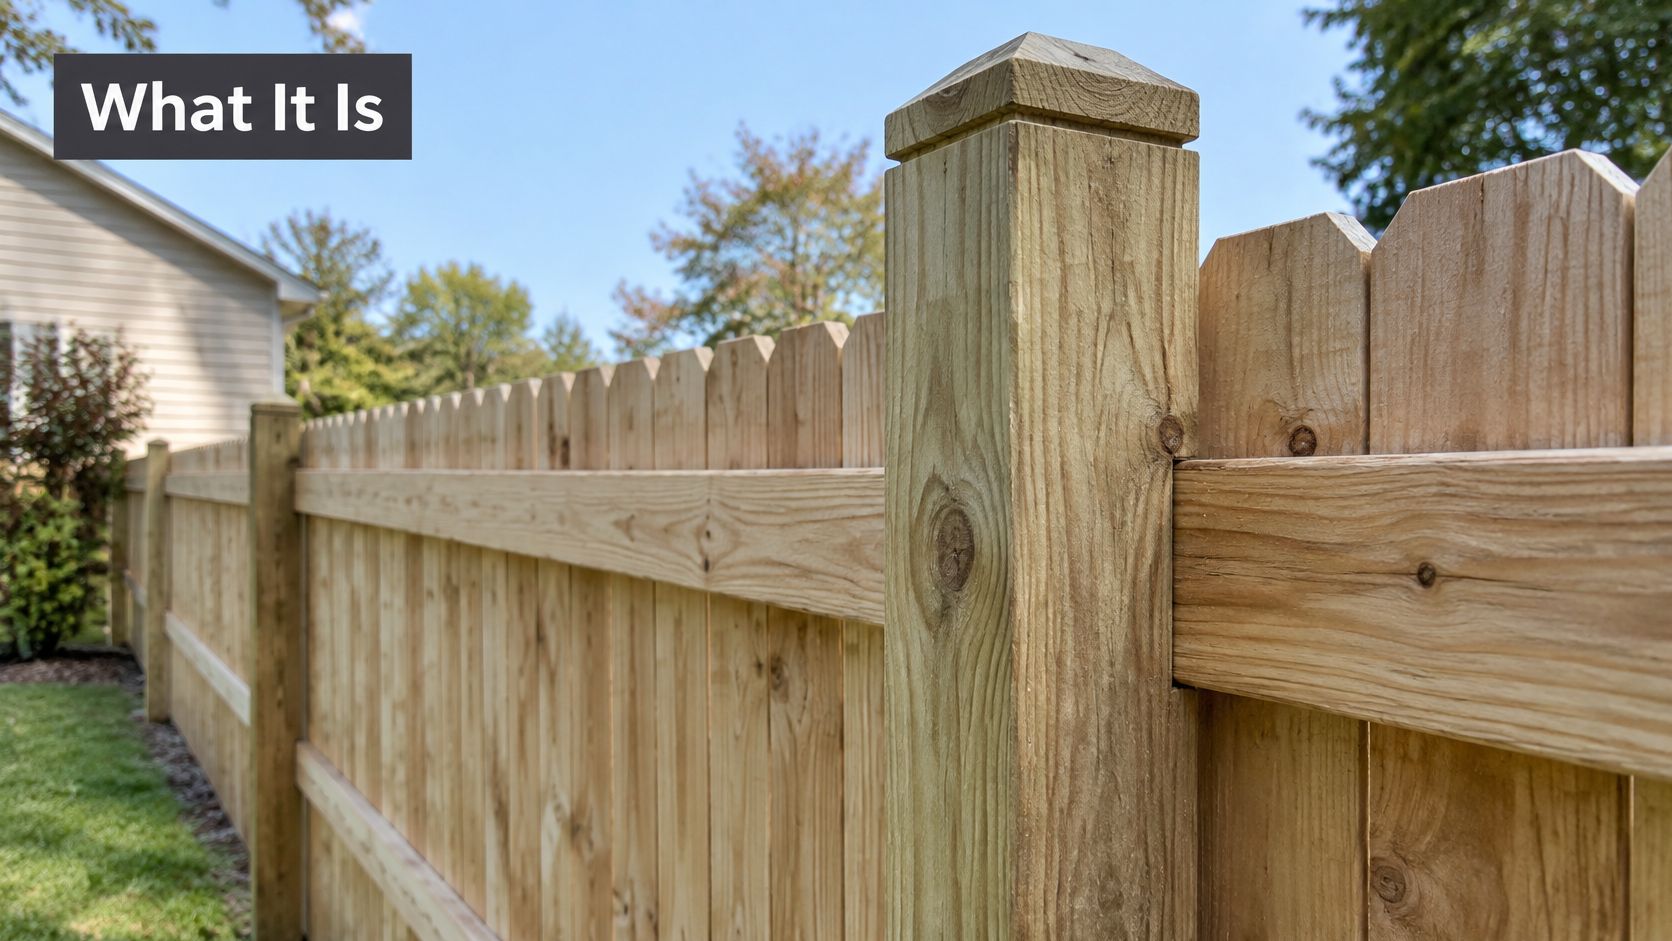
A 4x4 fence post is a square wood post, nominally four by four inches, that supports panels and holds the fence line in alignment. The Home Depot Canada product specification identifies its pressure-treated 4x4 as a nominal product sold in a 10-foot length, suitable for ground contact or freshwater applications, and calls for hot-dipped galvanized fasteners and connectors at minimum.
“Nominal” is the important distinction at the lumber rack. Dressed lumber measures smaller after manufacturing, so take a tape measure rather than assuming the name tells you the finished dimensions.
Think of posts as the fence's spine
Say you're replacing tired backyard panels while keeping the same layout. The boards provide privacy, but the posts carry their weight, resist wind against the panel face, and keep the rails aligned. Like a spine supporting a frame of studs, the posts determine whether the finished assembly stays upright.
Measure the actual post before buying brackets. Its finished size also changes the clearance inside the hole and the amount of concrete or compacted backfill around it.
Line posts support the panels along a straight run.
End and corner posts handle connections where the fence stops or changes direction.
Gate posts carry moving loads and can be too demanding for a light post.
Fence height, soil and exposure decide whether this size works on your lot. Use the depth table to assess the footing, the treatment checklist to check the lumber, and the size comparison to identify posts that need more strength.
When a 4x4 Falls Short and a 6x6 Makes Sense
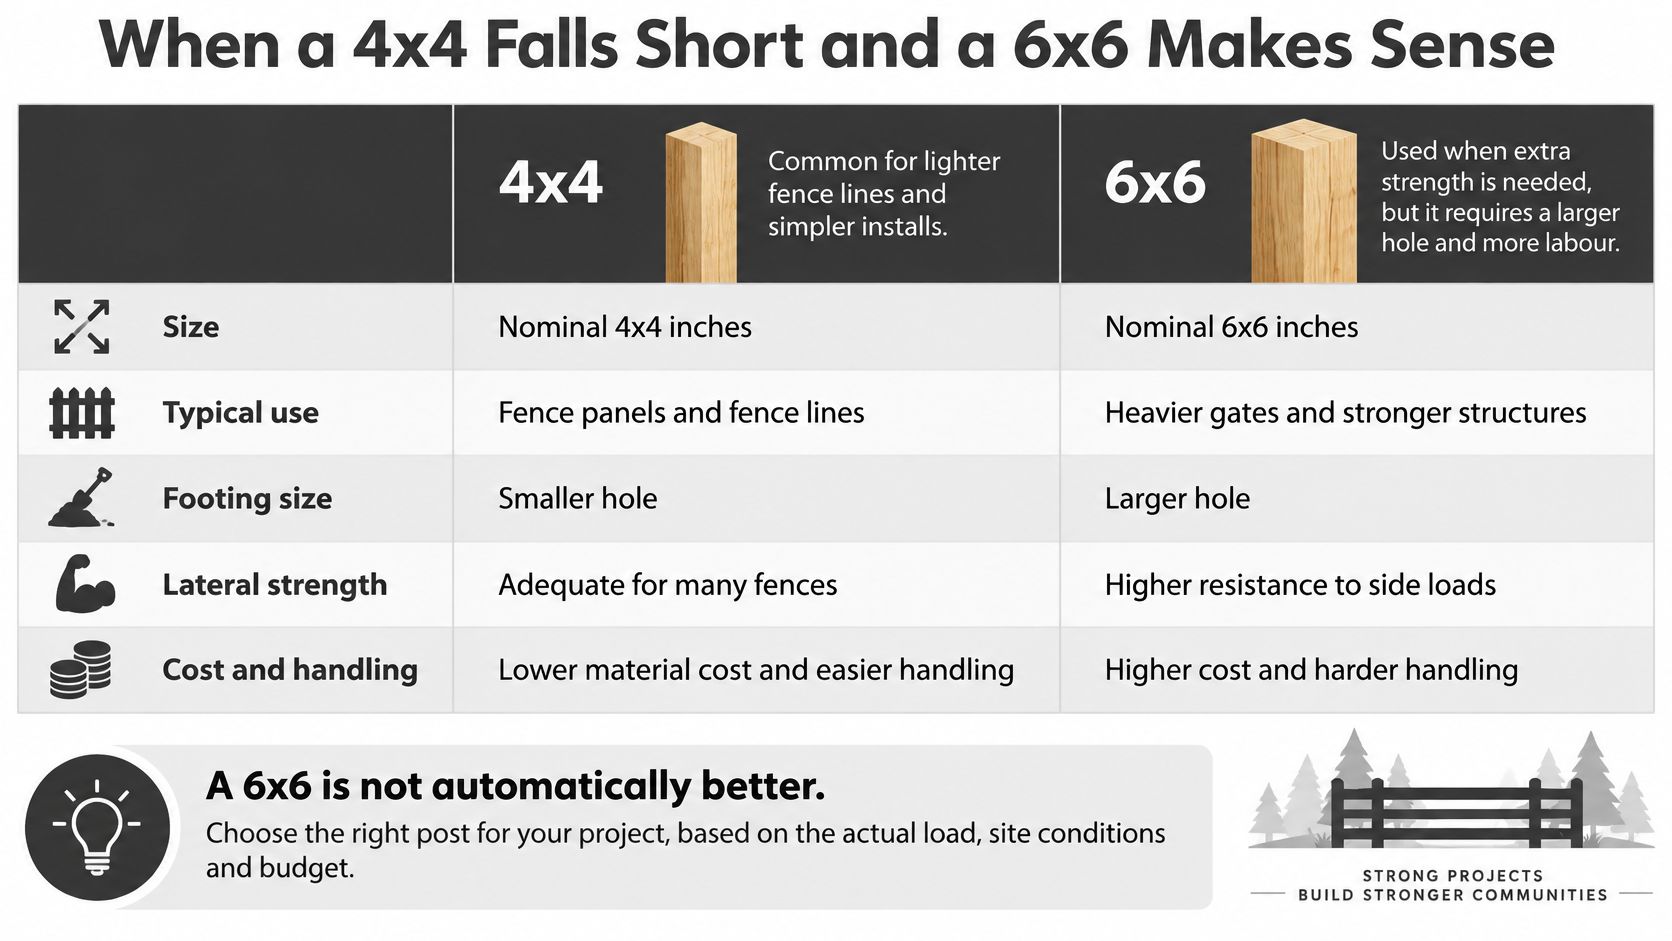
4x4 versus 6x6 fence posts
Factor | 4x4 post | 6x6 post |
|---|---|---|
Nominal size | 4 x 4 in | 6 x 6 in |
Typical use | Standard privacy panels and light gates | Tall fences, heavy gates, corners, pool enclosures |
Footing and concrete | Smaller hole, less concrete | Larger hole, more concrete |
Lateral strength against wind | Adequate for standard panels | Better resistance to bending at the ground line |
Material cost | Lower | Higher per post; obtain a matching ground-contact quote |
Handling | Manageable for one installer | Heavier, often needs two people |
The comparison is about matching material to load, not declaring a universal winner. A larger post costs more to purchase and usually requires more excavation, concrete and handling effort. On an awkward lot, getting the material through a narrow side passage can matter almost as much as the lumber price.
The visual comparison highlights those installation trade-offs.
Match the post to the load
For a hypothetical sheltered privacy fence about 1.8 m high, a properly specified 4x4 can be a sensible starting point. Nearby buildings may reduce exposure, but don't count a hedge as permanent wind protection. The fence should remain serviceable if the neighbour removes vegetation.
For a proposed fence above about 1.8 m, I would assess larger posts rather than extend the same light-post detail. Panel construction, rail connections and local requirements still need checking. Post size alone doesn't establish that a fence is suitable.
Heavy gates are a separate problem. Their weight pulls away from the hinge post, while opening, closing and slamming repeatedly load the connections. Double gates also need careful attention to hinge support, latch alignment and the footing beneath each supporting post.
Pool enclosures require a compliant assembly, not just substantial-looking lumber. Choose the gate, hinges, latch and post support together, and verify the applicable municipal requirements before ordering.
Practical rule: Spend extra where the load is concentrated, not automatically on every post.
A mixed layout can be the better purchase
Larger gate, end and exposed corner posts paired with lighter line posts can protect vulnerable locations without increasing every material quantity. Check that the rail brackets fit both sizes and that the change in post width won't interfere with panel dimensions.
A larger post in a shallow, poorly drained hole can still move or decay. It may resist bending better, but it doesn't solve the underlying installation defect.
Use this video as a visual companion when comparing the post options.
Before buying, mark the highest-load positions on your sketch: the gate, the exposed corner and the tallest panel. Ask whether those locations justify a larger post and a correspondingly designed footing.
Post Depth, Frost and Spacing by Fence Height
Post size, burial depth and spacing by fence height
Fence height and site | Post size | Burial depth |
|---|---|---|
Up to 1.2 m (4 ft), open or lightly loaded | 4x4 | About 42 in baseline |
1.2 to 1.8 m (4 to 6 ft) privacy, sheltered site | 4x4 | About 42 in baseline |
1.2 to 1.8 m (4 to 6 ft) privacy, exposed or windy | 4x4, subject to load assessment | 48 in planning example |
Over 1.8 m (6 ft) or heavy gate | 6x6 recommended for assessment | 48 to 60 in |
Clay-rich soil or poor drainage, any height | 4x4 or 6x6 by height and load | 48 to 60 in |
These are preliminary planning choices, not a permit-ready design: Ontario's 2024 Building Code establishes frost penetration through local experience, while regional practice commonly uses approximately 42 inches as a baseline and often 48–60 inches for more demanding conditions.
Apply depth and spacing together
Wet, frost-susceptible soil can freeze onto the post and lift it through adfreeze forces. Repeated movement can tilt panels and misalign gates. Clay and silt generally present more heave risk than free-draining granular soil.
For a hypothetical 1.8 m (6 ft) privacy fence on a windy Gatineau clay lot, consider a preliminary layout with 48 inches of burial and 2.1 m (7 ft) spacing. Have the footing and post strength checked before treating that example as a construction detail. Spacing must suit the panel system, rail span and wind exposure.
Provide a compacted gravel base where it can drain, slope the concrete top away from the wood, and don't create a sealed water-holding pocket. Gravel alone won't drain an impermeable clay hole.
For excavation planning, consult this guide to fence-post depth in Ontario. If an existing pool fence leans or has a damaged collar, Pool & Landscaping of Vistancia fence repairs, from Pool & Landscaping of Vistancia LLC, is a repair-service resource, not a substitute for local frost or enclosure requirements.
Choosing Ground-Contact Treatment and Hardware
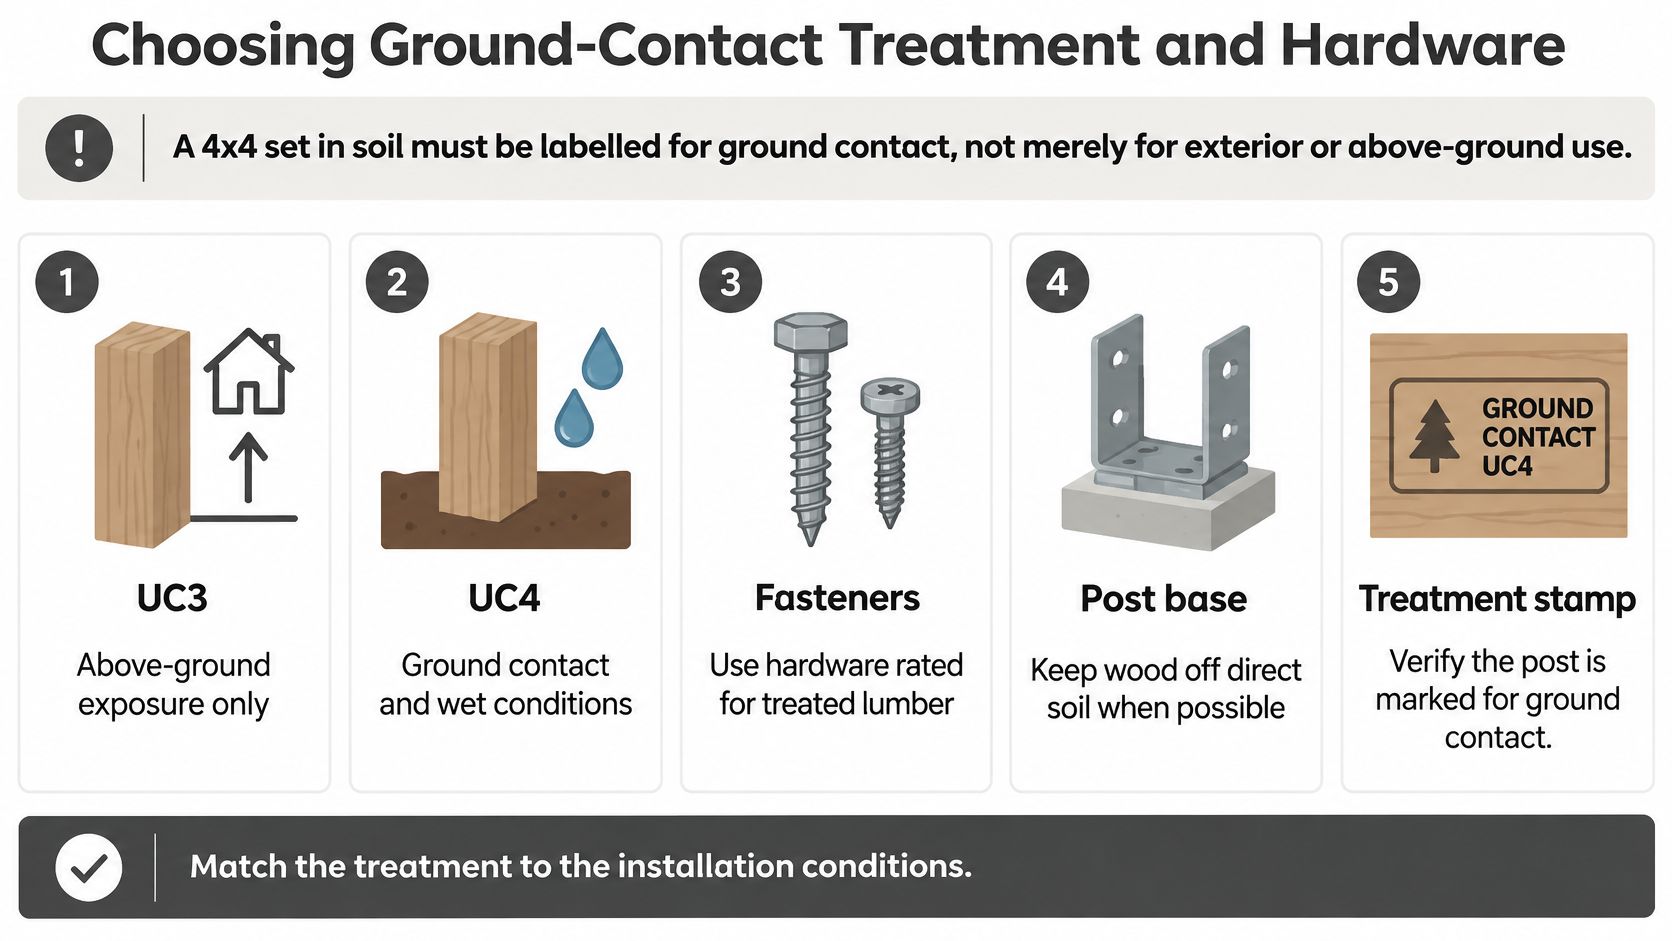
A post set in soil must be labelled for ground contact, not merely exterior or above-ground use. Colour doesn't establish the treatment category, and the words pressure-treated don't tell you enough about the intended exposure.
The Canadian Wood Preservation Association's specifier guide identifies UC4.1 for general ground-contact applications, including fence posts, and UC4.2 where deterioration risk is greater. The Canadian Wood Council's treatment standards guidance distinguishes above-ground UC3 applications from ground-contact UC4 applications.
Treatment categories for fence posts
Use category | Exposure it is rated for | Suitable for a buried 4x4 post |
|---|---|---|
UC3 | Above ground, no soil or water contact | No, it will decay below grade |
UC4.1 | Ground contact, general fence and deck posts | Yes, the standard choice |
UC4.2 | Ground contact, heavier or harder-to-replace structural use | Yes, for heavy gates or higher-risk sites |
Field cuts and drilled holes | Exposed untreated wood | Brush on approved preservative before setting |
Read the tag before loading the truck
Check the end tag while the post is still in the rack. If it's missing or illegible, ask the supplier for the product's treatment specification rather than accepting a verbal assurance that all treated lumber is interchangeable.
Use this buying checklist:
Exposure rating: Confirm that the label explicitly permits ground contact.
Use category: Match the stated category to the intended installation and deterioration risk.
Product identification: Record the preservative system and keep the tag or receipt for reference.
Dimensions and condition: Check length, actual section, straightness and damage near planned connections.
Hardware compatibility: Buy connectors and fasteners approved for that treatment system and outdoor exposure.
Wood grade and preservative category answer different questions. This guide to pressure-treated lumber grades helps separate structural quality from the exposure rating.
The checklist below is useful when comparing products at the supplier.
Protect the wood you expose
The buried section, ground-line area, cut ends and drilled penetrations deserve particular attention. Moisture and oxygen support fungal decay, while soil contact increases insect exposure. Cutting or drilling can expose wood that doesn't have the same protection as the original treated surface.
Whenever possible, keep the factory-treated end below grade and trim the top instead. Before installation, brush an approved field-cut preservative onto exposed end grain and inside drilled holes. Use a product explicitly intended for the preservative system and exposure, allow the specified absorption or drying time, and wear the protective equipment listed on its label.
Ordinary stain isn't a replacement for field-cut preservative. Neither is painting the buried end with an improvised coating. Those shortcuts can hide the surface without providing suitable protection.
Increasing the post size cannot compensate for buying lumber with the wrong treatment category.
Treat connections as part of the specification
Plain steel fasteners can corrode in treated wood and outdoor moisture. Use hot-dipped galvanized hardware at minimum, or a compatible stainless-steel system where the exposure or manufacturer calls for it.
Match screws, brackets, bolts and washers as a system. Don't combine an approved bracket with miscellaneous screws from the garage, and don't assume electroplated zinc provides the same protection as hot-dipped galvanizing. Follow the connector manufacturer's fastener specification so the connection has both suitable corrosion resistance and adequate strength.
Setting a 4x4 Post Step by Step
Prepare the string line, tape measure, digging bar, post-hole digger or auger, spirit level, braces and preservative before mixing concrete. Rushing to find tools while the mix stiffens is an avoidable installation problem.
Prepare and position
Mark the approved alignment. Work from the confirmed boundary, arrange utility locates, and establish post centres from the chosen panel and rail layout. Don't derive spacing from burial depth alone.
Excavate to the designed depth. Measure from finished grade. Allow for the gravel base so adding it doesn't leave the post or footing too shallow.
Prepare drainage and wood. Compact the specified gravel base, keeping loose spoil out. Treat field cuts and drilled holes before the post goes into the hole.
Set the post plumb. Check adjacent faces with a level and verify its position against the string without pushing the string sideways.
Place, brace and finish
Place the concrete carefully. Consolidate it around the post without shifting the alignment. Finish the exposed collar so water runs away from the wood.
Brace against movement. Use stakes and braces at right angles. Recheck plumb after placing concrete, and leave the bracing until the mix has developed the strength required by its product instructions.
Attach the fence after curing. Use compatible hot-dipped galvanized hardware, check the full line before hanging panels, and use help when handling larger posts.
Before loading the posts: Confirm that the concrete has cured sufficiently for panel and gate installation, not merely become firm at the surface.
Recheck alignment after the first freeze-thaw season. Early movement is easier to investigate before rails, latches and neighbouring posts are pulled out of position.
Cost, Maintenance and Lifespan Expectations
Home Depot Canada listed a ground-contact pressure-treated 4x4 x 8-foot premium wood post at $9.20 each in 2026. Treat that as a retail price anchor, not a current project quote or a suitable length for every fence.
The post itself is only part of the installed cost. Deep excavation, concrete, spoil removal and difficult access can outweigh the savings from choosing cheaper lumber. Compare complete assemblies rather than post prices alone.
Build a usable material estimate
Sketch each straight run separately. Divide its length by the proposed spacing, round up to establish the required bays, then count the actual post positions on the drawing. Add dedicated gate supports and identify shared corner positions so you don't count them twice.
Price these items separately:
Posts and panels: Include the correct post lengths, upgraded load-bearing positions, rails and infill.
Footing materials: Calculate concrete from the actual hole dimensions and allow for the specified drainage base.
Connections and protection: Include brackets, fasteners, caps and field-cut preservative.
Site work: Account for equipment rental, access restrictions, disposal and restoration.
For contractors pricing multiple jobs, HireArchitects' discussion of the cost to expand preconstruction capacity is relevant to estimating overhead. It isn't a residential fence-price guide; homeowners should still request a scope-specific installation quote.
Inspect the failure points
Check the fence annually and after severe weather. Look along the line for lean, examine concrete collars for cracking, and probe suspicious ground-line wood gently with an awl. Surface checking in lumber isn't automatically structural failure, but soft fibres, significant section loss or movement at the base need attention.
Tighten loose hardware only after checking why it loosened. A screw repeatedly pulling out may indicate decayed wood or an overloaded connection rather than a simple maintenance issue. Re-treat new cuts and holes, and prevent mulch or garden soil from building up against the post.
A correctly treated, well-drained post can remain useful well beyond a decade, but that isn't a warranty. Poor drainage, inadequate treatment and overloaded gates can shorten service considerably. Avoid choosing a post on an advertised lifespan without understanding the installation assumptions behind it.
Repair the cause of a lean before straightening the panel. Replacing deteriorated wood or correcting a failed footing costs more than tightening a bracket, but repeated cosmetic fixes waste labour and can leave an unsafe fence standing.
Confirm the Boundary, Then Choose DIY or a Pro
For Gatineau homeowners, the Québec government's guidance on fences and common walls says a private fence must sit entirely on the owner's land without touching the dividing line, unless the arrangement follows the applicable rules for a common or party fence. Municipal by-laws govern matters including height, style, colour and materials.
Don't use an old fence, hedge or mowing edge as proof of the legal boundary. Find the survey documentation and have a land surveyor resolve uncertainty before placing permanent footings. Include the finished fence's thickness, caps and projecting hardware when checking its location.
Clear the administrative obstacles first
Work through the decisions in this order:
Establish the legal line: Compare the survey information with reliable boundary evidence, not visual assumptions.
Agree on ownership: Decide whether the installation is private or shared and document arrangements before ordering.
Check municipal requirements: Confirm permitted height, placement, materials, pool-enclosure details and any approval requirements.
Locate underground services: Arrange utility locates and identify private lines that may need separate investigation.
Mark the complete layout: Position gates, corners and panels only after those constraints are understood.
This guide to property-line fence rules can help organise the boundary questions. Municipal requirements differ across the region, so advice for another city isn't approval for your lot.
Choose DIY when the site is straightforward
A short, low, straight fence on level, well-drained ground can suit a careful homeowner. You need a clear boundary, safe excavation access and enough time to keep every post aligned while its footing sets. Material-only purchasing makes sense when you can prepare a complete cut list and understand the selected panel connections.
Ask the supplier for a checklist before cutting. Confirm post lengths, treatment suitability, connector compatibility and the intended assembly sequence. A bargain bundle isn't useful if its posts are too short for the planned footing and finished height.
Bring in a professional when the consequences increase
Slopes, wet clay, exposed locations and heavy gates justify more than a generic post-setting detail. Shared townhouse fences and pool enclosures also involve coordination or compliance issues that can make an apparently simple project difficult.
A useful professional quote should identify post sizes by location, footing assumptions, drainage provisions, gate hardware and responsibility for restoration. Ask who handles design decisions, utility coordination and the final inspection of alignment and operation.
For neighbourhood projects, settle the shared specification before comparing prices. Consistent materials and coordinated access can simplify construction, while a written scope makes it easier to compare contractors fairly.
FenceScape offers free estimates and in-house crews for wood, PVC and hybrid fences, with turnkey support from planning through the final walkthrough. Visit FenceScape to discuss post sizing, ground-contact materials and footing choices for your Ottawa–Gatineau lot, or request a material-only checklist before cutting. Ask about financing for Ontario and Quebec customers and neighbourhood group discounts when planning a shared project.
Enclomiphene is sometimes associated with bodybuilding because testosterone has an important role in muscle development and recovery. However, raising testosterone is not the same thing as directly creating muscle, and results depend heavily on training, diet, sleep, and baseline hormone status. Enclomiphene works by stimulating endogenous testosterone production. This makes it more relevant to hormonal management than as a standalone bodybuilding strategy.
https://valhallavitality.com/blog/what-is-enclomiphene-for-bodybuilding-used-for