
Glass Pool Fence Installation: A Complete Guide

You're halfway through a backyard renovation, the pool is taking shape, and you're comparing clear glass panels with stainless-steel spigots. Then a neighbour asks whether you've applied for the pool-enclosure permit. Suddenly, the project involves municipal rules, footing design, gate testing, inspections, and a deadline you hadn't planned for.
That's the reality of glass pool fence installation in Ottawa–Gatineau. Glass can deliver excellent visibility and a clean finish, but it's first a code-compliant pool barrier, then a design feature. The job runs from permit research and site measurements to engineered anchoring, glazing, gate adjustment, and final inspection.
Why Glass Pool Fence Installation Starts with the Code
A glass fence can look simple after it's finished. The installation underneath it rarely is. A frameless run may appear to float above the deck, but its safety depends on the substrate, anchors, panel spacing, gate hardware, and the rules attached to the property.
In Ontario, pool enclosures are governed by municipal requirements alongside the Ontario Building Code baseline. A commonly applicable baseline is a minimum enclosure height of 1.2 m, a self-closing and self-latching gate, and openings no larger than 100 mm, as reflected in municipal guidance such as Aurora's pool enclosure by-law. Aurora's rules also address safety glass and post spacing, including laminated or tempered glass and posts no more than 2.4 m apart.
Practical rule: Don't order glass from a sketch. Confirm the barrier requirements, gate position, setbacks, and footing approach before anyone takes final panel dimensions.
Ottawa and Gatineau homeowners also need to separate material approval from permit approval. Gatineau expressly allows glass or plexiglass panels as residential fence materials, but requires a permit for a fence protecting a pool under its residential fencing regulations. A glass panel can therefore be an allowed material while the proposed layout still fails because of height, climbing features, gate operation, setbacks, or anchoring.
The paperwork should include the site plan, product information, gate details, and footing or anchoring specifications. Homeowners unfamiliar with the inspection sequence can also review this excavation inspection overview to understand why below-grade work is checked before it disappears under concrete, soil, or landscaping. For Ontario-specific planning, compare the property's requirements with this guide to pool fence requirements in Ontario.
Quebec adds a time-sensitive issue. Existing residential pools built before 2010 had until September 30, 2025 to comply with newer provincial enclosure requirements, while Gatineau coverage identifies an extension of the retrofit deadline to September 30, 2027. Check the current municipal position before starting work, especially if the pool predates the newer rules.
Pool Enclosure Rules and Safety Standards
A glass barrier can look finished and still fail a safety check. The practical tests are simple: can a child pass through an opening, find a foothold, or open the gate without help? The enclosure must also remain stable at its weakest connection, not just along the most visible glass run.
Ontario requirements depend on the municipality, so confirm the address-specific rule before ordering panels. Aurora's by-law, cited earlier, illustrates how local provisions add detail to the provincial baseline. On site, the 100 mm opening test means checking the completed enclosure with a rigid gauge or sphere at every accessible gap, including panel bottoms, corners, gate clearances, and irregular deck areas. Measure the finished barrier, not a shop drawing. Also verify that the glass is safety glazing and that the layout does not create climbable rails, brackets, or adjacent objects.
Quebec's pool safety requirements use a similar 1.2 m minimum barrier height, require resistance to climbing, and prohibit openings that allow a 10 cm diameter ball to pass. Glass, wrought iron, and metal can serve as enclosure materials when the finished system meets the applicable standards. Gatineau also requires a permit for a fence protecting a pool, so the material choice does not remove the approval step.
The gate deserves its own inspection. Confirm that it closes and latches from a normal opening, without someone pulling it shut, and check the release hardware after the hinges and latch are fully adjusted. A gate that works on a level temporary setup can bind after the deck settles or the posts are tightened.
California provides a useful comparison because its measurements differ. A glass pool barrier is commonly planned at a finished height of at least 60 inches from the outside face, with bottom clearance no greater than 2 inches and no opening large enough for a 4-inch sphere. The gate must self-close and self-latch, swing away from the pool, and place its release mechanism at least 60 inches above grade, according to this California glass pool barrier requirements guide. These figures do not replace Canadian rules. They demonstrate why the installer must identify the measuring face and test real gaps rather than judge uniformity by eye.
Jurisdiction | Governing body | Min. height | Gate hardware | Glass specification | Permit / inspection trigger |
|---|---|---|---|---|---|
Ontario municipal example | Municipality and Ontario Building Code baseline | 1.2 m commonly used in municipal enclosure rules | Self-closing and self-latching | Aurora identifies laminated or tempered safety glass | Local permit and inspection requirements apply |
Quebec | Provincial pool safety rules and municipality | 1.2 m | Self-closing and self-latching, with climbing resistance | Glass is an acceptable fence material when compliant | Municipal permit requirements apply, including Gatineau |
California comparison | Local building department and California barrier guidance | 60 inches from outside face | Self-closing, self-latching, outward swinging gate | Safety glazing may be required near the pool edge | Permit drawings, footing inspection, and final inspection are typically required |
Permit packages may require product specifications and engineered drawings. Footings can need inspection before concrete covers them, followed by a final inspection after the glazing and gate hardware are installed. In Ottawa and Gatineau, ask the municipality which inspections apply before work begins. A fence that looks complete is not necessarily ready for approval.
Measuring the Site and Planning the Layout
A glass supplier can cut panels accurately only if the site information is accurate. Measure the pool edge, deck, property constraints, gate route, and substrate before templating. A few millimetres lost at the planning stage can become a visible gap, an awkward infill panel, or a gate that can't swing properly.
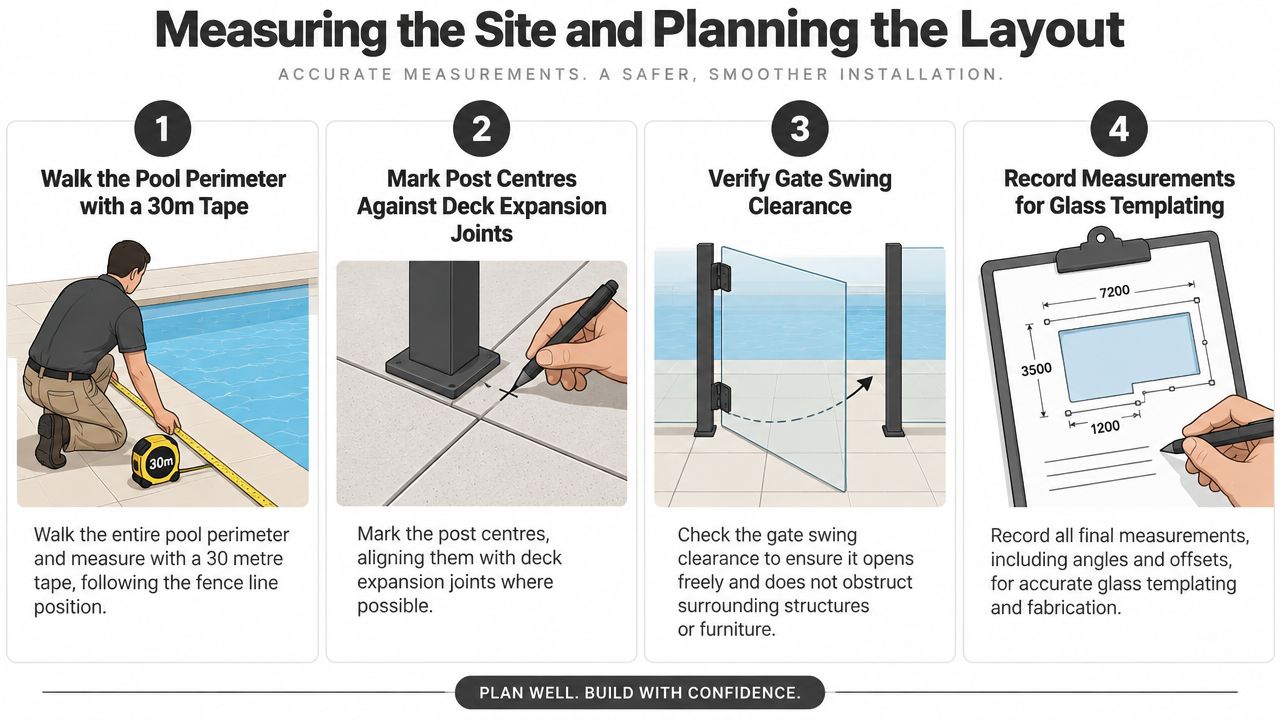
Start with the perimeter and the ground
Walk the full pool perimeter with a 30 m tape. Record straight runs, corners, steps, slopes, coping changes, drains, expansion joints, and every location where a gate might be considered. Mark proposed post centres against deck joints where possible, because drilling directly over a joint or too close to a slab edge can weaken the anchoring plan.
Call Ontario One Call or Info-Excavation before excavation or core drilling. Buried gas, water, hydro, and communications lines can run through areas that appear clear from the surface. Utility locating is a planning step, not a last-minute precaution.
Use a laser level across the proposed fence line. It can reveal a deck that drains toward the pool, a change in elevation that will create uneven panel tops, or a footing location that needs redesign. Existing concrete, pavers, timber decking, and newly poured slabs each require different anchoring decisions.
Confirm constraints before templating
Check property lines, easements, access routes, and the municipal setback rules that apply to the address. Don't assume the shortest route around the pool is the permitted route. The barrier must also leave enough room for the gate to swing, close, and latch without hitting a wall, planter, ladder, or outdoor furniture.
Record measurements in metric and imperial, then verify them again before glass fabrication. Keep photographs, a marked-up site plan, utility-locate documentation, proposed gate location, product data sheets, and any engineering information with the permit file. The glass should be the last major item ordered, not the first.
Choosing Frameless vs Semi-Frameless Systems and Hardware
The right system depends less on the brochure photograph than on what sits below the hardware. Frameless glass gives the clearest sightline, but it places more responsibility on spigots, anchors, slab condition, and panel layout. Semi-frameless fencing introduces visible posts, yet those posts can make layout and alignment more forgiving on a complicated deck.
Frameless systems typically use glass panels secured by spigots or channels. Core-drilled spigots can create a clean result on a new concrete pour, provided the slab and reinforcement plan support them. Base-plate spigots are more suitable for some finished-deck retrofits, but they need a sound substrate and careful waterproofing. A base plate installed on weak concrete, a thin edge, or a surface vulnerable to frost movement won't become reliable because the stainless steel looks substantial.
Semi-frameless systems use slim posts between panels. They can suit split-level yards, existing structures, or layouts where the post positions help resolve corners and changes in direction. A top rail may be appropriate where the system design or local review requires added continuity and child-resistance. It also changes the visual character, so decide before fabrication.
System type | Glass and hardware | Anchoring method | Cost per linear foot (CAD) | Best for |
|---|---|---|---|---|
Frameless | Clear safety glass with stainless-steel spigots or channels | Core-drilled or engineered base anchoring | $145–$240 | New concrete, uninterrupted views, carefully engineered layouts |
Semi-frameless | Glass panels with slim posts and optional top rail | Base plates or embedded posts, depending on substrate | $150–$250 | Finished decks, more complex layouts, easier visual alignment |
Canadian market references place frameless glass fencing roughly between $145 and $240 per linear foot, while Ontario material advertises around $185 per linear foot for framed systems and $215 per linear foot for frameless systems. These are planning figures, not guaranteed quotations. Access, demolition, concrete work, engineering, gates, and municipal requirements can shift the final price.
Glass thickness also needs to match the selected system and engineering rather than personal preference. Some suppliers discuss 10 mm and 12 mm tempered glass as system options, but the correct specification depends on the approved product, panel dimensions, wind exposure, support spacing, and local requirements.
For related exterior glass applications, this glass railing guide provides useful context on how hardware and substrate choices affect the finished installation. As a practical rule, choose frameless with core-drilled spigots for a new pour when the design and substrate support it. Choose semi-frameless with base plates when retrofitting a finished deck makes coring impractical, after confirming that the deck can carry the system.
From Footings to Final Glazing
The installation sequence determines whether the fence stays aligned after the first winter. Glass is only the visible part of the assembly. The concrete, reinforcement, anchors, drainage, and gate hardware carry the long-term load.
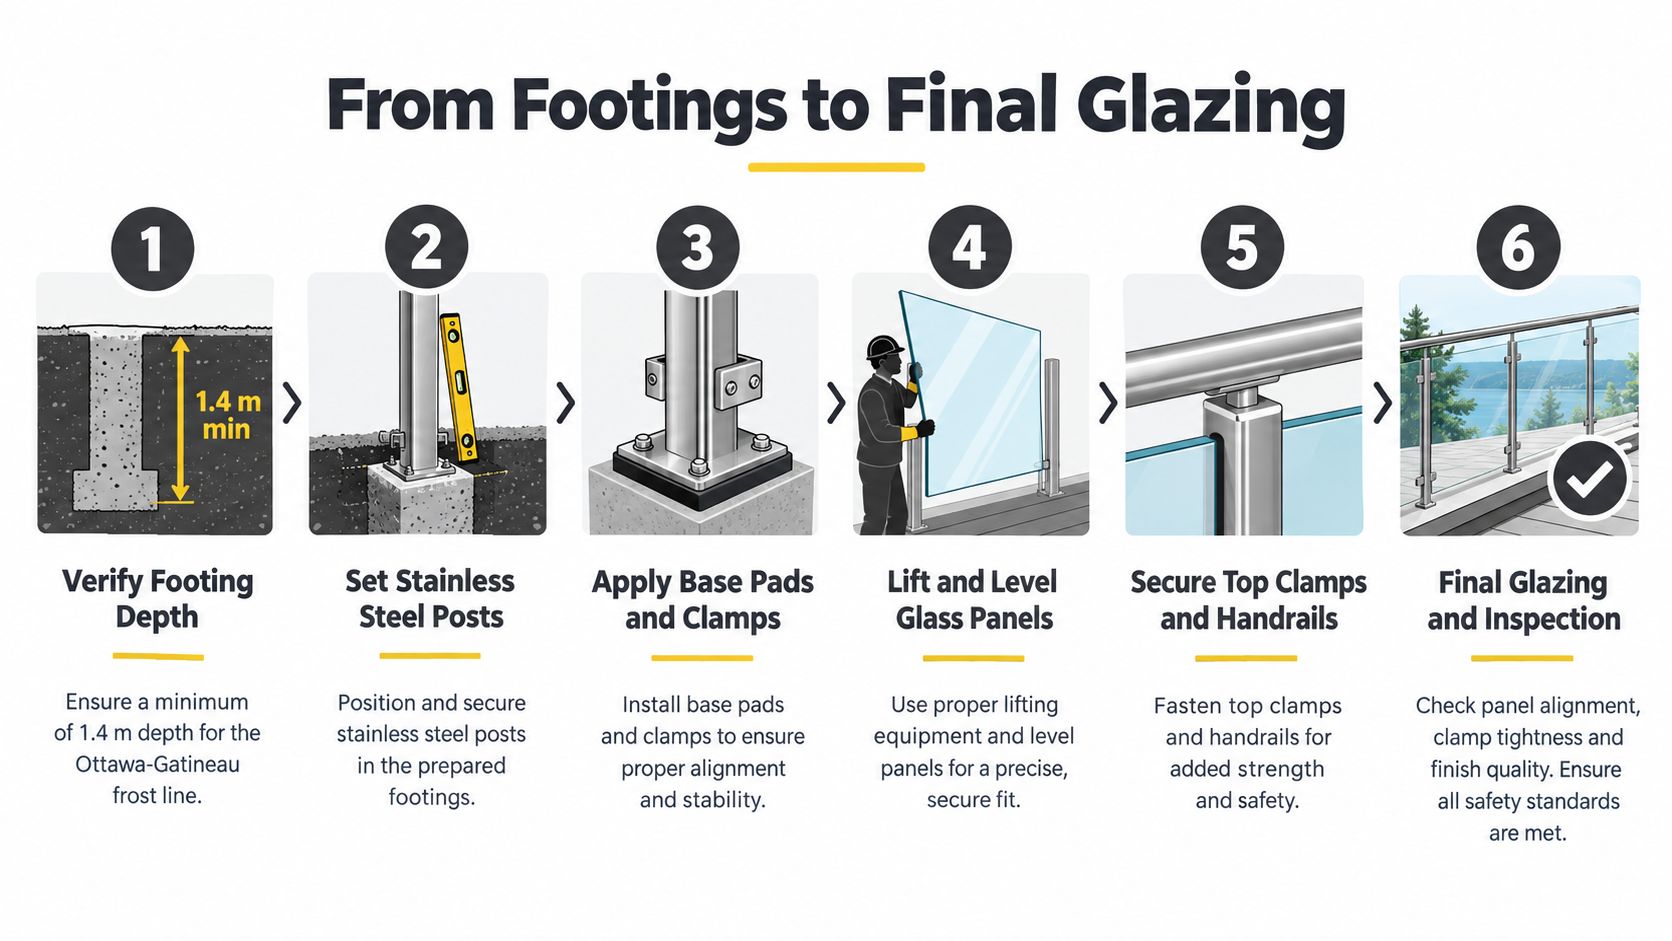
Prepare and inspect the base
For Ottawa–Gatineau work, confirm the footing design against local frost conditions before excavation. The design may call for substantial depth, reinforcement, drainage, and a concrete section that won't shift independently from the surrounding deck. Don't pour until the required footing and rebar inspection is complete.
On a new concrete installation, the crew sets out the post or spigot centres from the approved drawing, checks edge distances, and cores or installs the specified anchors. Chemical anchors need the manufacturer's cure time before loading. A 24-hour cure is a common installation allowance for chemical anchors, but the product instructions, temperature, hole preparation, and inspector's requirements control the actual waiting period.
The crew should protect finished coping and tile while drilling. Dust extraction, clean holes, correct embedment, and approved sealants matter more than speed. If the substrate is cracked, hollow, too close to an edge, or poorly bonded, stop and revise the anchoring plan instead of hiding the defect under a base cover.
Lift, level, and secure the panels
Installers use suction cups and controlled lifting techniques to move the glass. Each panel is shimmed and checked for plumb before clamps or spigots are tightened. Structural silicone or compression gaskets should be installed exactly as specified, with no metal edge contact that could create a stress point.
The gate deserves its own adjustment cycle. The hinges, self-closer, latch, and strike must align without forcing the glass. Test the gate repeatedly from different opening positions, then verify that it closes and latches under its own hardware. Don't accept a gate that looks aligned only when pushed into position.
For practical information about avoiding movement in cold-weather ground, review this guide on preventing frost heave.
A California-facing compliance guide for glass pool barriers also stresses PE-stamped engineering for site-specific seismic and wind loads, particularly where frameless systems rely on concentrated base hardware. That principle is useful in Canada too. The engineer or authority having jurisdiction should be satisfied that the anchors and foundations resist lateral loads without introducing climbable features.
Before the final walkthrough, rinse the panels, polish the hardware, inspect every seal, and photograph penetrations and anchor locations for warranty records. Book the municipal inspection before backfilling, paving, or placing landscaping against the fence.
When to Hire a Pro in Ottawa–Gatineau
A professional installer earns the fee by controlling risk before the glass arrives. In Ottawa–Gatineau, the difficult part isn't carrying a panel across the yard. It's coordinating the permit, barrier dimensions, substrate, frost movement, gate operation, inspection documents, and warranty conditions.
Start with the permit holder. Ask who submits the application, who answers municipal questions, and who books inspections. Gatineau requires a permit for a fence protecting a pool, and Ontario municipalities can apply their own enclosure processes. If the project includes pool equipment or electrical bonding, confirm whether a separate electrical inspection is required.
Review the installer, not just the sample
A credible quotation should identify the glass specification, hardware finish, gate mechanism, anchoring method, footing scope, engineering responsibility, permit responsibility, inspection sequence, exclusions, and restoration work. “Supply and install glass fence” isn't enough if nobody has explained who handles cracked concrete, utility conflicts, drainage, or an unsuccessful inspection.
Ask for:
Coverage documentation: Request current WSIB clearance where applicable and proof of commercial liability insurance.
Licensing information: In Quebec, ask for the contractor's RBQ details where the work requires them. In Ontario, confirm the applicable municipal and trade requirements.
Local references: Choose recent Ottawa or Gatineau projects with comparable substrates, gates, and access conditions.
A named permit holder: The contract should state which party submits the permit and remains responsible for responding to review comments.
Warranty terms: Confirm who covers glass, hardware, sealants, labour, and damage caused by substrate movement.
Don't rely on an installer who guesses footing depth, skips utility locating, or says the inspector can decide after installation. California compliance material identifies insufficient footing preparation, incorrect latch height, and oversized panel gaps as recurring causes of rework or rejection. Canadian jurisdictions use different rules, but the installation lesson is the same: details must be checkable before the panels go in.
The cheapest quote can become expensive if the crew drills into unsuitable concrete, installs a gate that won't latch, or leaves you to manage the permit alone. A local professional can also coordinate the sequence with concrete, landscaping, electrical, and pool-equipment trades so one completed surface doesn't have to be opened twice.
Maintenance, Longevity, and Smart Next Steps
Glass avoids painting, but it still needs routine checks. Dirt can hide sealant cracks, mineral deposits can restrict hardware movement, and winter debris can load a gate or panel. Add the fence to the same maintenance schedule as the pool equipment and deck.
Rinse and inspect the enclosure twice yearly, then check it after major storms. Look for movement at spigots, corrosion staining around stainless hardware, loose fasteners, chipped edges, damaged gaskets, and a gate that does not close or latch cleanly. A panel that has contacted metal or developed an edge chip requires assessment by a glass professional before the damage worsens.
Keep the system serviceable
Clean the glass with a mild product and soft equipment. Abrasive pads can scratch the surface and leave residue on seals. Lubricate hinges and latches only as the hardware manufacturer directs. Inspect silicone around posts and gate components for cracking, lifting, or separation.
A properly specified tempered or laminated panel can provide a long service life with proper care. Hardware and sealants may require attention sooner, especially in freeze–thaw conditions or where road salt reaches the yard. The glass may outlast the first set of gate components, so retain product names, warranty details, and installation records.
Project cost depends on more than the glass system. Allow for demolition, footing repairs, difficult access, engineering, permit work, and inspection requirements. The figures covered in the systems section should be treated as starting reference points, not a complete quote.
Use this Monday-morning checklist:
Identify the jurisdiction: Confirm the municipal pool-enclosure rules for the exact address.
Check the retrofit status: If the pool is older, verify the current Ottawa–Gatineau or Quebec deadline.
Measure the perimeter: Record runs, corners, slopes, joints, gate clearance, and substrate changes.
Locate utilities: Contact Ontario One Call or Info-Excavation before drilling or excavating.
Gather comparable quotes: Require a written scope for glass, hardware, footings, engineering, permit work, and inspection.
File before fabrication: Submit the required drawings and product information before ordering custom panels.
Schedule the inspection: Arrange footing and final inspections before landscaping closes access to the fence.
FenceScape provides Ottawa–Gatineau homeowners with site consultation, measurement, concrete preparation, core drilling where suitable, glass panel installation, and self-closing, self-latching gate fitting. For a code-aware installation plan covering permit review through the final walkthrough, visit FenceScape and request a project discussion for the property.
Comments