
Cedar Fence Stain Guide for Ottawa Winters

After 18 months of exposure, finish type, climate, surface orientation and wood texture were the dominant influences on coating performance in a Canadian exterior-finish study. For an Ottawa homeowner choosing cedar fence stain, that's a useful reset: the name on the pail matters less than where the boards get wet, how they dry and what surface you're coating.
Start your assessment near the ground, not at the colour rack. A sunlit board above a damp snowbank can need different preparation from the shaded lower section of that same board, even when both receive the same stain.
Stain Types and Finishes Compared
More visible grain generally means less pigment screening the wood from sunlight. That's the central trade-off between transparent, semi-transparent and solid colour cedar fence stain. Choose the appearance you want, but account for the exposure and maintenance that come with it.
Transparent stain keeps cedar's natural colour and grain fully visible, although a tinted product can warm the appearance. It adds the least pigment, making it a reasonable choice for premium boards in shade or light exposure. It won't disguise grey patches, replacement boards or uneven preparation.
Semi-transparent stain adds a visible tone while allowing the grain to show. A penetrating formulation is a practical middle ground for backyard privacy fences, particularly when you want the character of cedar without a paint-like surface.
Cedar stain finish types compared
Finish | Grain visibility | UV and weather protection | Best for |
|---|---|---|---|
Transparent | Full wood colour and grain | Lowest pigment, least UV screening | Premium boards in shade or light exposure |
Semi-transparent | Grain visible under a tone | Moderate UV screening, penetrates the wood | Backyard privacy fences seeking balance |
Solid colour | Grain largely hidden | Strongest UV screening, longest coating life | Weathered or mixed boards needing a uniform colour |
Choose coverage before choosing colour
Solid colour stain conceals most of the grain pattern while retaining some surface texture. It suits a fence with mismatched boards or an uneven appearance, provided the underlying wood is sound. Coverage can unify colour; it can't repair damaged cedar.
Within a finish family, darker or more heavily tinted colours generally obscure more of the wood's natural appearance. Brush several samples onto actual fence boards, let them dry and inspect them in full sun and shade before committing to a full pail.
For another practical explanation of finish selection, the fence staining advice from CP Painting Company provides a useful comparison alongside your product's technical sheet. If you're still choosing the fence itself, our wood privacy fence materials guide helps separate material decisions from finishing decisions.
Compare usable coverage, not pail size
A Canadian retailer's 2026 listing showed BEHR PREMIUM Transparent Waterproofing Wood Finish in Cedar Naturaltone at CAD $345 for 18.9 L, approximately CAD $18 per litre. Another 2026 listing showed BEHR PREMIUM Solid Colour Waterproofing Stain & Sealer in Cedar at CAD $67.97 for 3.79 L, also approximately CAD $18 per litre.
Those are price snapshots, not project estimates. Compare coverage on your board texture, required coats and total area rather than assuming the smaller pail represents a cheaper finish.
How Ottawa Weather Shapes Your Stain Choice
Ottawa's 1991–2020 climate normals record approximately 883.4 mm of total annual precipitation, including 716.2 mm of rainfall and 167.3 cm of snowfall, according to Environment and Climate Change Canada. The same normals show early-summer rain averaging 102.7 mm in June, 86.4 mm in July and 81.5 mm in August, followed by 77.6 mm of combined precipitation in October.
These aren't measurements from an unusually wet season. The climate-normal system uses stations with at least 15 years of observations within that reference period, providing a regional baseline for planning exterior work.
For a fence, winter isn't a single exposure event. Rain can wet the boards before a freeze, snow can remain against the base, and spring melt can repeatedly soak areas that haven't dried.
Make separate coating and drainage decisions
Choose a stain system intended for exterior wood and the fence's existing surface. A penetrating product needs absorbent wood; a film-forming product needs a sound surface that supports adhesion. Neither choice excuses coating damp boards or leaving incompatible old finish underneath.
Then inspect how the fence sheds water. Look at upward-facing rail surfaces, post caps, joints and exposed end grain, where water can remain after the broad faces appear dry.
Check horizontal details: Repair loose caps and remove debris that holds water against rails.
Inspect joints: Look for tight pockets where leaves, soil or old coating obstruct drainage.
Assess exposed end grain: Make sure cut ends receive the treatment specified by the chosen coating system.
Practical rule: Select the coating for the exposure, and correct the detail that keeps the wood wet.
Plan around drying conditions
A warm afternoon isn't proof that the fence is ready. Shaded boards may still hold moisture from overnight dew or recent rainfall while exposed faces feel dry to the touch.
Read the forecast together with the stain's application requirements. You need suitable wood moisture, surface temperature and enough uninterrupted drying time, not just a convenient weekend.
The practical benchmark is roughly 1.7 metres of annual snow and nearly 0.9 metres of annual precipitation, expressed from the climate normals above. Inspect after winter and before the wetter part of the growing season, so you can identify drainage problems before booking the coating work.
Oil, Water and Hybrid Stains Under Canada's VOC Rules
Stain formula families compared
Formula | How it sits in wood | Odour and cleanup | Watch for |
|---|---|---|---|
Oil-based penetrating | Soaks in and flexes with the wood | Stronger odour, solvent cleanup | Full drying time and the VOC label |
Water-based | Commonly forms a surface film, although penetrating products exist | Generally lower odour, soap-and-water cleanup | Adhesion on damp wood or bleeding extractives |
Hybrid | Penetrating or film-forming behaviour specified by the product | Check the label for odour precautions and cleanup solvent | Drying and recoat rules on the data sheet |
Formula and opacity are separate choices. Semi-transparent describes how much wood you can see, while oil-based or water-based describes the coating's formulation. Don't assume every semi-transparent product behaves like a penetrating oil.
Oil-based penetrating stains can suit wood that moves seasonally, but excess material left on the surface can remain tacky. Water-based products offer convenient cleanup, yet you still need to check their compatibility with cedar and the existing finish. Hybrid is a broad product description, not a reliable drying-time specification.
Compliance isn't a durability rating
Environment and Climate Change Canada's VOC guidance describes rules covering roughly 130 consumer and commercial product categories, with most applicable concentration limits taking effect January 1, 2024, and a federal limit of 250 g/L for clear or semi-transparent exterior wood stain.
That regulatory information concerns VOC limits and compliance, including manufacture and import. It doesn't certify that a stain will adhere to your particular fence or survive a poorly timed application.
A low-VOC label is therefore a useful purchasing filter, not the final verdict. Compare preparation demands, drying requirements, odour, cleanup and the work needed at the next recoat.
Read the technical sheet before paying
Check the actual product documents rather than borrowing instructions from another stain in the same brand.
Confirm the label: Verify exterior wood use, the stated VOC content and compatibility with the existing coating.
Compare drying requirements: Distinguish touch-dry time from rain resistance, recoating and full curing.
Check application limits: Find the permitted wood-moisture and temperature conditions before choosing a workday.
Plan cleanup: Have the specified cleaning materials and a safe disposal method ready before opening the pail.
If the fence can't meet a product's moisture requirement, postpone the work. Switching formula families isn't a dependable workaround for wet wood, and incomplete drying can leave a finish vulnerable to adhesion problems and persistent surface contamination.
How to Prepare and Stain Cedar Step by Step
Cedar is dimensionally stable, but its extractives can migrate under moist conditions and interfere with a finish. The Canadian Wood Council's finishing guidance also reports that boards painted without prior weathering performed substantially longer than boards weathered for 16 weeks, a finding that supports preparing exposed surfaces rather than deliberately leaving them to deteriorate.
Prepare the surface before opening the stain
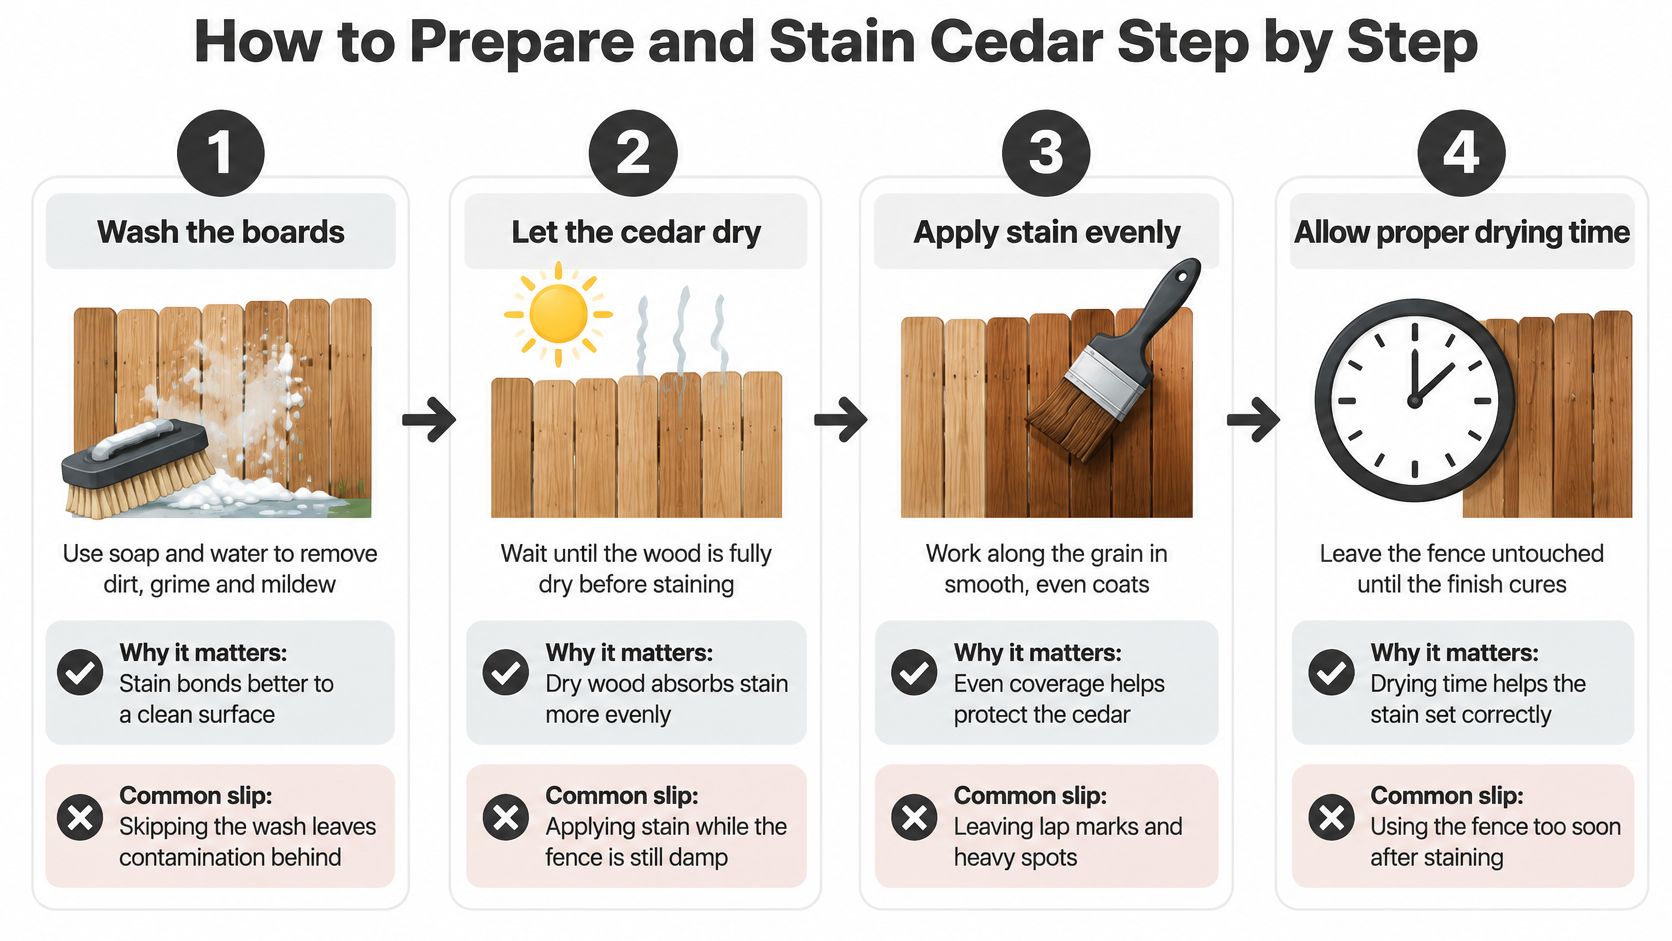
Wash the boards. Use soap, water and a suitable brush to remove dirt, grime and surface contamination, addressing mildew with a cleaner approved for the coating system. Skipping the wash leaves material between the stain and the wood, even if the fence looks reasonably clean.
Treat extractive staining where necessary. If brown staining remains, use a suitable oxalic-acid wood cleaner carefully, following its handling instructions and protecting nearby surfaces and plants. Rinse thoroughly, because cleaner residue can interfere with the next coating.
Let the cedar dry. Check representative boards with a moisture meter and compare the readings with the stain manufacturer's maximum permitted moisture content. Don't judge readiness by the dry-looking upper edge while the lower board remains damp.
Lightly sand exposed or weathered wood. Remove weakened surface fibres and feather the edges of sound remaining finish without polishing the wood smooth. Brush or vacuum away sanding dust, which otherwise becomes another adhesion barrier.
Gentle cleaning is the starting point, not maximum water pressure. Cultivate House Detailing's guidance on how to avoid pressure damage to cedar siding explains a relevant softwood-cleaning risk, while our fence pressure-washing guide addresses the fence application.
The preparation and application sequence is summarised visually below.
Test, apply and inspect
Test a representative board. Use the complete preparation and coating system on an inconspicuous area with comparable exposure, then allow the specified drying period before checking appearance, bleed and adhesion. A colour sample alone won't reveal whether the full system is compatible.
Apply a compatible stain evenly. Protect plants, hardware and adjacent surfaces, then work along the grain and maintain a wet edge, brushing sprayed material into the wood when the product requires it. Follow the technical sheet for temperature, coat count, spreading rate and drying time rather than adding a heavy coat for supposed extra protection.
Inspect the details before packing up. Check end grain, fasteners, joints and shaded areas for missed spots, drips or excess material, and correct them while the product remains workable. Leave the finish undisturbed for the specified drying period and handle used applicators and oily rags according to the product's fire-safety directions.
Application standard: Clean, dry, lightly sanded, tested, then stained.
Why the Bottom Third of the Fence Fails First
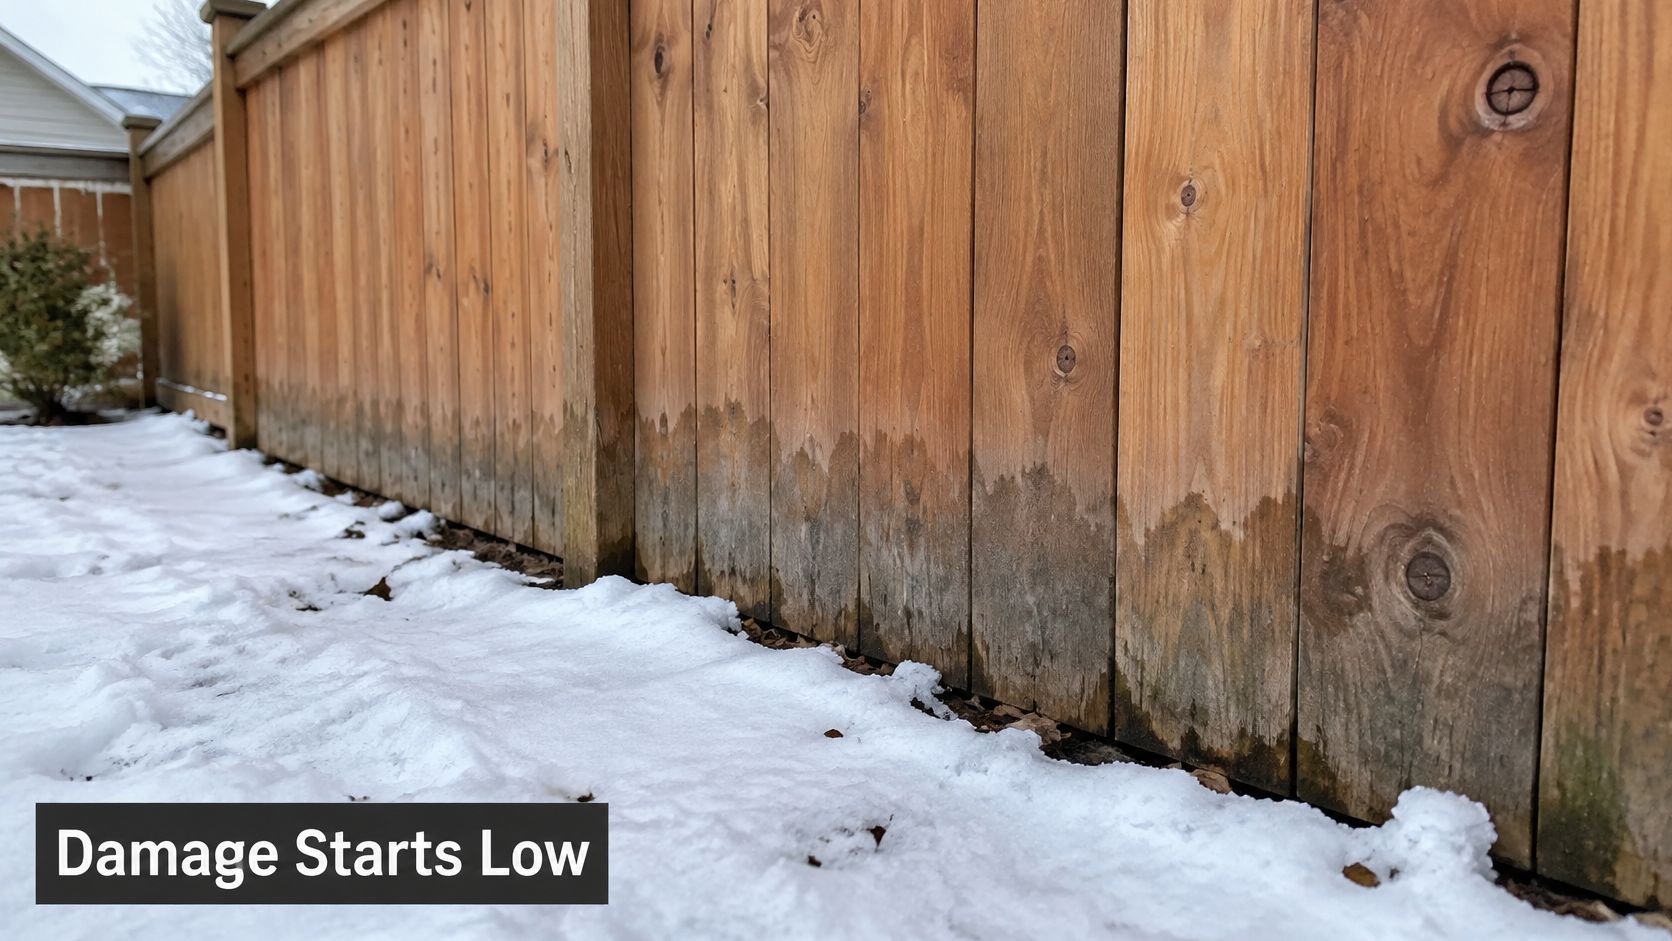
The bottom third deserves attention before the brand or colour, because snowbanks and prolonged wetting concentrate exposure around lower boards and posts. Environment and Climate Change Canada's notable weather events for 2025 include 37 cm of snow in Ottawa, a reminder of how much snow can collect against a fence.
Look for a change in condition near the ground, not just an overall faded appearance.
Let the lower boards determine readiness
Should bottom boards receive a different stain? Usually, use the same compatible finish system, but inspect and dry the lower section first. A penetrating semi-transparent product can suit substantial seasonal movement, yet it won't correct chronic wetting.
How much clearance is enough? Keep fence boards clear of soil, accumulated leaves and splashback, and confirm the intended gap against the builder's specification. For posts designed to extend into the ground, stain on the exposed portion isn't a substitute for appropriate below-grade construction.
When is the wood dry enough? Record moisture readings at the top, centre and bottom of representative boards after rain or snowmelt. Postpone coating while the lower section remains materially wetter or exceeds the product's permitted moisture level, and check shaded north-facing sections more often for mildew.
Use a walk-through to identify the areas that need closer inspection.
Measure after thaw: Compare readings along representative boards.
Inspect snowbank areas: Check for softening, staining and mildew.
Clear the base: Remove trapped snow and leaf litter, then confirm drainage before coating.
Signs It Is Time to Refinish Your Fence
Inspect annually, clean before recoating and renew the finish when its condition calls for it. Colour loss, increased water absorption, checking and localised film failure are more useful signals than a universal calendar promise.
The Canadian Wood Council's exterior-wood finishing guidance explains that coatings improve appearance, slow sunlight-driven weathering and provide some moisture protection, but they don't actively prevent decay. That distinction matters when a homeowner is deciding whether a section needs stain, repair or replacement.
Refinish signs, causes and actions
Sign | Likely cause | Action |
|---|---|---|
Colour loss or chalky surface | Sunlight weathering | Clean, then recoat per the data sheet |
Bare wood soaking up water | Worn film | Clean, check, then recoat |
Checking or cracked boards | Seasonal movement and dry wood | Inspect the section, recoat after repair |
Peeling or lifting film | Poor adhesion or damp prep | Strip loose film, re-prep, recoat |
Mildew in shaded sections | Persistent moisture and shade | Clean, fix drainage, recoat once dry |
Separate cosmetic wear from damaged wood
Fading alone doesn't tell you whether the wood is structurally sound. Probe suspicious soft areas gently, check loose connections and examine cracks around fasteners before deciding that another coat is enough.
Checking also needs judgement. Small surface checks and a split that weakens a board aren't the same repair problem, so don't conceal a questionable section under an opaque finish.
Water absorption needs context too. A splash test can help reveal differences between worn and intact areas, but it isn't a substitute for a moisture reading when deciding whether the boards are dry enough to coat.
Recoat sound wood to manage weathering. Repair unsound wood before choosing a finish.
Work by section rather than by anniversary
Use the product's technical data sheet as the maintenance reference, then adjust your inspection attention to actual exposure. A sunny run beside pavement and a shaded run beside dense planting shouldn't automatically receive identical treatment on the same day.
If several warning signs occur together, address that section first. Clean it, remove failed coating, make necessary repairs and establish whether a compatible maintenance coat can blend acceptably into the adjacent finish.
Don't transfer expectations from a deck to a fence. Low-density western red cedar can wear faster on horizontal walking surfaces, while vertical fence boards avoid foot traffic and are a more suitable application.
Our cedar fence maintenance guide can help organise routine care between refinishing jobs. Keep a simple record of photographs, affected locations and the product used, so the next inspection compares the same areas.
Widen the work when similar deterioration extends across the fence or when a section-only application would leave an unacceptable colour difference. Otherwise, a local problem deserves a local diagnosis before it becomes a whole-fence coating project.
Gather Your Fence Details Before You Book
A useful quote starts with the fence you have, including its damp corners and awkward access. Measure the fence length and height, note whether you want both faces assessed, and identify sections that face north or remain shaded by buildings and planting.
Photograph the whole fence for layout, then take closer images of lower boards, post bases and any soil or snowbank contact. Include peeling areas and replacement boards, rather than sending only the most attractive stretch.
Build a practical quote package
Dimensions and access: Record the fence measurements, gates, tight passages and nearby surfaces that need protection.
Exposure: Mark shaded runs, drainage concerns and places where snow is routinely piled.
Current condition: State whether the boards are bare, grey, stained or painted, and flag loose or soft wood.
Product information: Photograph the existing stain container if available, including wood-substrate wording, VOC content and product name.
Application requirements: Save the technical sheet with drying and recoating rules for any finish you're considering.
If you don't know the existing coating, say so rather than guessing. An unidentified film can change the preparation needed, while a colour name alone tells very little about compatibility.
Choose the quote route that fits your project
We offer a free estimate, and our contact form lets you request a Material Quote or an Installation Quote. A DIY homeowner can ask for materials alone; for installation projects, our own crew handles every installation.
Describe whether you're planning a new fence, replacing deteriorated sections or gathering materials for your own work. Include your preferred appearance, but make the condition photographs the priority.
Send your measurements and bottom-third photos through the contact form this week. That gives us a clearer starting point for a conversation about your fence's actual exposure and the scope you need.
FenceScape offers free estimates and material-only or installation quote options for Ottawa–Gatineau fencing projects. Visit FenceScape and send your fence measurements, lower-board photos and project goals so we can help you plan around the wood's condition, not just a stain colour.
Comments