
Wooden Fence Rails in Ottawa–Gatineau: Sizes and Rules

You're walking the yard in the last week of March, snow pulling back from the fence line, and one rail has lifted off its post by a centimetre. The pickets below it look fine. The posts look fine. So why has the horizontal piece moved?
Wooden fence rails are the horizontal members that run between posts and carry the pickets, boards or panels. They're the part homeowners notice last and blame first, because a rail shows every bit of movement the panel makes. It twists when it takes on water, sags when it's undersized for the span, and lets go at the fasteners once the end grain starts to soften.
The rail is also a real manufactured product, not a spare board. Statistics Canada's historical forestry tables counted 18,797,800 fence rails in 1963 and 18,666,685 in 1964, tracked as a category separate from fence posts (Statistics Canada historical forestry tables). What follows is how rails are sized, how they carry load, what local bylaws and treatment categories demand, and which installation details keep a rail straight through an Ottawa-Gatineau winter.
Standard Rail Sizes and Typical Spans
Start with the number that decides your post spacing. A rail's nominal size sets how far apart posts can sit and how much infill the panel can hold. Three sizes cover most residential work.
Nominal size | Typical use |
|---|---|
2x4 (actual 38 x 89 mm) | Picket and light decorative fences. Spans up to about 2.4 m (8 ft) between posts. |
2x6 (actual 38 x 140 mm) | Board-on-board privacy fences. Spans up to about 2.4 m (8 ft), with two or three rails per panel. |
2x8 (actual 38 x 184 mm) | Pool-adjacent or gate-heavy runs. Spans of 1.8 to 2.4 m, with a designer check at the long end. |
What the Label Says and What the Tape Measure Says
A 2x4 is milled to 38 x 89 mm, a 2x6 to 38 x 140 mm, and a 2x8 to 38 x 184 mm. Nothing is wrong with the board. The nominal figure is the rough size before planing and drying, and the dressed size varies a little between mills and between spruce, pine and cedar stock. Compare rails at the yard with a tape, not with the label, especially if you're matching them to post notches or metal brackets cut for one specific dimension.
Length matters just as much. Most yards stock precut rail lengths that line up with common post spacings, then sell longer stock for anything unusual. Measure the span you have, inside face of post to inside face of post, before ordering.
The Three-Question Test
What's the span? Measure the longest run, not the shortest.
What's the infill? A board-on-board panel with two layers of boards weighs more than a single picket run, and a gate hangs heavier still.
Which row fits both? If the span says 2x6 and the infill says 2x6, you're done. If they disagree, size up or add a post.
A rail specified on span alone, with gate weight ignored, is the one that sags by August.
How Rails Carry Load and Which Profile Suits Your Fence
A gust hits a solid privacy fence, and the force travels through the boards into the rails, then through the posts into the ground. Rails and posts work as one assembly: post spacing sets how far each rail must span, while rail size and placement help resist bending across that span.
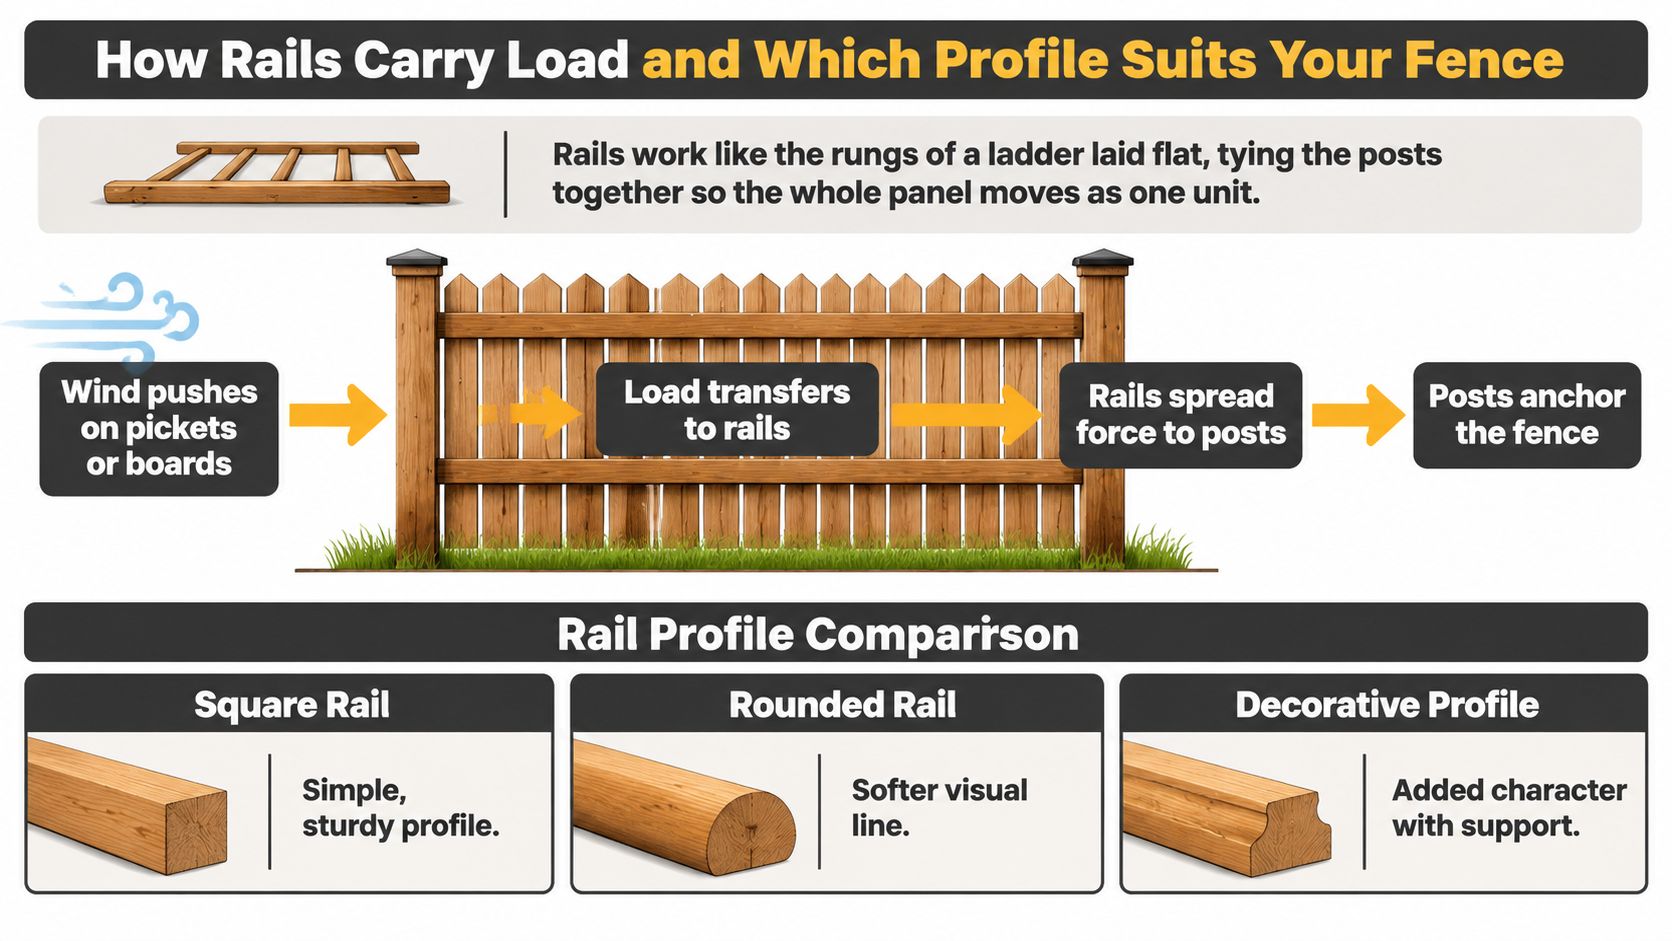
The infill transfers wind pressure to the rails. Rails carry that force to the posts, which anchor the fence in the ground. A tall privacy panel with no middle rail has a longer unsupported area: boards can flex, and the top rail has to carry more load between posts. Adding a rail gives the boards another fixing point and shortens the unsupported section.
The rail profile affects how it handles water and how it feels to the touch. It does not replace choosing a suitable size and span.
Square, Rounded or Sloped Profiles
Square edge is a straightforward choice, often used where the rail sits under a cap or behind boards. Its flat surfaces can hold water at the corners, so keep the rail's orientation and exposure in mind.
Eased or rounded edge softens the corners and is more comfortable to touch. It can suit fences around areas where people may brush against the rails.
Sloped or capped top sheds water more readily than a flat, upward-facing surface. On an exposed top rail, that shape can help limit standing water.
Two Rails or Three
Two rails can suit a low picket or decorative fence. Taller fences and privacy panels often need a third rail to give the infill support at mid-height. The exact arrangement depends on the panel height, infill, rail size and distance between posts.
Keep the bottom rail clear of soil and mulch. A gap of about 100 mm helps prevent the lumber from drawing moisture directly from the ground.
Practical rule: Rails are structural members, not trim. Match their size and spacing to the span and the weight of the infill.
Before fastening the infill, check that each rail sits straight and level between the posts. A rail that bows under pressure may need a shorter span or a larger profile; adding more picket screws will not correct a rail that is undersized for its span.
Local Height and Setback Limits to Check First
A rail layout starts with the fence's permitted height, not its appearance. Municipal rules vary by yard type and lot position, so check the local bylaw before setting rail heights or cutting posts.
Municipality | Front yard maximum | Side or rear yard maximum | Notes |
|---|---|---|---|
Rosemère, QC | 1.2 m | 1.8 m side or back yard | Authorization certificate required; 1.5 m from sidewalk, 3 m from street edge without sidewalk, 4 m from pavement; height from average natural ground |
Dollard-des-Ormeaux, QC | Zoning by-law governs | Zoning by-law governs | Pool and spa enclosures 1.5 to 1.8 m; ordinary fences need no permit except on a main artery or collector street |
The Nation Municipality, ON | 1.2 m | 2.6 m side and rear | Measured from finished ground to top of fence, posts included; taller may need a minor variance |
Rosemère measures fence height from average natural ground. A mound or knoll does not create extra permitted height. Where raised ground cannot be avoided, the maximum drops to 1.25 m (Ville de Rosemère landscaping authorization). Setbacks also depend on the location: 1.5 m from a public sidewalk, 3 m from the street edge where there is no sidewalk, or 4 m from existing or planned pavement.
Dollard-des-Ormeaux requires fences to meet its zoning by-law even when no permit is needed. A permit is required for a fence separating private property from a main artery or collector street (Ville de Dollard-des-Ormeaux fence rules).
The Nation Municipality measures from finished ground to the top of the fence, including posts. Its listed limits are 1.2 m in front yards and 2.6 m in side and rear yards; a taller fence may require a minor variance (The Nation Municipality fence rules). Rules differ across jurisdictions, as a guide to maximum fence height uk illustrates from another country. For a project in Ottawa–Gatineau, use the municipality's own rules rather than applying another region's limits.
A Five-Step Check Before You Order Rails
Identify the municipality. The relevant rules follow the property's location, not just its mailing address.
Identify the yard type. Front, side and rear limits can differ.
Check the lot position and setbacks. Look for rules tied to sidewalks, street edges, pavement or intersections.
Count the full fence height. Post caps, decorative tops and other pieces above the top rail can affect the total.
Confirm the current bylaw with the City of Ottawa, the City of Gatineau or the local planning office. Rules can change, so check before ordering materials.
The Ottawa fence bylaw guide explains the city's limits in more detail. If your planned fence exceeds the local maximum, a minor variance may be required. Check that before setting post and rail heights, since changing them after installation can mean rebuilding part of the fence.
Pool Enclosures Where Privacy Rails Must Give Way
A privacy fence and a pool barrier can look identical from the driveway and do completely different jobs. One blocks a sightline. The other has to stop a child from reaching the water, and a rail layout that improves privacy can fail that second job outright.
In Quebec, a pool enclosure generally has to be at least 1.2 m high, prevent passage of a 10 cm spherical object, and be difficult to climb. Gates need passive devices that close and lock automatically. The rules apply to pools at least 60 cm deep, including temporary, above-ground and semi-inground pools depending on their dimensions and access conditions, and enforcement still catches older installations, including pools installed before November 1, 2010 (Ville de Beaconsfield pool safety rules).
The rail layout is where privacy and compliance collide. Horizontal rails on the outside face make a ladder. Wide picket gaps make a foothold and fail the sphere test. A gap under the fence lets a small body through, and so does an unlatched route across a deck.
Compliance Checklist Before You Order Rails
Turn the rails inward: keep climbable horizontal members on the pool side or eliminate them, and leave the outside face as flush as the design allows.
Set picket spacing to the sphere test: gaps sized so a 10 cm sphere can't pass, which rules out widening spacing for a lighter, more open look.
Close the gap at the bottom: rail height above grade matters as much as overall fence height.
Treat the gate as a hardware item: a self-closing, self-latching device rated for the gate's weight, not a slide bolt added later.
Look at the deck and retaining wall: a raised deck, shed roof or retaining wall beside the fence can become an uncontrolled route over the barrier.
Municipalities can go past the provincial floor, and where a city publishes its own band, that local figure replaces the 1.2 m baseline for your property. Design to the stricter number and confirm the requirement in writing before any rails are cut.
Treating Rails for Ottawa-Gatineau Exposure
Choose preservative treatment by exposure, not by species alone. Two rails can come off the same pine log and need different treatment classes because one sits under a roof overhang and the other rests in mulch at the bottom of a slope.
The Canadian Wood Council identifies CSA O80 as the governing preservation framework, setting acceptable species, preservatives, preservative retention and penetration for each use category (Canadian Wood Council specifiers' guide). Rails that stay above ground but take repeated rain, snow and splash belong to the applicable exterior exposure category. Anything touching soil, including a bottom rail sitting in mulch or a rail end set into a post hole, needs a ground-contact category such as UC4.1. Posts and other components you can't easily replace, exposed to severe weather and high decay risk, may call for UC4.2.
Why the Local Climate Raises the Stakes
Wetting, drying, freeze-thaw cycling and snow accumulation keep rails wet for long stretches, and an unsealed end grain or a flat horizontal surface holds that water against the wood. Fungi and insects move in once moisture and temperature allow it. Pressure treatment works because the preservative is driven into the vulnerable zones instead of painted on the surface.
A surface coat is the bet to avoid here. A film of stain looks like protection and fails at the first check crack.
The Lumber Yard Checklist
Ask for the use category in writing. "Treated" isn't an answer. You want the category, the retention and the penetration on the supplier documentation.
Match category to exposure, not to price. A cheaper above-ground rail isn't a saving when it ends up in soil contact.
Confirm the species. Cedar and pressure-treated pine behave differently, and the treatment schedule changes with species.
Buy the fasteners with the lumber. Preservative-treated wood corrodes ordinary hardware, so use hot-dip galvanized or stainless-steel fasteners.
Plan for field treatment. Approved end-cut preservative on every cut and drilled hole, applied before the joint goes together.
Layout and Fastening Steps for Straight, Level Rails
Layout is where rails stay straight or don't. Fastening is quick. Measuring decides the result. The sequence below runs off a string line and a level, and each step carries the reason it matters and the slip that usually follows.
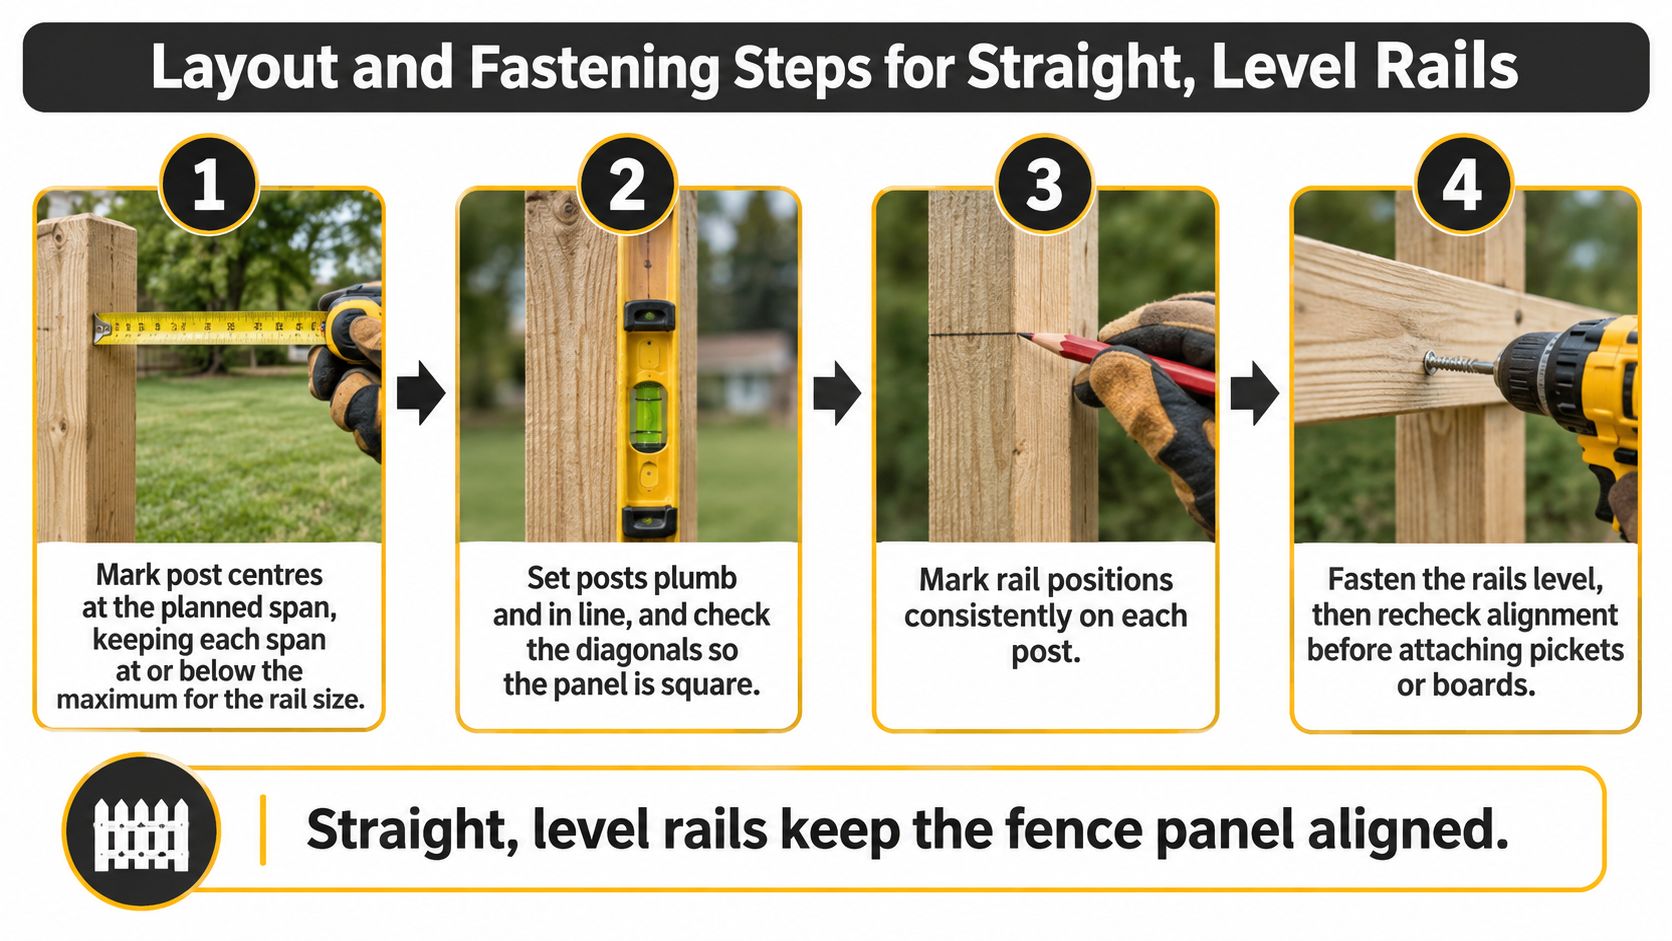
Mark post centres at the planned span. Keep each span at or below the maximum for the rail size you chose. A span that grows by 100 mm at the far end of a run overloads every rail behind it. Run a string line and measure from it rather than using the old fence as a template.
Set posts plumb and in line, then check the diagonals. Compare corner-to-corner measurements across each panel, because equal diagonals mean square. Skipping this is the usual reason a finished fence looks racked, and you can't correct racking once rails are fixed.
Mark rail height on every post from one level line. A laser level, or a chalk line snapped off the highest post, keeps the top rail continuous. Marking each post by eye produces a top rail that steps along the run.
Face each rail the right way. Wide face toward the pickets or boards, sloped or eased face outward. The wide face gives fasteners more wood to bite, and the shaped face sends water off instead of holding it.
Fix each joint with two fasteners, staggered. Two screws stop the rail rotating around a single fixing. Offset them vertically so both holes miss the same grain line, and keep them back from the rail end by at least twice the board thickness to avoid a split.
Leave about 6 mm between rail and infill. Wood moves with the seasons. A joint clamped tight in July opens a gap in January, and a picket fixed hard against a rail splits along that line. The gap doubles as a drainage channel.
Field-treat every cut and drilled hole before the rail goes up. Brushing preservative onto an assembled joint misses the fresh cut. Do it on the bench, let it dry, then fasten.
What a finished run looks like: rails level across the full span, no visible bow when you press the middle, joints tight, and a consistent gap to the boards. Our wood fence installation guide walks through the same sequence on site.
Rail Service Life, Upkeep and Cost Drivers
Two rails can look identical on the rack and differ by decades in service. What separates them isn't colour or grain. It's treatment and position.
Canadian guidance from the Canadian Wood Council puts untreated wood in ground contact at about 3 to 12 years, while factory pressure-treated red pine, jack pine and Douglas-fir examples reach approximately 25 to 40 years under comparable outdoor service conditions (Canadian Wood Council treated wood durability FAQ). Same broad material class, same climate, different treatment and different exposure.
Rail condition | Reference service life | Action to take |
|---|---|---|
Untreated wood in ground contact | About 3 to 12 years | Do not bury untreated rail ends |
Factory pressure-treated red pine, jack pine or Douglas-fir in ground contact | About 25 to 40 years | Keep rails clear of soil and vegetation |
Above-ground rails with good drainage | At least the treated ground-contact range | Inspect joints after snowmelt and reseal cut ends |
The Weakest Point on Any Rail
Decay starts in the side-grain wood just below the ground line, where oxygen, persistent moisture and wet-dry cycles meet. Brush-on protection doesn't reach it. That's why factory treatment is the recommendation for anything in soil contact, and why burying a rail end to hide it is the most expensive shortcut on the job. Keep rails clear of soil and vegetation, and orient exposed faces so they shed water rather than pooling it.
These figures are references, not guarantees. Poor specification, weak quality control or an installation error can shorten service life substantially.
A Routine That Fits the Season
After snowmelt, inspect every joint. Water sits in joints all winter and freeze-thaw works fasteners loose. This is the highest-value check of the year.
Reseal any cut end or fresh split. Carry a small brush and end-cut preservative on the walk-round.
Clear drainage gaps and pull soil back off the rails. A rail buried in wet mulch behaves like a rail in ground contact.
Tighten or replace loose fasteners. A backed-out screw leaves a hole that holds water.
Three signals mean a rail is failing rather than just weathered: splitting along the grain, dark staining around a fastener, and a rail end that feels soft when you push a screwdriver into it. Our cedar fence maintenance guide covers washing, resealing and hardware checks on the same seasonal schedule.
What Actually Drives the Cost
Not the price per board. Treatment class and lumber grade set the material cost, then the number of spans, gate hardware, site access and any pool-compliance components add to the labour side. A quote that lists one lump sum hides all of it. Ask for the drivers itemised so two quotes can be compared on the same basis.
Confirm Your Rail Specs Before You Order
You don't need to memorise anything above. Write five facts on one page and take them to the counter or into the quote conversation.
Span and rail size. The measured post-to-post distance and the nominal size you chose for it.
Exposure and treatment category. Above ground, ground contact, or a component you can't easily replace.
Municipality and yard type. The exact city, the front, side or rear classification, and any setback that applies.
Pool barrier status. Whether any part of the fence has to satisfy a pool enclosure rule, which changes heights, gaps and gate hardware.
Fastener specification. Hot-dip galvanized or stainless, at the length that matches the rail thickness.
Errors in those five areas cost the most to fix, because every one of them is settled before wood is cut. A rail too light for its span sags within a season. A board in the wrong exposure class rots from the inside. A fence that breaks a height or pool rule can be ordered removed.
We offer a free estimate, and the contact form lets you request either a Material Quote or an Installation Quote, so you can price the same rail spec both ways. Call (613) 617-4414 to talk through the details before committing to materials.
A rail that twists, sags or rots early is almost always a specification problem rather than bad luck, and those decisions are made before anyone digs a hole. FenceScape designs and installs wood fencing across Ottawa-Gatineau around the measured span, the correct treatment class and the bylaw that applies to your property, from pool enclosures to long privacy runs. Send us the five facts above or book a free estimate, and we'll confirm the rail specification with you before a single board is ordered.
Comments