
How to Install Chain Link Fence on Uneven Ground

You're standing at the bottom of an Ottawa backyard, looking up at a fence line that changes elevation halfway across the lot. The ground is lumpy, the neighbour's fence is already in place, and every post hole seems likely to land in a different kind of soil. If you install chain link as though the yard were flat, the result can be a wavy top rail, uneven gaps under the fabric, leaning posts, and a gate that drags after the first freeze-thaw cycle.
The reliable way to install chain link fence on uneven ground is to treat the slope as part of the structure, not as a problem to hide. Map the grade, choose between a stepped and racked layout, establish plumb posts, protect the footing from frost movement, and respect the concrete cure period before tensioning the fabric.
Planning Your Chain Link Fence on a Sloped Lot
Start with the ground, not the fence materials. Walk the proposed line with a 100-foot tape and a line level, and mark every high point, low point, dip, bump, and abrupt grade change. A change of more than 6 inches over a 10-foot run is a useful practical warning that the line needs closer planning, although the final method depends on the overall slope and how sharply the grade changes.
Measure the total rise and run between the ends of each section. A run with a rise-to-run ratio under 1:8 can usually be racked, while steeper ground generally works better with stepped sections. Don't rely on your eye. A fence can look straight from the house and still wander enough to create inconsistent post spacing or a troublesome gate opening.
Before digging, call Ontario One Call or your local utility locator. Confirm property pins or obtain a survey so the fence stays on your property, then check how the lot drains during heavy rain. A fence placed across a drainage path can hold water against a foundation or redirect runoff into a neighbour's lawn. If the line needs substantial soil removal or a retaining solution, review this practical resource on drainage and excavation for walls before setting the fence axis.
Build the materials list around the layout
Order materials only after gate locations and slope transitions are marked. Your list will normally include:
Terminal posts: End, corner, and gate posts carry the main fabric tension.
Line posts: Choose posts for the selected fence height and terrain.
Frame hardware: Include top rail, loop caps, rail ends, brace bands, tension bands, and post caps.
Fence fabric: Include tension wire and enough mesh for slope cuts.
Concrete and drainage material: Keep the footing mix and granular drainage base available before excavation starts.
Plan for 10 percent extra fabric and one extra line post per corner to cover mis-cuts and layout adjustments. Gate openings must be decided before concrete goes in. Moving a gate after the posts set usually means breaking out concrete, resetting the opening, and rebuilding the surrounding fabric.
Choosing Stepped or Racked Installation
Stepped and racked installations solve the same problem in different ways. Stepped fencing keeps each fabric section level, then changes elevation at the posts. The top edge forms a stair-step profile, and the bottom edge creates triangular openings where the grade drops away.
That method works on any slope and is usually the more forgiving choice for a DIY build. Each bay stays square, cuts are easier to control, and sharp grade changes don't force the mesh into an awkward angle. The trade-off is appearance and bottom containment. You may need a bottom rail, gravel, or a strip of sod to close the triangular gaps, especially if the fence contains a dog.
Racked fencing tilts each section so the top and bottom rails follow the grade. The fabric remains aligned with the slope and often looks cleaner across a long, even rise or fall. It isn't suitable for every grade. A racked section generally works only below roughly 30 degrees, and it may require swedged or special-angled top rail fittings. The diamonds can distort if you force a standard panel beyond what the mesh can accommodate.
Factor | Stepped | Racked |
|---|---|---|
Appearance | Visible stair-step changes | Continuous line that follows the grade |
Slope suitability | Works on any slope when properly designed | Best on gentle, consistent slopes |
DIY difficulty | Simpler bays and more predictable cuts | More demanding alignment and fittings |
Bottom gap | Triangular gaps may appear at steps | Bottom edge follows the ground more closely |
Pet containment | Often needs a bottom rail or additional fill | Usually provides cleaner ground contact |
Best use | Sharp transitions, uneven grades, and straightforward builds | Long, smooth slopes where a continuous profile matters |
The Canadian General Standards Board guidance says the top of a chain link fence should follow the natural ground profile and calls for a straining post at changes in grade greater than 30 degrees. That supports a practical decision: use racking where the grade is gentle and consistent, and use steps with additional structural control where the slope changes sharply. The standard also applies to commercial and industrial chain link fencing in earth, rock, or rock with overburden, making it relevant to mixed Ottawa and Gatineau terrain. Read the CGSB chain link fence guidance.
Marking the Fence Line and Post Layout
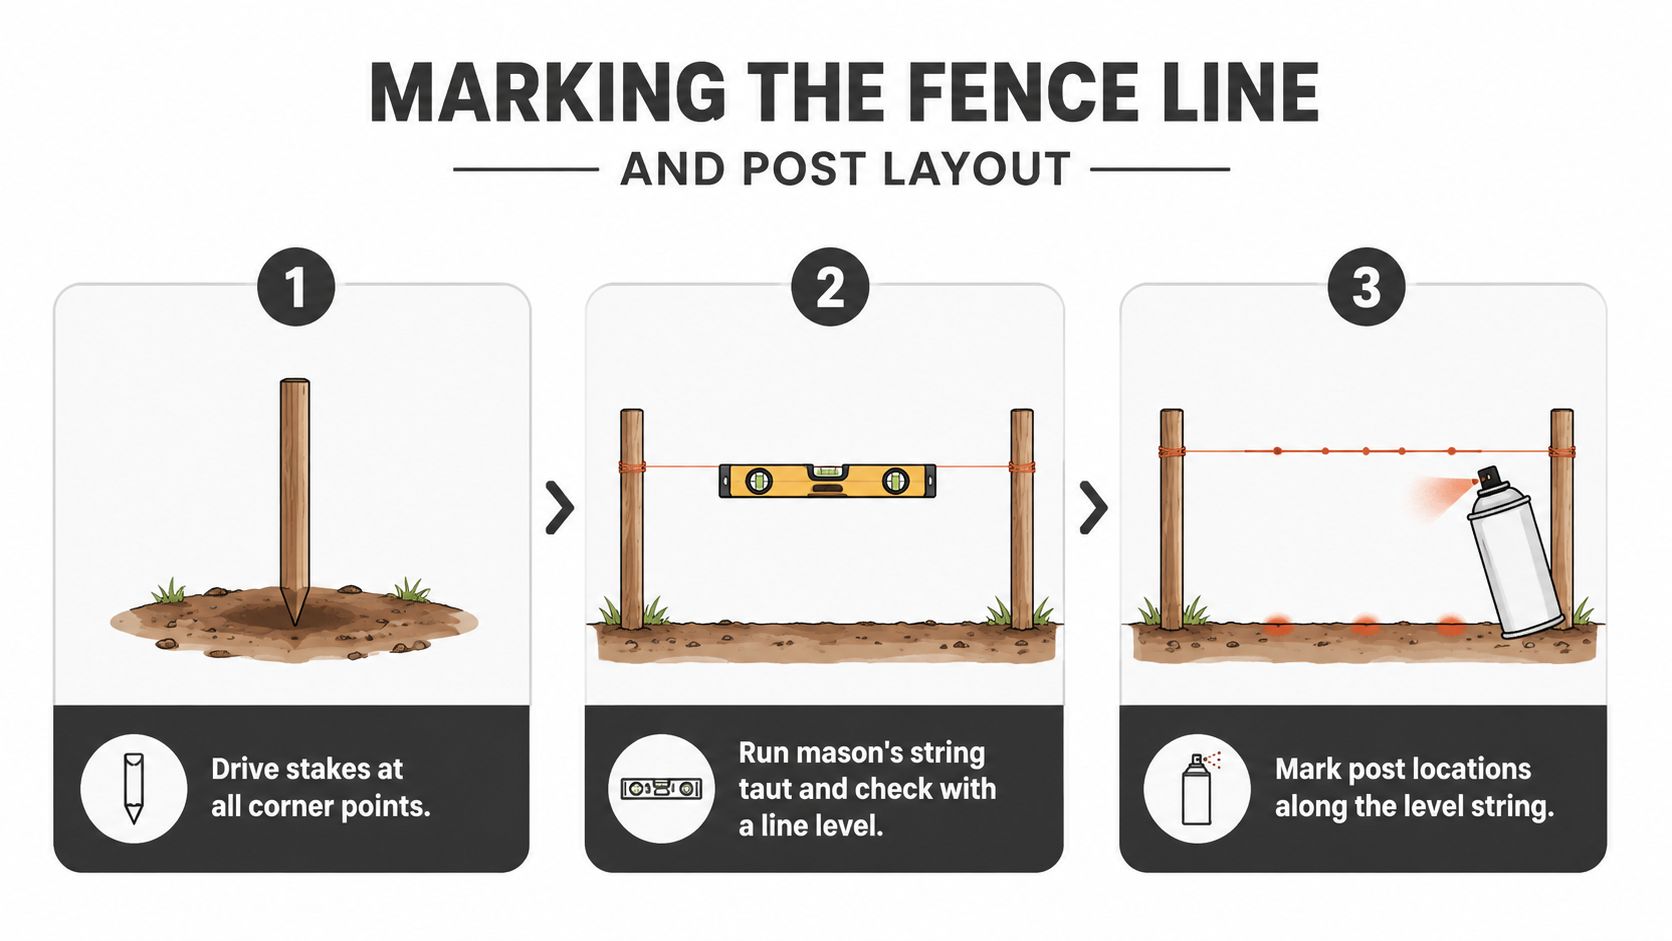
A clean layout starts with stakes at every corner of the proposed fence. Drive them firmly, then run mason's string taut between the points to establish the fence axis. Check the string with a line level, not just by sight. A sagging reference line can pull post centres toward a low spot and make the finished fence look uneven even when every post is technically plumb.
Use batter boards to preserve the line
At each end of a run, make a batter board from two stakes and a horizontal cross-piece. Move the string from the corner stake to the batter board, keeping the same axis. You can then slide the string aside to mark post centres without losing the reference line when excavation begins.
Mark the terminal locations first. That includes end posts, corner posts, and both sides of each gate. Place line posts at no more than 10 feet on centre, then tighten sections to 8 feet where a sharp grade break puts extra strain on the frame. The CGSB guidance sets line-post spacing at no more than 3.1 metres, or 10 feet, centre-to-centre, measured parallel to the natural slope. Ontario's roadway specification uses equal horizontal spacing with a maximum of 3,000 mm, so keeping the layout at or below 3.0 metres is a sensible regional benchmark. See this practical guide to chain link fence line post spacing before finalising the marks.
Walk the string line and flag every elevation transition. Those flags identify where a stepped bay should begin or where a racked section needs to change direction. Spray-paint each post centre, photograph the layout, and check the diagonals at corners before digging. A few minutes spent confirming the line is square is cheaper than correcting a misplaced gate post after the concrete has cured.
Setting Posts Below the Frost Line
Ottawa and Gatineau yards don't forgive shallow footings. Region-specific guidance warns that frost lines can reach 48 to 60 inches, and recommends post holes approaching 5 feet with a bell-shaped base, drainage, and granular backfill where frost-susceptible soil is present. Review Ottawa-region frost-heave guidance before choosing a standard DIY hole depth.
Another Ottawa-region installation guide gives a minimum post depth of 42 inches, or 3.5 feet, below the local frost line and recommends tightening slope spacing from the usual 5 to 6 metres to 4 metres for added strength. It also recommends batter boards and string lines, which should already be in place before the auger or post-hole digger starts. Use this guide to plan a fence on uneven ground.
Dig and set in a controlled sequence
Use a manual post-hole digger where access is tight, or a powered auger where the soil permits. Keep the bottom of each hole slightly bell-shaped when conditions allow, and provide a granular drainage layer rather than leaving the post base in a wet pocket. On uneven ground, holes may have different visible depths from the uphill and downhill sides, but the posts still need a consistent structural reference.
Set terminal posts first, including ends, corners, and both sides of every gate. Use concrete appropriate for the load, brace each post with 2x4 kickers, and check plumb on two adjacent faces with a 4-foot level. A post can look vertical from one direction while leaning across the fence axis, so the second face matters. Place caps on the posts to keep water out of the tubing.
Set line posts to the planned profile while keeping each post vertical. The Ontario specification requires posts to be installed plumb, and it also says the ground undulations along the fence line should be corrected to create a smooth, uniform gradient. Don't bury a crooked post to make the rail appear to follow the hill. Correct the line, set the post plumb, and let the frame carry the intended profile.
Practical rule: Don't load green concrete with fabric tension. A terminal post that leans during curing rarely returns to position.
Ontario's provincial specification requires the concrete footings to cure for a minimum of 5 days before the fabric is installed. That waiting period is the part many DIY schedules skip, particularly when a weekend project is planned from excavation through mesh tensioning. Follow this guide to installing a fence post for the post-setting mechanics, then plan the next phase only after the full cure period.
The sequence is simple, but the timing matters. Dig and drain the holes, set and brace the terminal posts, establish the line posts, install caps, and leave the concrete undisturbed until the 5-day window has passed.
Hanging and Tensioning the Fabric on a Slope
Before the mesh goes up, slide the tension bands and brace bands onto each terminal post. Install the top rail through the loop caps, connect it to the terminal posts, and check that the rail follows the planned stepped or racked profile. Ontario's specification says the top rail or top wire should carry the fabric's diamond pattern perpendicular to the slope. If the diamonds twist along the run, the frame or the cut is wrong.
Unroll the fabric on the ground outside the fence line, then stand it against the completed frame. Starting at a terminal post gives you a fixed edge for the tension bar. A Canadian installation guide recommends starting with terminal posts, pulling the fabric tight, and using bias cuts where the ground rises or falls. It also advises keeping post holes at the same depth regardless of slope, with post heights measured from a right angle to the ground rather than from the sloping post itself. See the hill-installation mechanics for chain link fabric.
Match the cut to the installation method
For a stepped layout, cut the fabric cleanly at each step so the bottom edge follows the ground contour. Don't leave a large triangle and hope gravel will hide it. If a step creates a gap, add a bottom rail or a properly cut section of mesh that blocks the opening without pulling the main fabric out of alignment.
For a racked layout, use a bias cut at each post so the diamond pattern angles with the grade rather than kinking. Keep the diamonds perpendicular to the top rail. A mesh panel that looks tight at the first post can still be twisted at the next one, so walk the full run before final fastening.
Weave a tension bar through the end row of diamonds at the terminal post. Hook a come-along to the opposite tension bar and pull the mesh taut in thirds, working from bottom to top. Remove kinks by twisting the wire into alignment rather than cutting strands. The Ontario specification calls for the fabric to wait until the concrete has cured for 5 days, so this work should happen only after the post footings are ready.
Finish the lower edge last
Attach the fabric to the top rail and line posts with aluminium tie wires at 24-inch intervals, then install the bottom tension wire last. Secure that wire with hog rings every 12 inches. The fabric should remain firm and spring back slightly when pressed, rather than feeling drum-tight and pulling the terminal posts inward.
A properly tensioned chain link panel has a consistent diamond pattern from end to end. If the top rail bends toward the pull, stop and correct the tension before adding more ties. The problem won't improve after the gate is installed.
Gates, Grading, Permits, and DIY Pitfalls
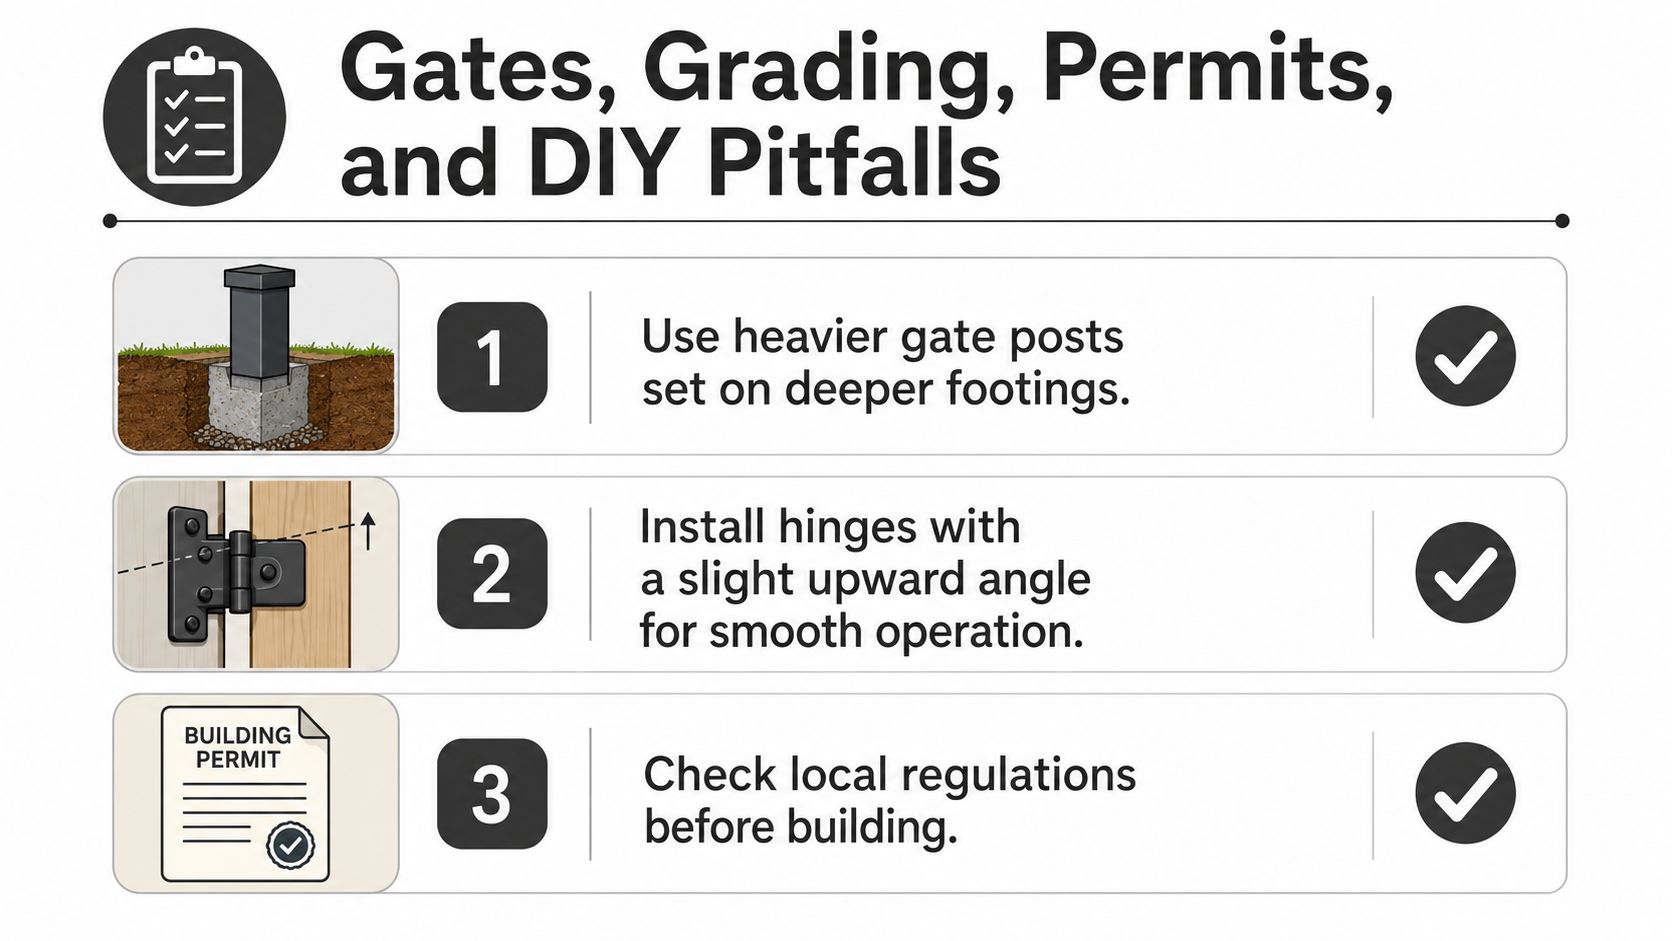
A gate isn't a decorative opening in the fence. It is a moving load attached to the part of the structure that must remain stable through frost movement, snow, and daily use. Set gate posts one full trade size larger than line posts, use deeper concrete footings, and hang the gate only after the surrounding fence has been aligned.
Adjustable hinges should have a slight upward bias so a frost-heaved post has some operating tolerance before the gate drags. Set the latch high enough to clear settled snow and any grade that may rise at the opening. Check the complete swing before final tightening, because a gate that clears an uphill side can still scrape on the return swing.
Keep water moving
Grade soil away from posts and avoid creating a low trench that collects runoff along the fence. Where fabric meets soil, a 2-inch gravel collar can slow rot and help keep the bottom edge defined. Don't use grading to bury a large fabric gap. Correct the fence profile first, then use modest soil or gravel work to finish the ground line.
Ontario's specification requires the fence line's undulations to be corrected for a smooth, uniform gradient. That requirement is practical, not cosmetic. A bumpy line makes the fabric harder to tension and gives water more places to collect around the footing.
Check local approval before excavation
Call for utility locates before digging, and confirm whether your municipality requires a fence permit. Ottawa guidance commonly distinguishes exempt side-yard and rear-yard fence heights at 1.2 metres, or 4 feet, and 1.8 metres, or 6 feet, respectively, but the applicable rule depends on the location and project. Review the Ottawa fence bylaw guidance and arrange any required inspection before the final hole is backfilled.
The most expensive DIY shortcuts are predictable:
Skipping approval: A finished fence may need alteration if it violates the applicable bylaw.
Undersizing gate posts: The gate then transfers movement into the line and terminal posts.
Tensioning too soon: Fabric tension can move terminal posts before the concrete has cured.
Ignoring drainage: Water at the footing invites frost movement and premature deterioration.
Get those decisions right and the rest of the installation becomes much more controlled.
Recap and Pre-Build Checklist
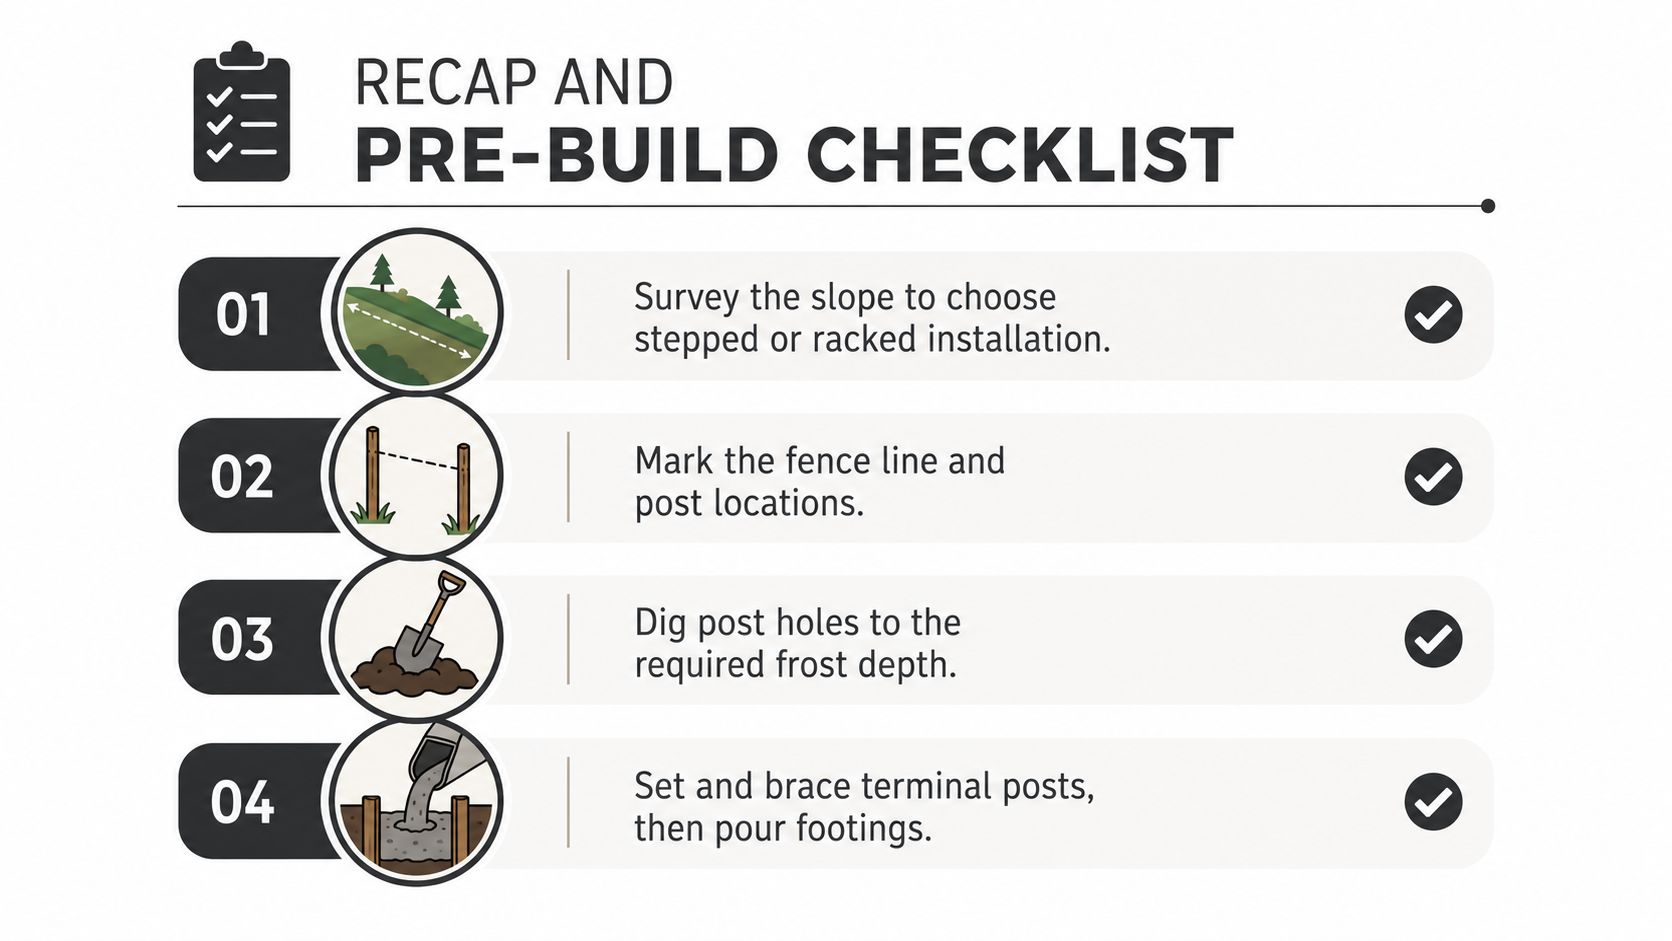
A successful sloped-yard installation follows a strict order. Survey the slope, choose stepped or racked construction, mark terminal and line posts, dig below the local frost risk, set and brace the terminal posts, pour the footings, and wait the full concrete cure period. Then install the top rail, hang the fabric with the diamonds perpendicular to the slope, tension the upper and lower edges, fit the gate, and finish the grading.
Four decisions control most of the project:
Slope behaviour: A long, even grade may suit racking, while sharp transitions favour stepping.
Terminal post locations: Ends, corners, and both sides of every gate need structural posts.
Gate clearance: Confirm swing direction, snow clearance, latch position, and nearby grade before digging.
Municipal requirements: Check property boundaries, utility locates, permits, and inspection needs before materials are committed.
The Canadian General Standards Board guidance limits line-post spacing to 3.1 metres, or 10 feet, and requires a straining post where the grade change exceeds 30 degrees. Ontario's provincial specification uses a maximum equal horizontal spacing of 3,000 mm and requires at least 5 days of footing cure before fabric installation. Those requirements give the project a dependable framework, while Ottawa-region frost guidance determines how aggressively you need to address depth, drainage, and heave risk.
Print this before you dig
Property line: Confirm survey pins or the legal fence location.
Utilities: Complete Ontario One Call or the applicable local locate.
Slope profile: Record rises, falls, dips, bumps, and transition points.
Method: Choose stepped or racked sections before ordering fabric.
Gate plan: Mark gate openings, swing direction, and clearance.
Materials: Check terminal posts, line posts, rail, fittings, fabric, wire, concrete, caps, and spare material.
Tools: Prepare the tape, string, line level, batter boards, post-hole tools, levels, braces, come-along, tension bars, pliers, and cutting tools.
Footings: Confirm the planned depth, drainage base, bracing, and concrete quantity.
Cure schedule: Reserve the complete 5-day period before fabric, rail loading, or tensioning.
Final walkthrough: Check every post for plumb, verify the fabric tension, confirm gate operation, and make sure water sheds away from the fence.
If your Ottawa or Gatineau lot has a sharp grade, difficult soil, or a gate that must work reliably through winter, visit FenceScape to discuss the layout, materials, frost-aware post installation, and full chain link construction. Their team can help with planning, installation, and the final walkthrough so the fence follows the ground without sacrificing strength or drainage.
Comments