
Fence Post How Deep: A Practical Guide for Your Fence
- Eric Lafleche
- Jan 1
- 13 min read

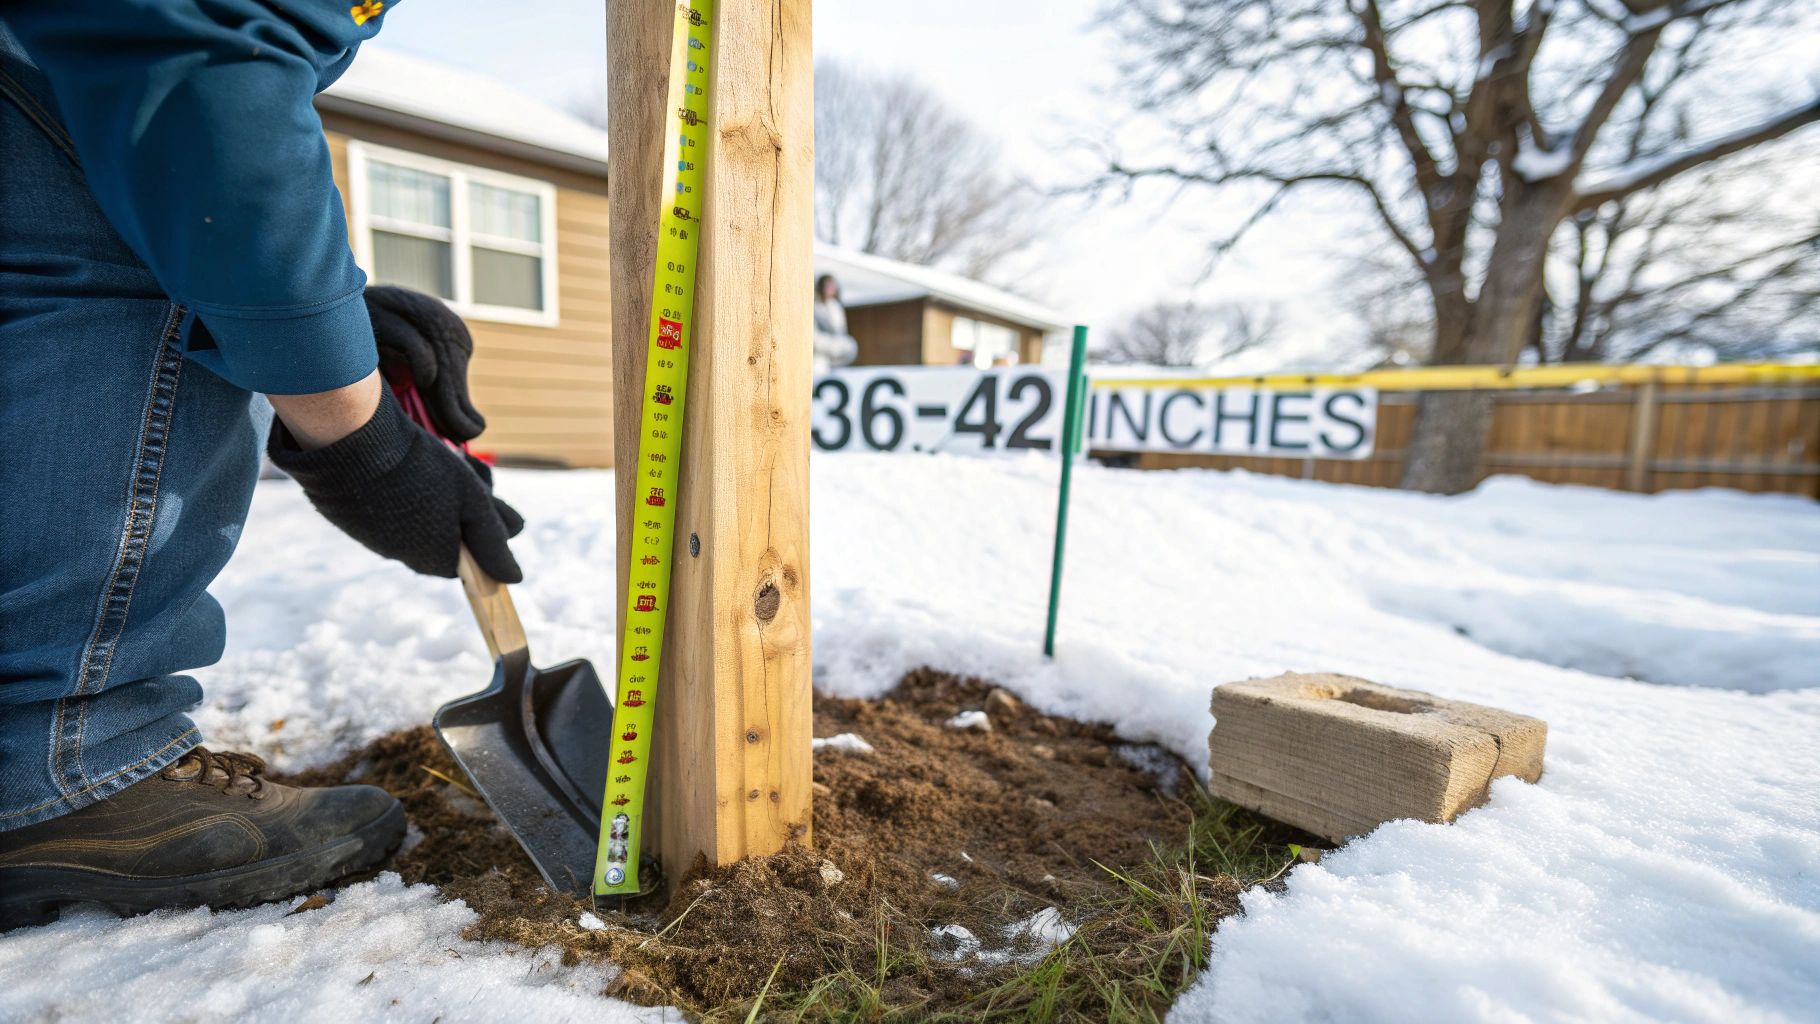
If you want a fence that stands straight and true for years in the Ottawa–Gatineau area, getting the post depth right is everything. We're not just talking about stability; we're talking about fighting back against our notorious winters. The magic number? Your posts need to go at least 36 to 42 inches deep. This isn't just a suggestion—it's your fence's primary defence against the powerful frost heave that can literally shove posts out of the ground.
Your Foundation: The Right Depth for Fence Posts in Ottawa
When you start researching how deep to dig, you'll run into two main rules of thumb. Both are important to understand, but in our climate, one of them is the absolute law of the land.
The One-Third Rule: A Starting Point
The first piece of advice you’ll almost always hear is the "one-third rule." It's simple: one-third of your post's total length should be buried in the ground. So, for a standard 6-foot fence, you’d grab an 8-foot post and sink it a little over 2.5 feet (or 32 inches).
This rule is a decent starting point for calculating post stability against wind and weight. But for those of us in Eastern Ontario, it's only half the equation and is often overruled by the next guideline.
The Frost Line Rule: The Ottawa Essential
This is the rule that truly matters here. The frost line rule demands that the bottom of your post sits below the maximum depth that the ground freezes in winter. If you don't do this, you're practically inviting frost heave to wreck your fence.
In the Ottawa-Gatineau region, the ground can freeze solid to an average depth of 30 to 36 inches. To be safe and ensure long-term stability, your action plan should be to dig to a minimum depth of 42 inches. This gets the base of your post well below that turbulent freeze-thaw zone. For more local expertise on this, the folks at The Post Hole Company have some great insights.
Key Takeaway: For any fence in the National Capital Region, your post depth must satisfy both the one-third rule and the frost line rule. Because our frost line is so deep, it almost always means you'll be digging down to a minimum of 36 to 42 inches, regardless of fence height.
Let's break that down with a real-world example. Imagine you're installing a short, 4-foot decorative fence. The one-third rule would only ask for about 2 feet of depth. That's not nearly enough. You still need to dig down to at least 36 inches to beat the frost line.
On the flip side, if you're building a tall, 8-foot privacy fence, the one-third rule would suggest a depth of around 4 feet. In this case, that calculation works perfectly because it automatically satisfies the frost line requirement. Your final depth is always the deeper of the two results.
Digging in Ottawa: Understanding Our Unique Soil and Frost
Anyone can dig a hole. The real challenge, especially here in the National Capital Region, is digging the right hole. It’s not just about hitting a certain depth; it’s about knowing the ground you’re working with and respecting the incredible power of our winters. The enemy we’re fighting is a relentless force called frost heave.
Frost heave is what happens when moisture in the soil freezes, expands, and pushes upwards. If the bottom of your fence post is caught in that freeze zone, the ice will literally grab hold and jack the post right out of the ground. It’s a common sight after a tough Ottawa winter—a once-straight fence line turned into a wavy, unstable mess.
Getting to Know Our Local Ground
The soil across Ottawa–Gatineau can change dramatically from one neighbourhood to the next, and your digging strategy has to change with it. We primarily deal with two types of ground, and each requires a specific game plan.
Leda Clay (or Champlain Sea Clay): If you're in areas like Orléans, Kanata, or across Gatineau, you're likely working with this. It’s a dense clay that holds a ton of moisture, making it a major risk for frost heave as it expands and contracts.
Sandy Loam and Rock: You'll find this more often closer to the Ottawa River or up in the Gatineau Hills. It drains much better but comes with its own headaches, from loose sand to rocks that just won't budge.
Getting this part right is absolutely critical for a fence that lasts. To get a better handle on how our winters impact foundations, you can check out our guide to frost depth in Ontario. It really drives home why a deeper, properly set footing is so important here.
Smart Strategies for Ottawa's Soil
Once you know what you’re digging into, you can build a foundation that’s built to last. Here’s how the pros handle it.
When you're dealing with heavy Leda clay, your best weapon is a bell-shaped footing. After digging your hole, use your post hole digger to carve out the base, making it wider than the top. When you pour the concrete, it creates an anchor. The frozen ground can try to push the post up, but that flared base will resist the force, locking it firmly in place. It's a game-changer for clay.
For sandy or loamy soil, the focus shifts to drainage. Before you do anything else, throw a few inches of coarse gravel into the bottom of the hole. This simple step creates a drainage pad, letting water flow away from the base of your post. It's your best defence against both frost heave and wood rot.
A Word of Warning: The single biggest mistake we see is people simply dropping a post in a hole and backfilling it with the dirt they just dug out. I guarantee that if you do this, your posts will be leaning within a year or two. You need a proper concrete or compacted gravel footing. No exceptions.
Getting Your Hands Dirty: How to Dig and Set Your Posts
Alright, you know how deep to go and why it matters. Now for the fun part: actually digging the holes and setting the posts. How you tackle this step directly impacts your weekend plans and, more importantly, how long your fence will stand tall. The tools you use and the backfill you choose are where the real work begins.
If you're only setting a couple of posts, a classic manual post-hole digger (the "clamshell" kind) will give you a decent workout and get the job done. But for an entire fence line? Do yourself a favour and rent a gas-powered auger. Our crews rely on them for a reason. They bore clean, straight holes with a fraction of the effort, something that’s incredibly tough to do by hand, especially if you hit our region's rocky soil.
The Great Debate: Concrete vs. Gravel
What you fill the hole with is just as critical as the hole itself. This isn't a one-size-fits-all situation; the best choice really depends on what that specific post is expected to do.
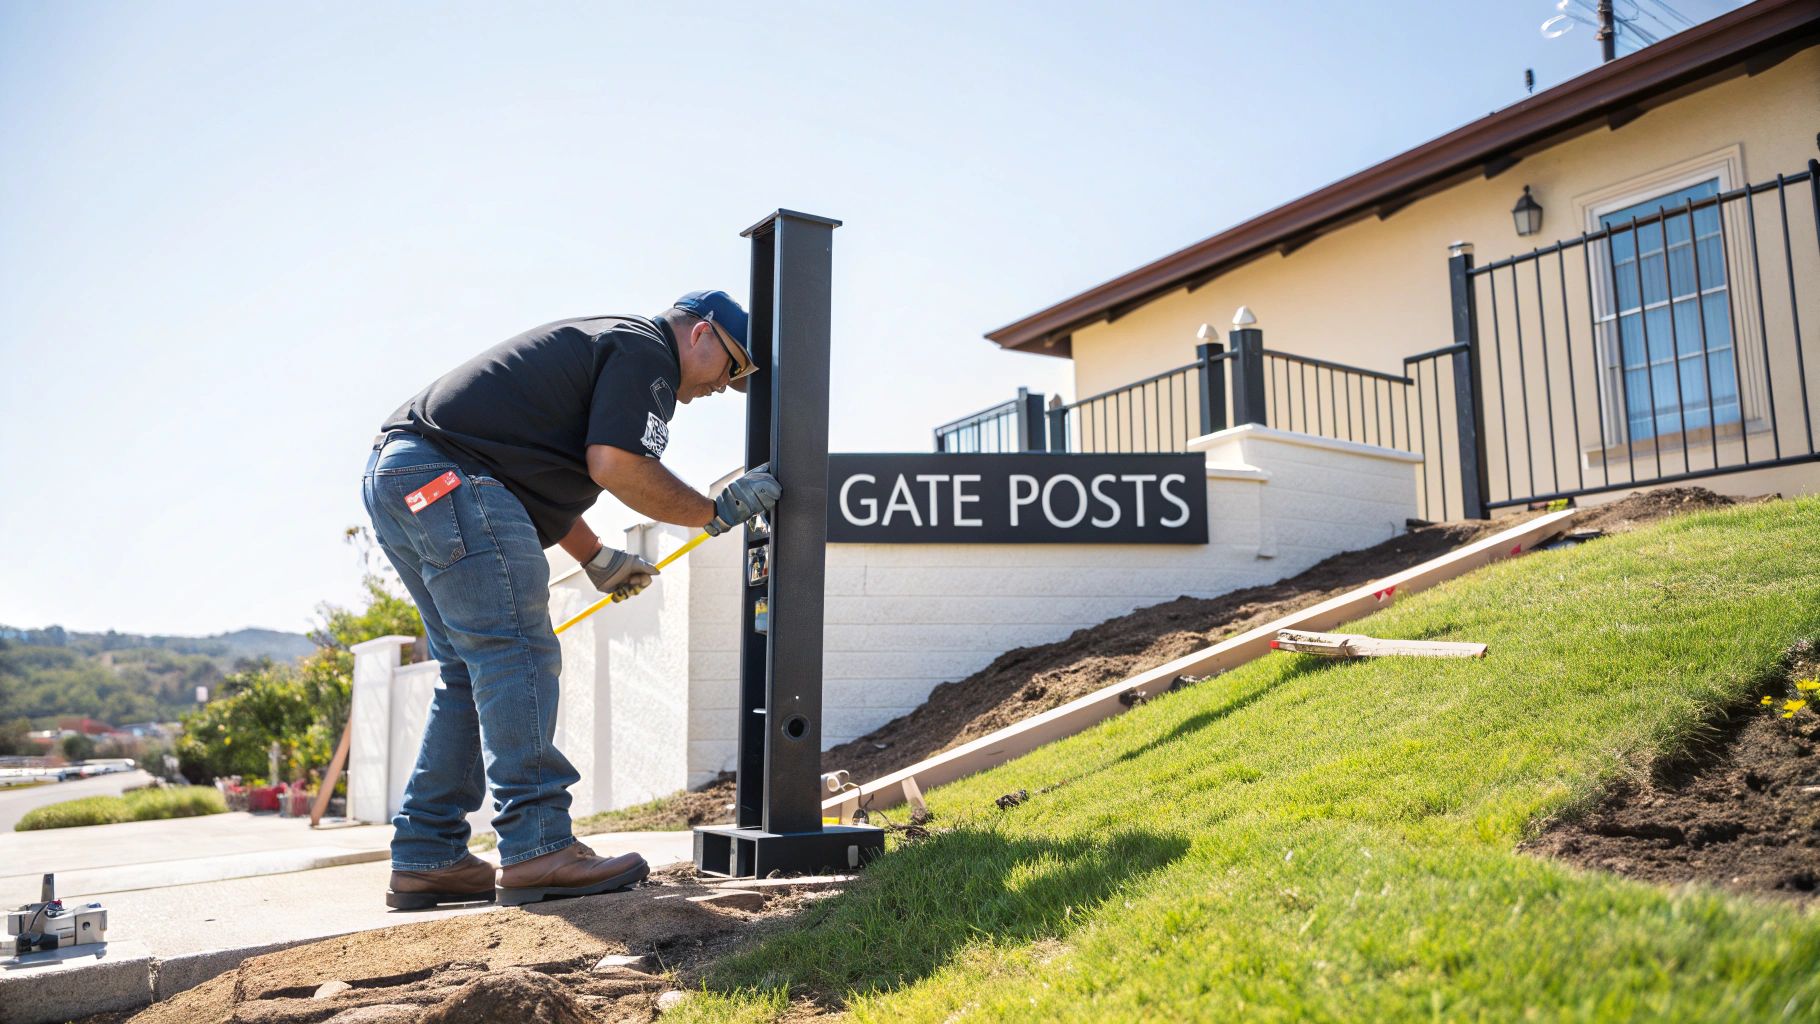
Concrete for Critical Strength: For any post that's going to be under serious stress, concrete is the only way to go. This means gate posts, which have to support the constant swing and weight of a gate, and corner posts, which are the structural anchors holding tension from two fence lines.
Gravel for Smart Drainage: For your standard line posts in soil that drains well, a mix of compacted gravel can work beautifully. The secret here is compaction. You can't just dump it in. Add a few inches, tamp it down hard, add a few more, and repeat. This creates a solid, dense base that still lets water drain away from the wood.
This whole process is about fighting back against frost heave. As the ground freezes, any moisture in the soil expands with incredible force, pushing everything—including your fence posts—upward.
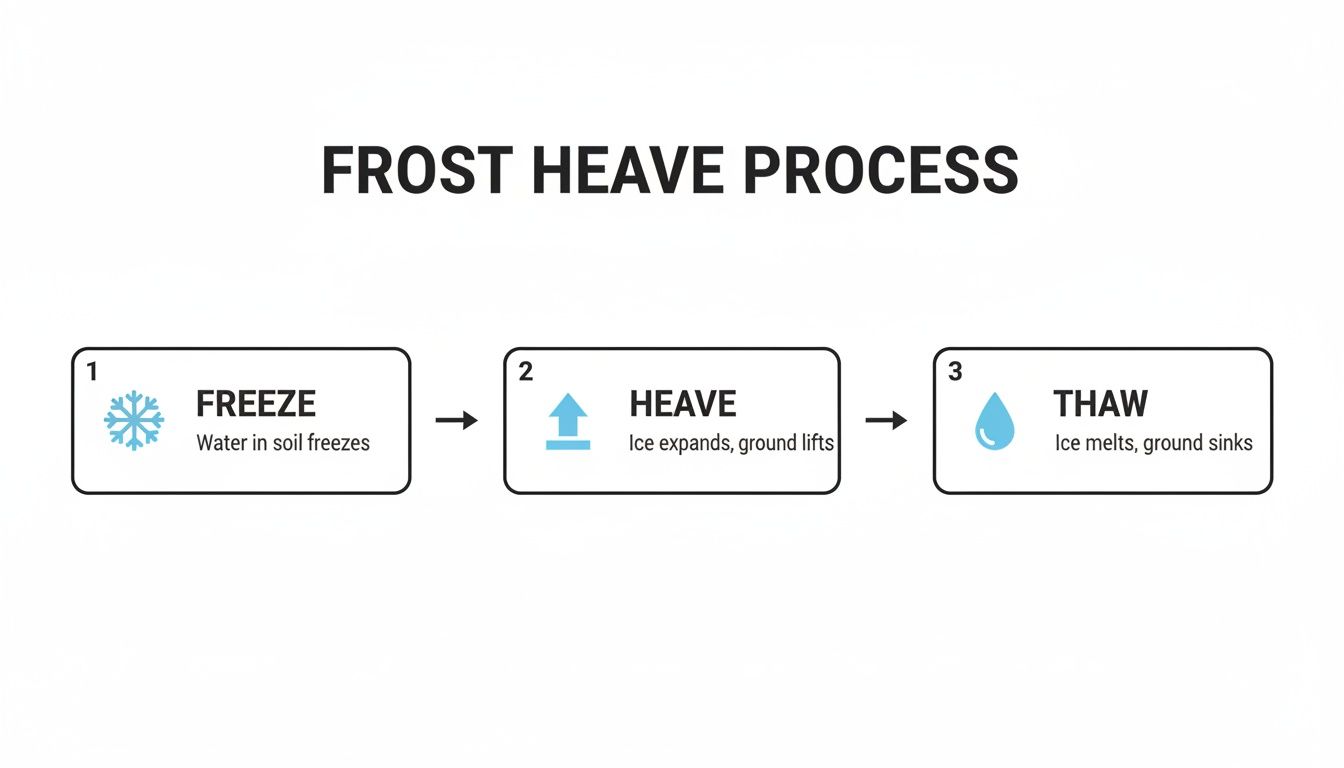
As you can see, that upward pressure can easily lift a post that isn't anchored deep enough, which is why we're so focused on getting below that frost line.
Pro Tips for a Rock-Solid Set
Setting a post perfectly straight and solid comes down to a few key details.
First, once the hole is dug, toss a few inches of gravel in the bottom. Do this even if you're using concrete. It creates a French drain right under the post, preventing water from pooling and rotting the end grain.
When it's time to mix your concrete, aim for a consistency like thick oatmeal, not soup. A wet, soupy mix is weak and will take forever to cure properly. For a complete play-by-play, we've put together a guide on how to properly set a fence post in concrete that walks you through every step.
Crucial Insight: Always brace your post before you pour the concrete. Grab some scrap 2x4s and screw them to the post to create temporary supports on at least two sides. Use a level to get the post perfectly plumb, then lock it in place. This prevents it from leaning while the concrete sets—the number one cause of a crooked fence.
Interestingly, some local pros are even challenging long-held beliefs about post depth. While we've covered the common methods, it's worth knowing there are advanced options like hydrovac industry techniques for digging fence post holes, which offer incredible precision, especially around buried utilities. Experts from Fence All, another Ottawa-based company, have found that a 36-inch depth is sufficient for 95% of their jobs, which saves a ton of time and labour compared to digging to a full 48 inches every time.
Handling Special Cases: Gates, Slopes, and Tall Fences
The standard rules of thumb for setting fence posts are a fantastic starting point, but they won’t cover every situation you’ll run into. Real-world properties are rarely perfect, flat rectangles. Tricky spots like gates, sloped ground, and extra-tall fences need a bit more muscle and planning to keep your entire fence line straight and strong for years to come.
A standard six-foot fence is one thing, but an eight-foot privacy fence is a completely different beast. All that extra height acts like a sail, catching way more wind. To fight back against that force, you have to go deeper and wider with your footings. For these taller fences, sinking the post a full four feet (48 inches) is the absolute minimum, and using a wider-diameter footing is key to giving it the stability it needs to resist leaning.
Reinforcing Your Hardest-Working Posts
Gate posts are the undisputed workhorses of any fence. They take a beating, supporting the constant stress of opening, closing, and the cantilevered weight of the gate itself. Trust me, a sagging gate is one of the most common—and annoying—fence problems out there, and it almost always comes down to a post that wasn't set right from the start.
To avoid that headache, your gate posts need special treatment.
Go Deeper: Always set gate posts at least 6 to 12 inches deeper than the rest of your line posts. No exceptions.
More Concrete: This is not the place to skimp. Fill the entire hole with high-strength concrete to create a solid, rigid anchor that won't budge.
Bigger Posts: For heavier wood or composite gates, consider upgrading from a standard 4x4 to a sturdier 6x6 post for extra structural integrity.
Pro Tip: Give the concrete for your gate posts a solid 48-72 hours to cure before you even think about hanging the gate. Rushing this step is a guaranteed way to end up with a crooked gate a few months down the line.
Tackling Slopes and Rural Fencing
Installing a fence on a slope—a common challenge in the Gatineau Hills—is all about careful measurement. You must measure your post depth from the downhill side of the hole. This ensures the bottom of every post is consistently below the frost line, even as the ground level changes. When you're digging on uneven terrain, it's also a good idea to know how to prevent soil erosion on slopes, which can compromise your footings over time.
Out on rural properties, the demands can be even tougher. For example, official Ontario government specs for deer fencing require 48-inch post depths for corner braces, especially in the sandy or wet soil common along the Gatineau River. These guidelines are there for a reason—they account for the unique pressures of agricultural use and wildlife. Likewise, pool fences are governed by strict municipal codes that dictate everything from post depth to spacing to ensure safety, and you have to follow those to the letter.
Before you even think about picking up a shovel, there are a few things you absolutely must get right. Getting the post depth correct is huge, but a successful fence project is just as much about the prep work. Over the years, we've seen countless projects get tripped up by simple, avoidable mistakes and overlooked local rules. Trust me, sorting these details out first is just as crucial as setting the posts perfectly.
Your first two calls—before any dirt flies—are to Ontario One Call or Info-Excavation in Quebec. This isn’t just a friendly tip; it’s the law. These services are free, and they'll come out to locate and mark all the underground utility lines. Hitting a gas line or an electrical cable is a nightmare scenario that’s incredibly dangerous and comes with staggering fines and repair bills.
Dodging the Classic DIY Blunders
Once the ground is marked and you’re cleared to dig, it's time to sidestep the common pitfalls that we see plague DIY fence builds all the time. A little bit of foresight here will save you a world of headaches later on.
The most common blunders are often the simplest:
Ignoring the Frost Line: A lot of people just stick to the generic "one-third in the ground" rule. That's a huge mistake in the Ottawa–Gatineau area. Our deep frost line means you need to go deeper. If you don't, your posts will heave and your fence will look like a crooked mess after the first winter. Always aim for 36 to 42 inches deep, no exceptions.
"Eyeballing" the Fence Line: A perfectly straight fence doesn't happen by accident. It starts with a tightly pulled string line. Don’t guess. Set your corner and end posts first, then run a mason’s line taut between them. This line is your guide for setting every single post in between, ensuring a professional, laser-straight result.
Making a Concrete "Bowl": When you pour concrete, avoid mounding it up around the base of the post above ground level. This common mistake creates a little bowl that collects water right up against the wood, which is the fastest way to cause rot. Instead, you want to shape the top of the concrete so it slopes away from the post, letting water drain off naturally.
FenceScape Pro Tip: Don't underestimate the power of a quick chat with your neighbour. It's honestly one of the most important steps. A simple conversation clarifies property lines, prevents future disputes, and sometimes you even find out they're willing to split the cost. It’s a win-win.
Even seasoned pros make mistakes, but they're almost always preventable. We've compiled a quick reference table of the most frequent issues we see and how a professional approach solves them.
Common Fence Installation Mistakes and How to Prevent Them
Common Mistake | Why It's a Problem | FenceScape's Pro Solution |
|---|---|---|
Guessing Property Lines | This can lead to serious neighbour disputes and even legal action, forcing you to move the fence. | Always work from a recent property survey. If one isn't available, we work with you and your neighbour to establish an agreed-upon line before any work begins. |
Forgetting Utility Locates | Hitting a utility line is extremely dangerous, can cause service outages, and results in massive fines. | We always contact Ontario One Call or Info-Excavation and wait for the all-clear before breaking ground. It's a non-negotiable part of our process. |
Using Shallow Post Holes | In our climate, posts set above the frost line will heave and shift, ruining the fence's alignment and stability. | Our standard is to dig below the regional frost line (36-42 inches), ensuring your fence posts are anchored securely and remain stable for years. |
Poor Drainage in the Hole | Water pooling at the base of a wooden post is the number one cause of premature rot and post failure. | We add a 4-6 inch layer of gravel at the bottom of every hole. This creates a drainage bed that wicks moisture away from the post, dramatically extending its lifespan. |
Taking the time to get these foundational steps right separates a fence that lasts a few years from one that stands strong for decades.
Your Pre-Dig Checklist
Run through this quick checklist before you start. It will help you dodge the most common and costly mistakes we see out in the field.
Confirm Property Lines. Do you have a recent survey? Use it. If not, make sure you know exactly where your property ends.
Call for Locates. Have you contacted Ontario One Call or Info-Excavation? Double-check that they’ve completed their markings before you dig.
Check Local Bylaws. Have you looked up the fence height restrictions for your specific area in Ottawa or Gatineau? These rules can change from one neighbourhood to the next.
Talk to Your Neighbours. A quick heads-up goes a long way. It builds goodwill and prevents surprises.
Plan for Water Drainage. Is gravel on your materials list? Remember to add a few inches to the bottom of every single hole. This is a must-do to prevent rot.
When It's Time to Call in the Pros
Alright, you've got the theory down—from digging depths to the classic mistakes homeowners make. Now for the million-dollar question: is this a weekend warrior project, or is it time to bring in a professional fence company? There's a certain pride in DIY, no doubt about it. But it's crucial to be realistic about the time, physical toll, and potential pitfalls versus the guaranteed quality of a professional installation.
Let's start with the hard part: the digging. Imagine trying to dig a dozen or more holes, each 42 inches deep, through the stubborn clay and rocky soil we have here in Ottawa. It’s back-breaking work that can easily swallow an entire weekend, if not more. A professional crew shows up with hydraulic augers and specialized gear that turns a multi-day ordeal into a few hours of precise, efficient work.
The Real Value of Experience and the Right Tools
Hiring a pro isn't just about saving yourself the manual labour; you're buying years of hard-won experience. A seasoned installer can read the soil at a glance, knows how to handle surprise boulders or buried utility lines, and ensures every single post is perfectly plumb. That’s the secret behind those flawlessly straight fence lines you see in professional jobs.
They also know the nuances that make a huge difference in the long run. Things like mixing concrete to the perfect consistency for our climate, bracing gate posts so they don’t sag after a few years, or navigating a sloped yard without creating awkward gaps. These aren't just minor details—they’re what separate a fence that stands strong for decades from one that’s leaning after just a couple of harsh Ottawa winters.
Key Takeaway: Think of hiring a professional as an investment in certainty. You’re not just paying for labour. You’re paying for deep knowledge of local codes, guaranteed results, and the peace of mind that you won’t be dealing with costly repairs down the road.
Making the Right Choice for Your Project
Choosing to hire an expert is a straightforward process. A good contractor will walk you through a clear, no-pressure estimate, breaking down every cost so you know exactly where your money is going. This lets you properly weigh the investment against the price of tool rentals, materials, and, of course, the value of your own time and effort.
If you want to know more about vetting a contractor, take a look at our homeowner's action plan for hiring Ottawa fence builders.
In the end, a professionally built fence does more than just add privacy—it enhances your home's curb appeal and increases its value. You get a finished product you can trust, often backed by a warranty that protects your investment for years.
Curious about what a professional installation could look like for your home? The FenceScape team is ready to help. Get in touch with us for a free, no-obligation estimate, and let’s talk about building a fence you’ll be proud of.
Comments