
PVC Post Wrap: The Ultimate Guide for 2026

You're standing beside a fence in late spring, looking at posts that survived another Ottawa winter but no longer look like they belong to the rest of the yard. The cedar has silvered, the lower edges are dark from moisture, and salt streaks or black mildew have appeared while the rails and pickets still look serviceable. Replacing the entire fence feels excessive, but painting or patching the posts feels like a temporary answer.
A PVC post wrap can be the surgical fix. It's a fitted exterior sleeve installed around a sound wood or steel post, so you can improve the most visible worn parts without rebuilding the whole fence. The important word is sound. A wrap hides appearance problems, but it doesn't repair rot, movement, or a post that has stopped carrying its load properly.
This guide focuses on the decisions that determine whether the result lasts through Ottawa–Gatineau freeze-thaw cycles: material and format, exact sizing, compatibility with the existing fence, installation method, and long-term care. A few upgraded homes on a typical neighbourhood street can change how everyone sees the project. One homeowner wraps tired porch and fence posts, a nearby neighbour notices the cleaner lines, and soon the conversation shifts from “that looks decorative” to “could this solve my weathered posts too?”
Why Homeowners Are Wrapping Their Fence Posts
The usual starting point isn't a new-build design meeting. It's a homeowner noticing that the posts look worse than everything attached to them.
Wood posts take the most attention because they stand vertically and sit close to the ground, where water, snow, soil splash, and de-icing residue collect. By late spring, a post can show checking, discolouration, soft fibres near the base, or a dark line where moisture has repeatedly travelled. Meanwhile, the fence rails and pickets may still be straight and useful. That mismatch makes a full replacement hard to justify.
Wrapping isolates the visual problem. A white or coloured PVC sleeve creates a clean outer surface around the existing post, while the original fence structure remains in place. The approach works particularly well when the post has cosmetic wear but remains plumb, stable, and structurally capable.
The repair must start with the post underneath
A PVC post wrap isn't a bandage for structural failure. Inspect the post before ordering anything. Push gently against it, check whether the base moves independently of the fence, look for soft or crumbling wood, and examine connections at the rails or beam. A sleeve should cover a healthy support, not conceal one that needs replacement.
The same principle applies to steel posts. A wrap can improve the finished appearance, but corrosion, loose foundations, or a leaning post still need attention first. The outer sleeve has no authority to correct a problem inside it.
Practical rule: If the post moves when the fence or supported structure moves, investigate the structure before choosing a covering.
Five decisions shape the result
Homeowners usually make the right material choice and still end up with a poor result because they skip the other decisions:
Material and format: Cellular PVC, aluminium, and wood coverings behave differently. KD, split-L, and U-construction formats also require different access.
Sizing: The inside dimensions must suit the existing post. A nominal 4x4 or 6x6 label isn't enough by itself.
Fence compatibility: Rails, brackets, gates, lighting, and adjacent panels can prevent a sleeve from sliding into place.
Installation approach: A small retrofit may suit a careful DIYer. Long fence runs, out-of-plumb posts, and complex joints call for more controlled cutting and adhesive work.
Long-term care: PVC reduces maintenance, but it still needs cleaning, seam inspection, and room to move.
A homeowner who treats the wrap as a simple decorative tube often misses the most important detail in this climate: thermal movement. The sleeve expands and contracts, and the installer must allow for that movement rather than trapping it between rigid trim pieces.
The next step is understanding what the product is. Once you see it as a fitted exterior envelope around a structural core, the choices become much easier to evaluate.
What PVC Post Wrap Actually Is
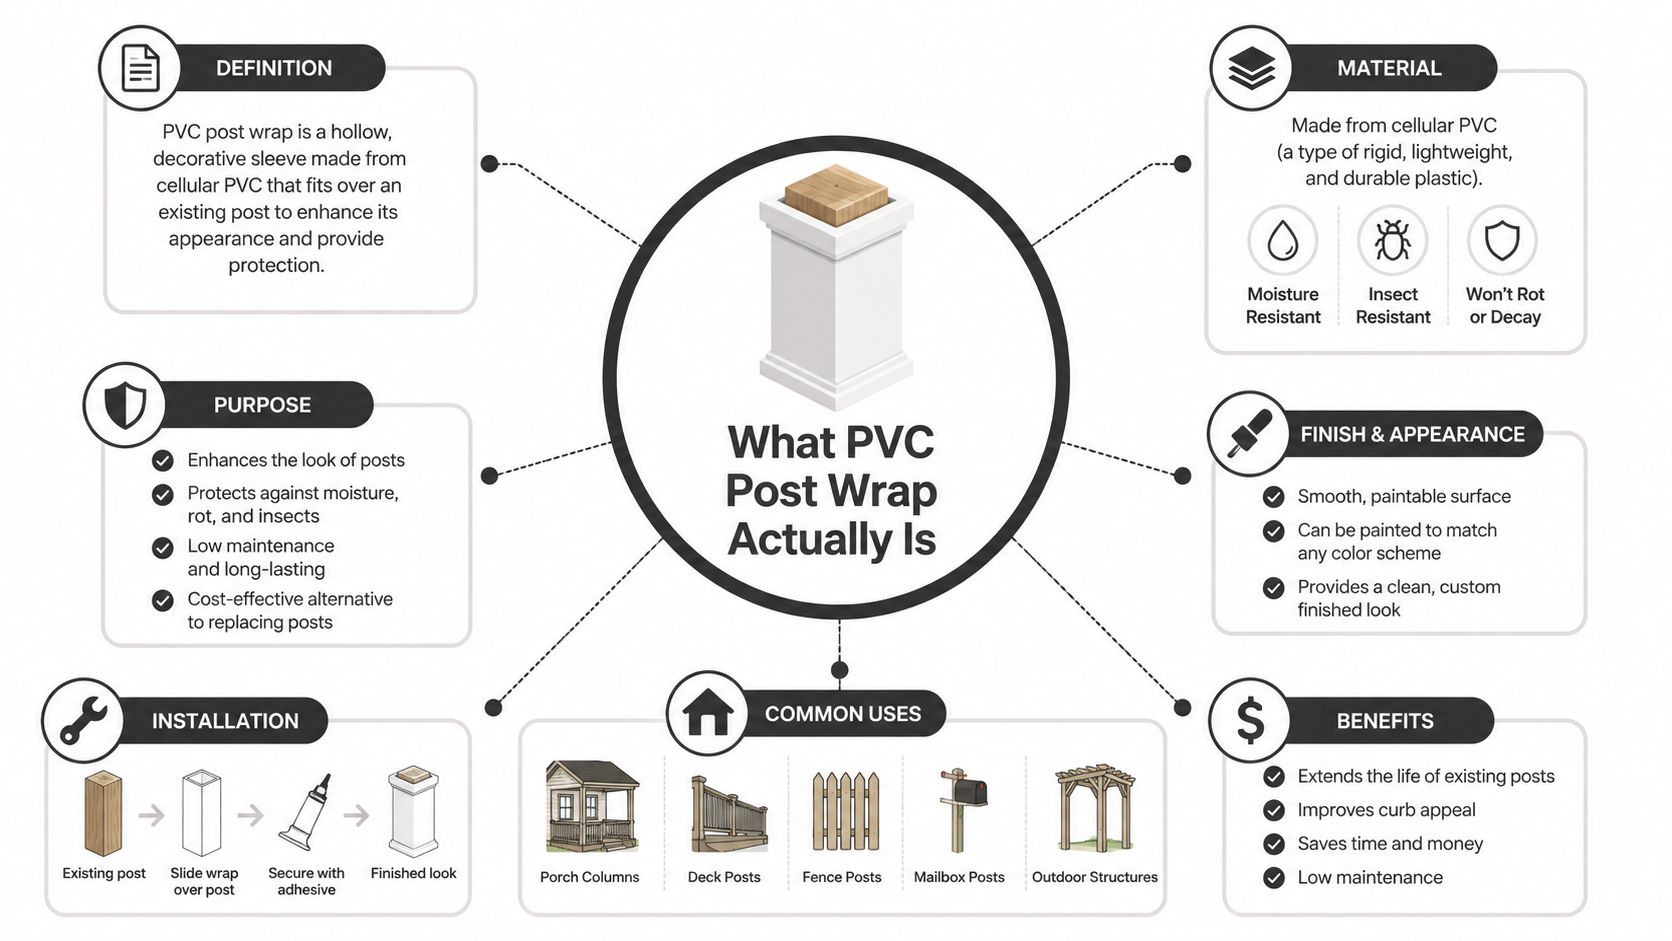
Cellular PVC post wraps use a foamed core and denser outer skin. That construction keeps the product light enough to handle while providing a consistent manufactured finish. In a cold-climate retrofit, however, the material is only part of the decision. The wrap must also fit the existing post and leave room for the sleeve to expand and contract through Ottawa–Gatineau freeze-thaw cycles.
A PVC post wrap works like a raincoat for an existing post. The covering sheds weather and improves the appearance, while the wood or steel post inside supplies the load-bearing capacity. PVC is non-structural cladding, so it cannot straighten a leaning post, reinforce a weak footing, or correct movement in the fence.
The visible surface is not paint over ordinary timber. Small scratches and cuts expose the cellular PVC construction rather than revealing a completely different wood substrate, as a painted timber sleeve might.
What it isn't
Several products appear beside PVC post wraps in catalogues and search results, but their material and installation requirements differ.
An aluminium post sleeve is a metal covering. It can provide a crisp finish and moves differently with temperature. Cuts, corners, and fasteners require metal-specific handling. A cedar sleeve is wood, so it retains wood's grain, moisture response, maintenance needs, and seasonal movement.
Raw PVC trimboards can be fabricated into a sleeve on site. That approach can suit an unusual post dimension, but it is not automatically equivalent to a manufactured wrap with matching corners, joints, caps, and bases. A decorative post cap finishes only the top. It does not cover the sides or replace a sleeve.
A sleeve-over-sleeve retrofit also needs careful checking. The second covering reduces the space available for movement and may conceal moisture or alignment problems. Measure the actual post or existing assembly, including its widest points, instead of relying only on a nominal 4x4 or 6x6 label.
Why code context matters
Ontario's code framework treats exterior cladding as a component exposed to weather and intended to protect against wind, water, and vapour. For low-rise residential construction, assemblies using vinyl, aluminium, or steel cladding on wood-frame walls exposed to precipitation must meet the province's rain-control requirements or an equivalent Part 5 solution under the applicable code framework. The Ontario Building Code regulation provides context for treating exterior products as envelope components rather than purely decorative objects.
A product-specific example appears in the Canadian Construction Materials Centre listing for a vinyl siding system under CCMC Ruling No. 14-23-319. That ruling was issued on 2014-03-07 and revised on 2021-04-16. Its installation conditions include a continuous 19 mm air space outboard of the sheathing membrane and furring no more than 600 mm on centre. Those requirements apply to the evaluated siding system, not every post wrap. They show why the product instructions and intended assembly matter.
Check the box before installation
Before cutting, confirm that the package contains:
The correct sleeve or panels for the measured post.
Matching cap and base pieces, if the kit includes them.
Manufacturer-approved PVC adhesive.
Instructions for the exact format, whether KD, split-L, or U-construction.
Any specified trim, fasteners, plugs, or joint components.
A KD wrap generally needs access around the post during assembly. Split-L and U-construction formats can change how an existing rail, bracket, gate, or adjacent panel affects the retrofit. If the shipment does not match the measured profile, stop before cutting. A clean installation starts with the right format, not an adjustment made after the wrong sleeve reaches the saw.
Benefits and Trade-offs Versus Other Post Coverings
PVC makes sense for many homeowners because it changes the maintenance equation, but it isn't automatically the right covering for every post. The useful comparison is not “which material looks nicest in a catalogue?” It's “which material fits the post, the climate, the access, and the amount of upkeep you'll accept?”
The table below keeps the choice grounded in four practical criteria.
Criterion | PVC Post Wrap | Painted Aluminium Sleeve | Cedar Sleeve / Wrap |
|---|---|---|---|
Maintenance effort | Usually low. Wash the surface, inspect seams, and keep trim areas clear. It doesn't require routine repainting. | Low to moderate. The finish can be durable, but dents, scratches, and damaged coating need attention. | High relative to the other options. The wood finish requires ongoing inspection and refinishing as exposure changes. |
Freeze-thaw weather resistance | Strong when installed with the required expansion allowance and suitable joints. PVC moves noticeably with temperature. | Stable-looking and resistant to moisture, but dents and coating damage can become visible. | Familiar and repairable, but moisture absorption, checking, and finish breakdown remain ongoing concerns. |
Aesthetic lifespan | Keeps a consistent manufactured appearance, although dirt and gradual colour change can show over time. | Crisp and modern, with a metal character that may not suit every fence style. | Natural and warm, but weathering is part of the appearance unless the finish is maintained. |
Total installed cost | Depends on profile, format, preparation, trim, and labour. It can avoid full post replacement when the structure is sound. | Depends on fabrication, finish, corners, and site access. Custom fitting can add work. | Material may be familiar, but preparation and future finishing add ownership effort. |
Where PVC earns its place
A cellular PVC sleeve won't splinter like a deteriorating wood cover, rust like exposed steel hardware, or demand repainting as part of ordinary ownership. Its consistent colour and manufactured profile also make several posts look alike, even when the original wood posts weathered at different rates.
For a fence that is structurally sound but visually uneven, that consistency is often the main benefit. You're not trying to make the whole fence look new by disguising every component. You're giving the posts a stable finish so they stop drawing attention away from the rails and pickets.
The lower maintenance burden is also useful around gates, porches, and high-visibility entry points where a homeowner doesn't want to sand and refinish vertical wood every season. For more ideas on material choices, compare low-maintenance fence options before deciding that a post-only repair is enough.
Where PVC loses
PVC expands and contracts more than aluminium or wood in a way that matters at the joints. If the installer closes every seam tightly, the panels may distort as temperatures change. The expansion gap isn't optional, particularly in the Ottawa–Gatineau corridor.
Organic debris can also discolour the surface if it sits in seams or against the base. A wrap reduces maintenance, but “low maintenance” doesn't mean “ignore it.” Finally, colour selection can be limited by local inventory. A profile that looks ideal online may not be available from a nearby supplier when the project needs to start.
Replacement remains the better choice when the post is rotten, unstable, or incorrectly positioned. PVC is a finish system, not a structural upgrade. If the underlying post is failing, spending money on a sleeve delays the decision you still need to make.
Choosing the Right Size, Format, and Profile
A wrap that is attractive, well made, and the wrong size is still the wrong product. Measure the existing post before you browse colours or order caps.
Canadian product literature commonly separates PVC post-wrap systems into KD, split-L, and U-construction formats. The format determines how the sleeve reaches the post, which is why it matters more during retrofit work than many homeowners expect.
Match the format to site access
KD, or knock-down, arrives unassembled. It is commonly the default shipping format unless another configuration is specified. KD works well on a new build or any situation where the post is exposed and the installer can assemble the sleeve around it before surrounding fence components block access.
Split-L uses two pieces that can be brought around an existing post. That makes it useful when the fence is already assembled and the post can't be slid through a closed sleeve. The joint must still be aligned, bonded, and allowed to move as the manufacturer specifies.
U-construction creates a three-sided sleeve that is closed with a fourth piece. It can be practical where access is limited or the post profile is not a perfect square, but it demands careful measurement and a clean closing joint.
A format that avoids dismantling the fence may save more time than a small difference in material price. Conversely, a new-build installer may prefer KD because assembly around an exposed post is straightforward.
Measure the inside, not just the label
Nominal 4x4 and 6x6 categories help you find the right product family, but the inside dimensions decide whether the sleeve fits. Existing wood may be planed, rough, bowed, or altered by years of coating. Steel posts may have a different actual profile from the wood size they replaced.
Measure each post rather than assuming every post is identical. Check width in more than one place, look for out-of-square corners, and account for hardware, rail connections, and any old covering that will remain underneath. Canadian catalogues list square post-wrap SKUs with precise inside dimensions, so compare those dimensions to your field measurements before ordering from a Canadian post-wrap catalogue.
Plan the length before cutting
A Canadian retail listing documents a 6 in. x 6 in. x 108 in. white vinyl post wrap, confirming a common 9-foot product length in the Canadian market Canadian 6 in. x 6 in. x 108 in. post wrap listing. PVC trimboards and post-wrap materials are also listed in stock lengths of 8', 10', 12', 18', and 20' PVC trim and moulding specifications.
You can trim a long sleeve to suit the post. You can't stretch a short one, so include the cap, base, and expansion allowance in your cut plan.
Sizing checklist
Measure the actual post width and depth.
Record the smallest inside dimension that will clear the post.
Check whether rails, brackets, or a gate prevent sliding.
Confirm KD, split-L, or U-construction suits access.
Verify the available length before cutting.
Confirm cap and base compatibility with the selected profile.
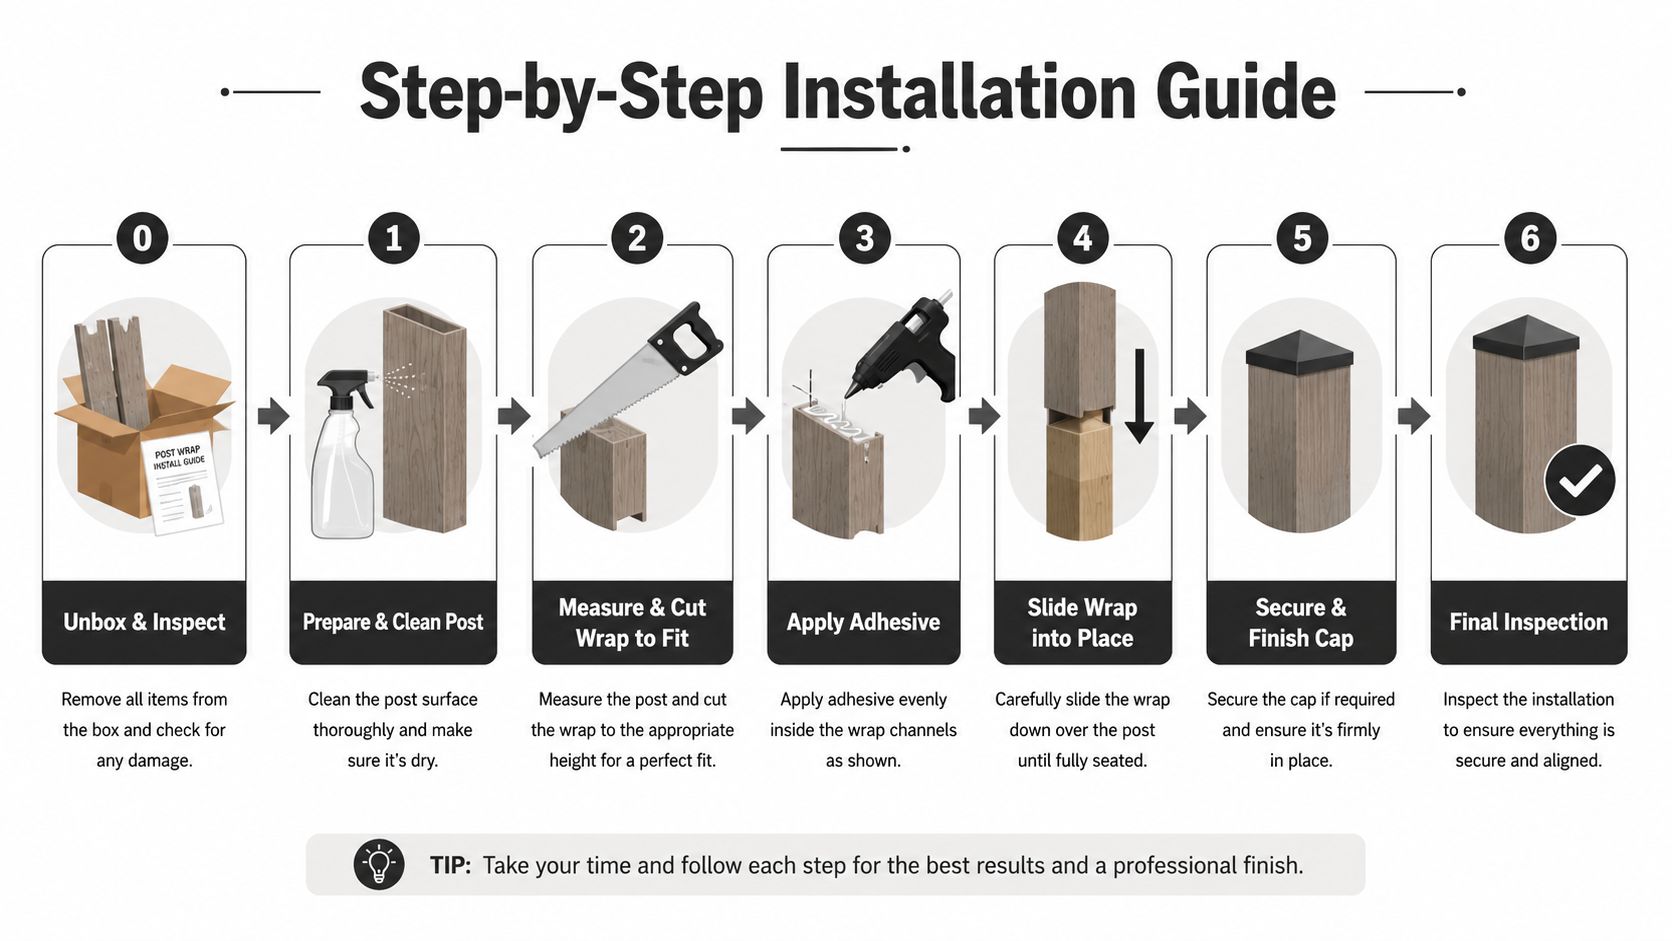
Use the video below as a visual reference for the sequence and the relationship between the sleeve, joints, and trim pieces.
Installing a PVC Post Wrap Step by Step
A neat installation depends less on speed than on preparation. PVC cuts much like a woodworking material, but the finished sleeve still needs to move with the weather and remain aligned around a post that may not be perfectly square.
The 10-step installation sequence
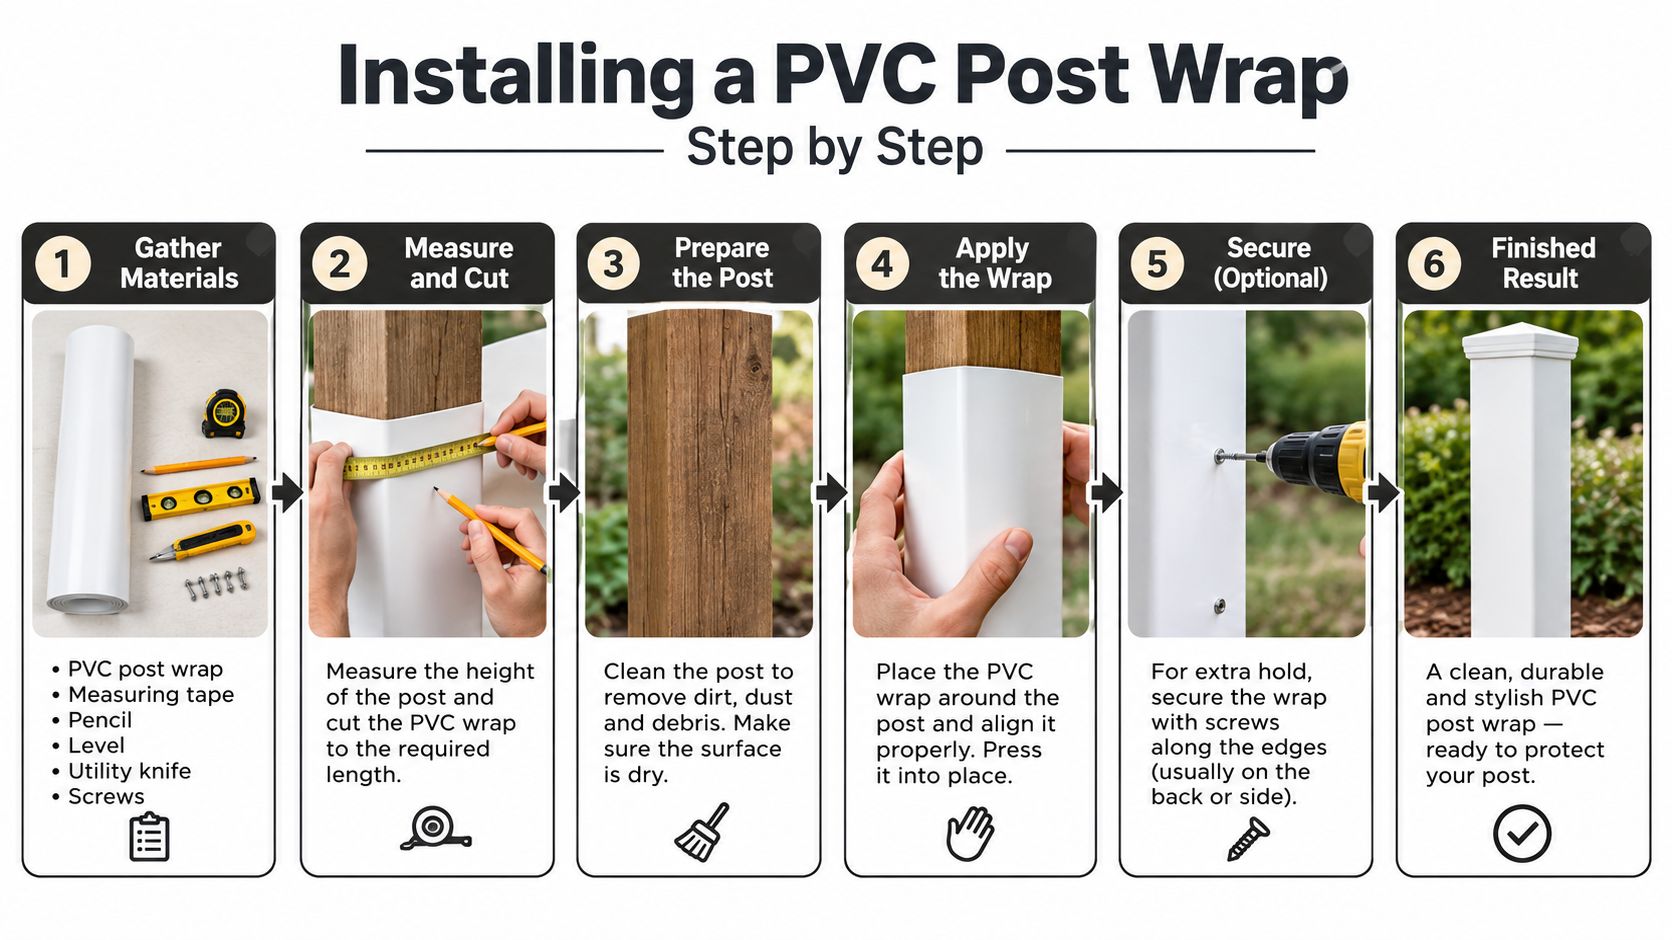
Inspect the post. Confirm that the wood or steel core is sound, stable, plumb, and dry. Repair or replace a failing post before covering it.
Clear the work area. Remove loose trim, dirt, old fasteners, and obstructions that would prevent the wrap from sitting evenly. On an existing fence, identify rails and brackets that limit access.
Measure the finished height. Mark the sleeve for the post height, cap, base collar, and the expansion allowance required by the product instructions. Don't cut from the nominal fence height alone.
Cut the wrap. Use a sharp, fine-tooth blade and support the panel during the cut. A dull blade can chip the edge, while poor support can leave a cut that isn't square enough for a visible trim joint.
Dry-fit every piece. Assemble the sleeve without adhesive and check the fit around the post. Confirm that the cap and base sit correctly, the seams close without force, and the sleeve remains plumb.
Prepare the joints. Clean the bonding surfaces and apply the specified PVC adhesive to mitred or closing joints. Keep adhesive away from visible faces because cured residue is difficult to disguise.
Assemble or slide the sleeve into position. KD pieces are assembled around an exposed post. Split-L and U-construction formats can be more practical for a completed fence because they don't require the whole fence section to be dismantled.
Protect movement at the ends. Canadian installation guidance for Ottawa–Gatineau conditions recommends a 1/8-inch expansion gap at cap and base collars for thermal cycling between −30°C and +35°C Kleer post-wrap installation instructions. Cellular PVC expands about 0.006 inch per foot, so a long section needs room to move rather than being trapped tightly.
Secure only as allowed. If the manufacturer permits fasteners, use the specified stainless brads or other approved fasteners in the correct locations. Don't drive fasteners through the visible panel face unless the system explicitly requires it.
Finish and inspect. Install the cap and base trim, wipe away adhesive immediately, check the seams from several angles, and confirm that the sleeve hasn't twisted around the post.
Retrofit work needs a different plan
A new-build post is open and accessible, so a KD sleeve is often convenient. An existing fence is less forgiving. Rails, pickets, gate hardware, and nearby structures can make a closed sleeve impossible to slide over the top.
That's where split-L or U-construction earns its place. The installer can work around the post, close the assembly in place, and avoid dismantling a finished fence section. The trade-off is that the closing joints become more visible and demand better alignment.
A small retrofit involving two or three posts is a reasonable Saturday project for someone comfortable with measuring, cutting, adhesive, and trim work. A 30-post fence line, multi-sided wrap work, or posts that are out of plumb usually justifies a crew with controlled cutting, proper adhesive systems, and a repeatable way to keep every sleeve aligned.
Stop and reassess if you see tight seams, no expansion allowance, adhesive on the visible face, or fasteners driven into the panel face. Those aren't minor cosmetic shortcuts. They signal that the sleeve may not have enough room or support to handle the next Ottawa winter.
Maintenance, Lifespan, and Cold-Climate Care
PVC post wrap ownership is simple when the installation leaves room for movement and the homeowner treats the sleeve as an exterior finish rather than a maintenance-free object. The practical routine is a short spring inspection, not a major renovation.
Set aside roughly 10 to 15 minutes per post for a basic yearly check Fencescape PVC post-wrap guidance. Wash the surface with mild soap and water, use a soft brush along the grain or surface direction, and rinse thoroughly. Then inspect the seams, cap, base collar, and the area where debris can collect against the original post.
A spring checklist that catches problems early
Wash gently: Avoid aggressive abrasives that can change the surface texture.
Inspect seams: Look for opening joints, distortion, or adhesive failure.
Check the cap and base: Make sure trim remains seated and hasn't trapped wet organic material.
Clear debris: Remove leaves, soil, and salt residue from the base area.
Review caulking: Re-caulk a joint that has opened, using a compatible exterior product.
Watch the post itself: A sleeve shouldn't prevent you from noticing movement, water accumulation, or a changing base condition.
Ottawa–Gatineau winters challenge the assembly through sustained cold followed by thaw cycles. A long cold period drives contraction, then a rapid spring temperature swing drives expansion. That is why the 1/8-inch gap and flexible, compatible joint treatment covered earlier are durability details, not decorative preferences.
What shortens service life
Organic debris left in a joint holds moisture and hides movement. Metal fasteners placed too close to an edge can encourage cracking, especially when the panel contracts. Snow piled against the base collar can keep the lower area wet and expose the trim to salt and repeated freeze-thaw action.
Good detailing helps. A properly fitted cap sheds water, a base collar keeps the finish transition controlled, and a clear area around the bottom allows inspection. Avoid directing de-icing salt spray at the wrap where possible, particularly beside driveways and steps.
Set realistic colour expectations
A PVC wrap can retain a clean appearance for a long time, but “long lasting” doesn't mean factory-new forever. Fading usually appears as a gradual softening or unevenness in the colour, especially where one face receives more sun or where dirt collects. It isn't the same as peeling paint, but it is still a visual change homeowners should accept before choosing a finish.
For broader property maintenance planning, managing construction bids effectively can help property owners coordinate exterior work, scopes, and follow-up responsibilities. Around the fence itself, also account for ground movement and drainage. The guidance on how to prevent frost heave is relevant when post movement, not just surface wear, threatens the finished line.
Codes, Pool Safety, and How FenceScape Can Help
Code questions become easier when you separate three issues: the product's exterior performance, the structure beneath it, and the purpose of the fence.
Ontario's regulatory framework treats exterior cladding as part of the weather-control assembly. That doesn't mean every PVC post wrap has the same approval pathway as a wall-cladding system, but it does mean installers should think about moisture, drainage, exposure, and manufacturer instructions rather than treating the sleeve as a decorative sticker.
The 2023 Ontario building-code notice also tightened expectations around combustible exterior materials for certain building types. The notice states that at least 90% of exterior cladding must be noncombustible in specified situations, and where foamed plastic insulation is used on buildings more than 3 storeys high, exterior protection must be provided by at least 25 mm of concrete or masonry or a qualifying noncombustible material Ontario building-code notice and amendments. Those provisions aren't a blanket ban on residential PVC fencing, but they show why polymer-based exterior components are evaluated through fire-safety and application criteria, not appearance alone.
Pool fences require a separate check
A pool enclosure has a safety function that a general boundary fence may not. Municipal requirements commonly address minimum height, climbability, gate self-closing and self-latching behaviour, and visibility through sections of the enclosure. The way a post is finished can affect projections, gaps, gate alignment, and hardware clearance even when the PVC itself isn't specifically prohibited.
Before wrapping a pool-fence post, check the applicable municipal rules and the complete gate assembly. A sleeve that adds bulk near a latch or creates a foothold can create a compliance problem even if the surrounding fence looks finished. FenceScape's guide to inground pool fence requirements is a useful starting point, but the local authority remains the final reference for the property.
Procurement is part of the installation decision
Canadian availability isn't uniform. One supplier notes that column-wrap offerings vary by area, so the profile and colour you find in one market may not be stocked nearby. Canadian catalogues also show increasing availability of pre-cut, pre-mitered kits for 4x4 and 6x6 posts with caps and bases included, which can shorten the work on a straightforward retrofit. The format still matters, because a pre-cut KD kit may not solve an access problem on an assembled fence.
That creates two sensible buying routes. A confident DIY homeowner can purchase material only after measuring each post, checking access, and confirming the expansion details. A homeowner with many posts, mixed profiles, gates, or questionable alignment may find it more practical to have one contractor handle supply, format selection, cutting, installation, and the final inspection.
FenceScape offers both material supply for DIY projects and turnkey fencing work in the Ottawa–Gatineau area. The relevant value isn't just obtaining a sleeve. It's matching the format to an existing fence, allowing for local temperature movement, and making sure the finished wrap doesn't hide a structural issue or interfere with a pool gate.

If your Ottawa–Gatineau fence posts are weathered but still structurally sound, FenceScape can help you compare PVC formats, confirm measurements, and choose between material-only supply and complete installation. Visit FenceScape to request a project discussion before ordering wraps that may not fit your existing posts.
Comments