
How to Build a Fence on a Slope A Practical DIY Guide
- Eric Lafleche
- Dec 8, 2025
- 12 min read

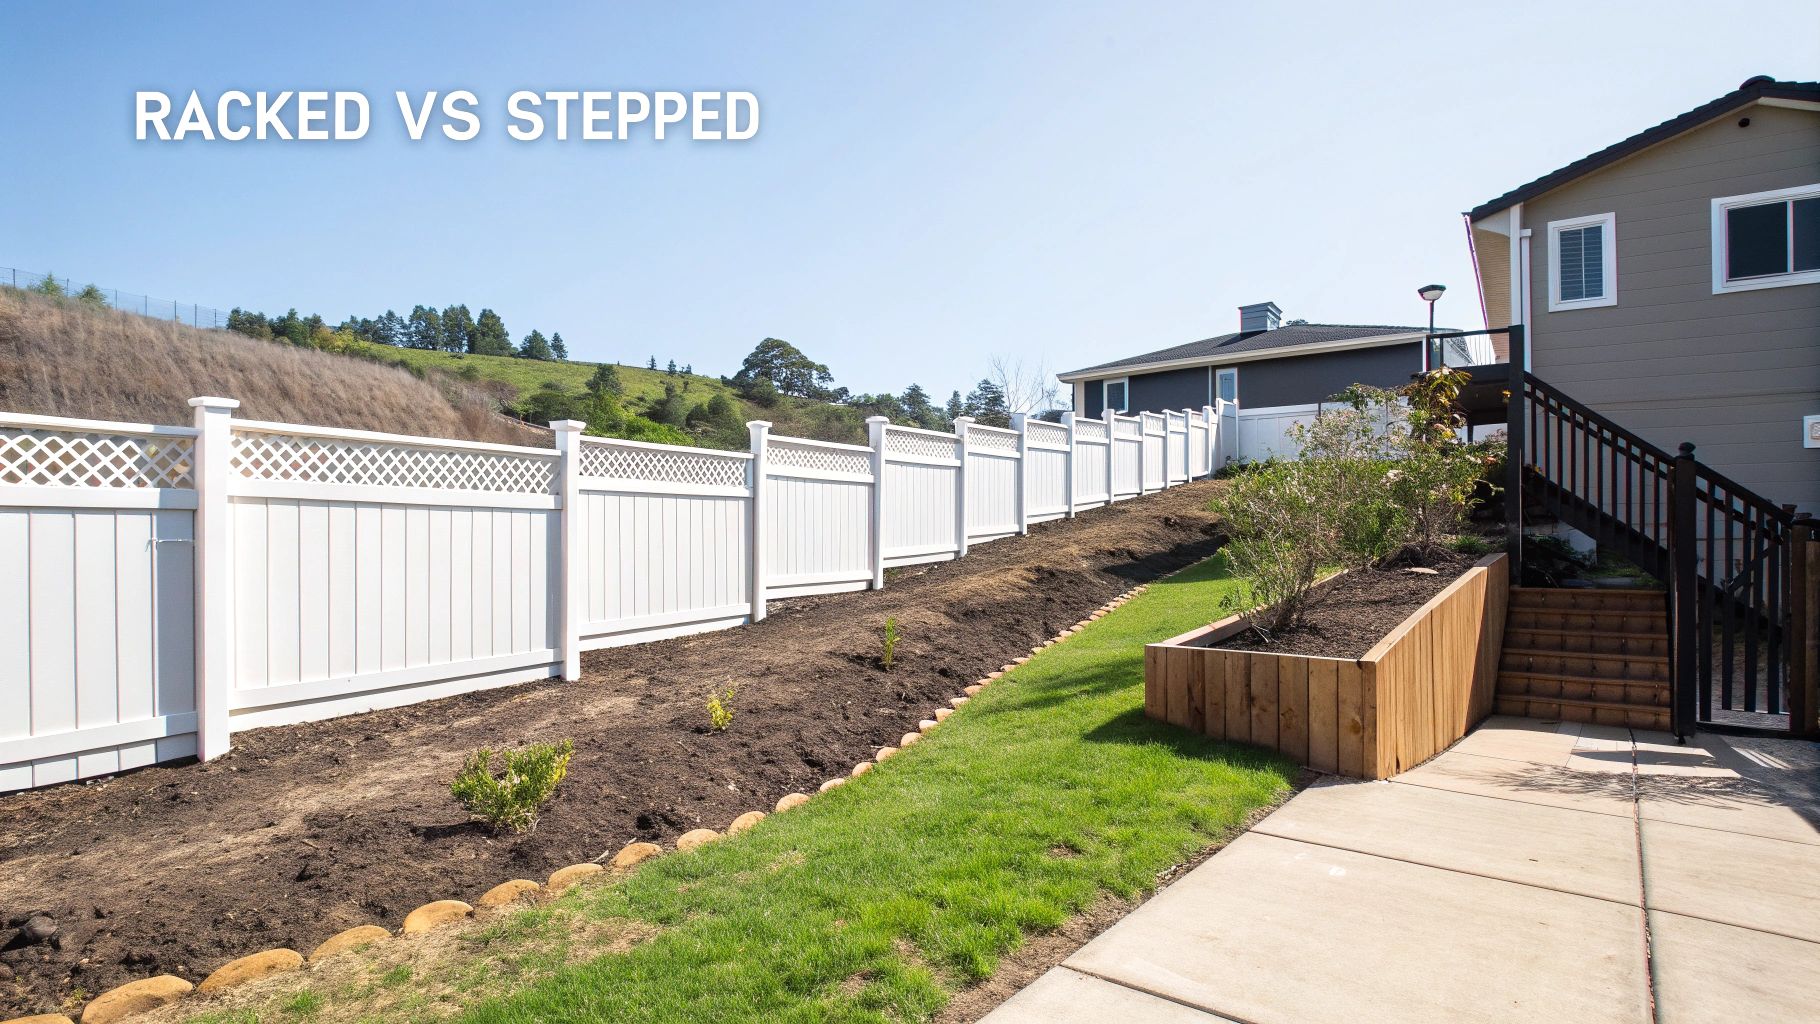
Building a fence on sloped ground requires one of two methods: build a racked fence that follows the contour of the land or a stepped fence that descends in level sections. Your choice depends on the steepness of the slope, your fence material, and the final look you want to achieve.
Choosing the Right Fence Method for Your Sloped Yard
Your first action is to decide whether to rack or step the fence. This decision dictates your material list, post heights, and assembly process. To make the right call, measure your property's grade and define your goals for the finished fence.
The Racked Method: A Smooth Solution
A racked fence, or contour fence, follows the natural slope of your land. You install the rails at an angle, parallel to the ground, while keeping the pickets perfectly vertical. This method creates a continuous line with a consistent, small gap at the bottom.
Use this method for gentle slopes with a grade of 30 degrees or less.
Aesthetic Appeal: Delivers a seamless, organic look that blends into the landscape.
Pet and Child Safety: The uniform gap along the bottom provides a secure barrier for small pets or children.
Material Suitability: Racking is best for fences built on-site from individual components, like wood or certain metal designs. Many pre-assembled vinyl or aluminum panels are now "rackable," with oversized holes where pickets meet rails, allowing them to pivot.
The primary drawback is that on very steep grades, the angle can become too extreme, compromising the fence's strength and appearance.
The Stepped Method: Taming Steep Grades
For steeper hills, the stepped method is the most effective approach. With this technique, you install each fence panel as a level section, creating a stair-step effect down the slope. This provides superior stability on significant inclines where racking isn't practical.
The most noticeable feature of a stepped fence is the triangular gap under each panel where the flat bottom meets the angled ground. This is a critical consideration for security or a polished look.
To address these gaps, you can add landscaping, attach custom-cut boards, or build a small retaining wall for a clean, finished design. This is the required method for any pre-built panel not designed to rack, as it keeps each section horizontal and strong.
For complex properties, consider consulting with professionals like sloping block specialists to ensure you make the best choice.
Racked vs Stepped Fencing: Which Is Right for You?
Use this table to decide which method best fits your project and property.
Feature | Racked (Contour) Method | Stepped Method |
|---|---|---|
Best For | Gentle to moderate slopes (under 30 degrees) | Steep or uneven slopes |
Aesthetics | Smooth, flowing, and continuous lines | Structured, formal, stair-step appearance |
Bottom Gap | Small and consistent along the entire fence line | Large, triangular gaps under each panel |
Installation | Can be more labour-intensive; requires precise angle cuts | Simpler installation, especially with pre-built panels |
Material | Ideal for custom-built wood or specific "rackable" panels | Works with almost any fence panel, especially non-rackable ones |
Security | Generally better for containing small pets or children | Gaps may need to be filled for full containment |
Ultimately, your terrain will guide your decision. Weigh these pros and cons against your yard's specific conditions to select the ideal installation method.
Making the Final Decision
For a long, rolling hill where you plan a cedar privacy fence, racking will create a beautiful, flowing boundary. Explore popular wooden fence styles for Ottawa homes that are well-suited for this method.
Conversely, if your property has a short, steep drop-off and you're using standard vinyl panels, stepping the fence down is the most practical and stable solution. Your property’s layout is the ultimate guide to the right answer.
Sorting Out Permits and Property Lines on Uneven Ground
Before digging, you must handle the administrative side of your fence project to avoid significant issues later. Rules for sloped terrain are often more complex than for a flat yard, especially concerning how to build a fence on a slope.
A critical detail is how fence height is measured. Many municipalities measure from the lowest point of the ground next to the fence, not from where the post enters the ground. This rule means a standard six-foot panel on a slope could be considered over the legal height limit, triggering a permit requirement.
Actionable Tip: Invest in a professional land survey. It eliminates guesswork about your property lines, prevents neighbour disputes, and ensures your fence is built precisely where it belongs.
Start with a clear understanding of your boundaries and local rules to avoid fines or a tear-down order.
Getting a Handle on Local Building Codes
Your first action is to contact your local municipality’s planning department. Do not make assumptions, as bylaws vary significantly between towns. You must find the specific rules for your address.
Prepare a list of questions:
What is the maximum fence height allowed without a permit?
How do you measure fence height on sloped ground?
Are there setback requirements (distance from property lines, sidewalks)?
Are any specific materials or styles prohibited?
Also, review the local zoning regulations, which may impose additional rules on height, materials, and placement.
Special Cases You Absolutely Can't Ignore
Certain situations have non-negotiable rules. For a pool fence, you must adhere to strict safety codes that dictate height, gate latch design, and the maximum size of any gaps to prevent unsupervised child access. On a slope, where gaps can easily form, these rules are even more critical.
Another common scenario involves steep grades. If your plan includes a retaining wall, you will likely need separate permits for the wall, especially if it exceeds a certain height. For example, California's specific fence permit rules often require a permit for fences over seven feet, a height easily reached on a slope when measured from the lowest point.
Completing this research now is the foundation of a successful project and will prevent long-term problems.
How to Accurately Lay Out and Measure a Fence on a Slope
With permits sorted and your method chosen, the next step is precise layout. Small measurement errors at this stage can compromise the entire project. The goal is to establish a straight reference line and accurately measure the slope.
Use simple tools—stakes, a mason's line, and batter boards—to create a visual guide that cuts through your yard's dips and rises, ensuring a professional-looking result.
Establishing Your Fence Line
First, create a reliable reference line using a mason's line pulled taut between two points. This tool ignores the ground's contours and provides a true line to follow.
To begin, drive tall stakes firmly into the ground at the start and end of your fence line to serve as anchors.
For corners, use batter boards—simple T-shaped frames made from scrap wood—placed just outside the corner post location. This setup lets you stretch the mason's line past the corner, giving you room to dig post holes without disturbing your layout.
Run the mason's line between your stakes or batter boards, pulling it as tight as possible to eliminate sag. This string is now your reference; align every post to it for a straight fence, regardless of the terrain.
This flowchart provides an overview of the preparation needed to reach this point.Following these steps—from code review to securing a permit—is essential for a compliant, headache-free project.
Calculating the Slope's Grade
With your line in place, calculate the slope's grade, or the 'rise over run'. This calculation is crucial for ordering the right amount of material and determining post spacing.
You will need a long, straight 2x4, a measuring tape, and a level.
Find the Run: Lay the 2x4 on the ground parallel to your mason's line. Place your level on top and adjust the board until it's perfectly horizontal, lifting the downhill end off the ground. The length of the board is your "run" (e.g., an 8-foot board).
Find the Rise: While the board is level, measure the vertical distance from the bottom of the downhill end straight to the ground. This measurement is your "rise."
Do the Math: If your 8-foot (96-inch) board has a rise of 12 inches, your grade is a 12-inch vertical drop for every 96 inches of horizontal distance. This tells you exactly how much each section needs to angle or step down.
Knowing the grade is mandatory. It determines the required post length, the number of panels needed, and whether certain pre-made panels are suitable.
Marking Post Locations for Your Chosen Method
The method for marking post locations differs for racked and stepped fences. A common error is measuring along the ground, which is inaccurate due to the slope.
For a Racked Fence:You need consistent spacing along the slope. Use a measuring tape to measure your desired distance (e.g., 8 feet) directly on the ground, following under your mason's line. Mark each spot with a stake or marking paint.
For a Stepped Fence:You must measure the horizontal distance, or the "run." Hold your tape measure perfectly level and measure your 8-foot interval from one post mark to the next. The actual distance on the ground will be longer, but this ensures each fence panel is a standard, level width.
Take your time during this layout phase. Accurate measurements now will ensure all components fit together smoothly later.
Setting Strong Fence Posts on Uneven Terrain
The foundation determines the strength of your fence, especially on a hill. Correctly set posts ensure a stable, long-lasting structure, while improperly set posts lead to a leaning, failing fence. Setting posts on a slope requires precision because gravity is constantly working against you.
Digging Holes Plumb, Not Perpendicular
The most common mistake is digging post holes perpendicular to the slope. This creates an angled hole, making it impossible to set a vertical post. Action: Dig the hole plumb (perfectly straight up and down), regardless of the ground's angle.
To do this, stand downhill from your mark and focus on digging straight down. Use a post level to check the sides of the hole periodically, ensuring they are vertical.
Calculating Post Depth and Length
On a slope, you will need longer posts than on flat ground, particularly on the downhill side of each panel. This accommodates the drop in elevation while maintaining a consistent fence top height.
Follow this rule: bury at least one-third of the total post length.
Mind the Frost Line: In cold climates like Ottawa, posts must extend below the frost line to prevent "frost heave," which can push posts out of the ground.
Downhill Needs More: The downhill post of a panel must be longer to maintain fence height. If a slope drops 12 inches over an 8-foot panel, the downhill post must be at least 12 inches taller than the uphill one before accounting for burial depth.
Our guide on how deep a fence post should be offers more practical advice for sloped installations.
Choosing Your Backfill: Concrete vs. Gravel
Lock your posts in place with either concrete or gravel.
Backfill Material | Pros on a Slope | Cons on a Slope |
|---|---|---|
Concrete | Offers unmatched strength and rigidity, essential for resisting the sideways pressure a slope creates. It locks the post in permanently. | Can trap water around a wood post's base if not crowned. It is unforgiving if you need to make adjustments. |
Gravel | Provides excellent drainage, a major advantage on a slope with water runoff. This helps prevent rot at the post base. | Lacks the rigid strength of concrete. Posts may shift over time on steep grades or with heavy panels. |
For most sloped fences, concrete is the best choice for stability. Actionable Tip: Place a few inches of gravel in the bottom of the hole for drainage before pouring the concrete.
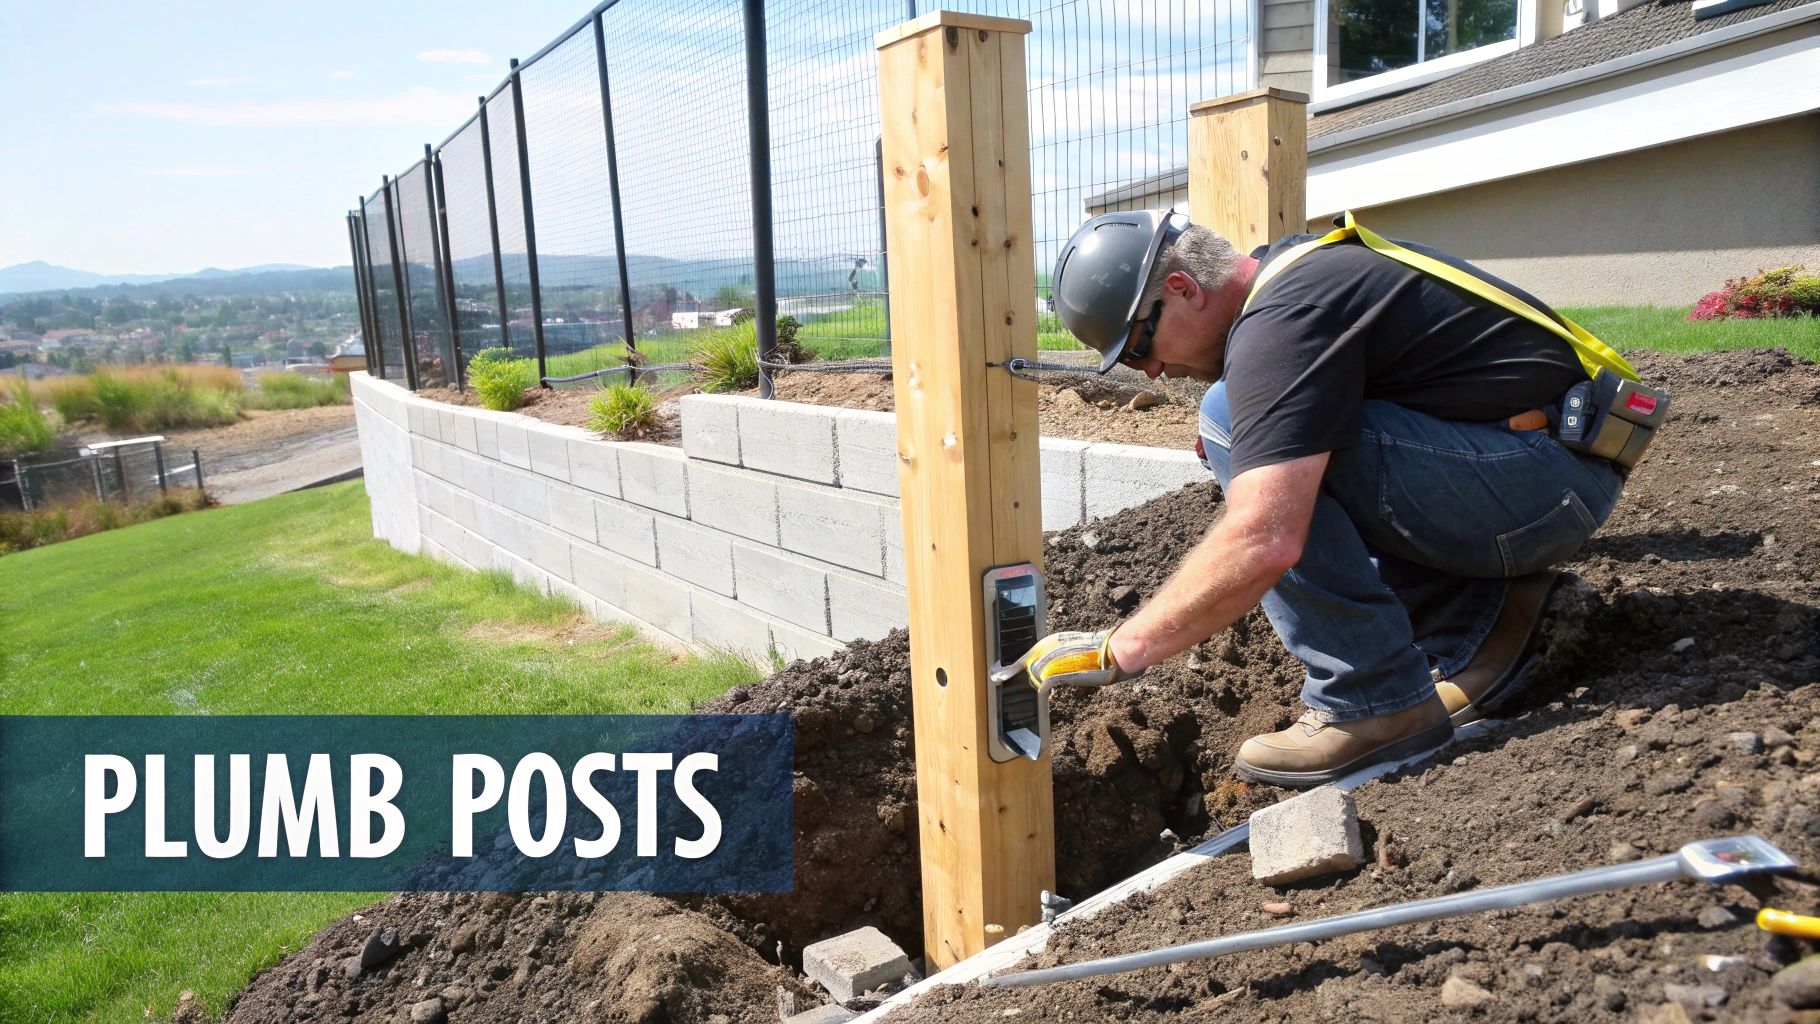
Ensuring Perfectly Plumb Posts
The final, critical task is to set the post perfectly plumb and brace it while the concrete sets.
Set the Post: Place the post in the hole on the gravel base.
Add Concrete: Pour the dry mix around the post, then add water per the bag's instructions. Mix thoroughly in the hole with a stick.
Plumb and Brace: Use a post level on two adjacent sides to adjust the post until it is perfectly vertical. Screw temporary braces made from scrap 2x4s to the post and stake them into the ground to hold it in position.
Crown the Concrete: As the concrete begins to set, use a trowel to slope the top surface away from the post. This "crown" sheds rainwater away from the wood, preventing rot.
Actionable Tip: Never trust your eyes. A post that appears straight on a hill is almost always leaning. Use a level to ensure every post is perfectly vertical for a professional and durable fence.
Bringing It All Together: Installing Rails and Panels
With your posts set, it's time to install the rails and panels. Your next steps depend entirely on whether you chose a racked or stepped fence. Follow the specific instructions for your chosen method to achieve a clean, professional finish.
Installing a Racked Fence
For a racked fence, the rails must run parallel to the ground, following the slope. This requires accurate angles and solid connections.
To attach rails at an angle between posts, choose one of these methods:
Toe-nailing: Drive screws or nails at an angle through the rail's end and into the post. This method is fast but requires practice to avoid splitting the wood.
Specialized brackets: Use angled or adjustable fence brackets. They remove guesswork and provide a secure attachment point for your rails.
After installing the rails, attach the pickets. For a professional look, ensure the picket tops form a straight, level line while the bottoms follow the slope.
Actionable step-by-step process:
Install pickets so their tops are even, using a taut string line or a long level as a guide.
After all pickets are attached, trim the bottoms to match the ground's contour. Use a small block of wood as a spacer: slide it along the ground and use it to mark a consistent cut line on each picket.
Actionable Tip: When racking a fence, always start at the highest point of the slope and work downhill. This makes it easier to manage panels and maintain alignment.
Building a Stepped Fence
For a stepped fence on a steep grade, consistency is key. Each panel is installed level, creating a "stair-step" effect.
First, determine a uniform drop for each section. Measure the total elevation change between two posts and divide it by the number of panels in that run. This calculation ensures a polished, intentional look. For example, a 24-inch drop over a 16-foot span (two 8-foot panels) means each panel must step down 12 inches.
Follow these steps:
Cut Your Rails: Measure the opening between posts and cut your top and bottom rails to that exact length.
Hang the First Panel: Install the highest panel first. Use a level to ensure it is perfectly horizontal as you secure the rails.
Mark the Drop: Measure down from the bottom of the just-installed rail to mark the position for the top of the next rail on the next post. Use your pre-calculated drop measurement.
Repeat and Conquer: Continue this process for each panel down the line, using a level and tape measure to ensure every section is horizontal and every step is identical.
Material-Specific Tips You Should Know
Your fence material will influence the installation process.
Pre-assembled Vinyl/Aluminum Panels: Check if your panels are "rackable." These are designed with oversized picket holes that allow the panel to tilt. If your panels are not rackable, you must use the stepped method.
Custom Wood Fences: Building a wood fence from scratch gives you complete flexibility. You can cut rails at any angle for a racked fence or build each stepped panel to the precise size needed.
Whether racking or stepping, take your time. Careful planning and precise execution are essential for a professional-looking fence on a slope.
Finishing Your Fence: Drainage and Long-Term Care
With the last panel installed, your fence is built, but the project isn't complete. The final steps involve protecting your work from the elements, especially water runoff on a slope. These finishing touches ensure your fence is built to last.
Proper drainage is critical on a hill. You must guide rainwater away from your fence posts to prevent rot and erosion.
Managing Water and Preventing Soil Erosion
Actionable steps to manage drainage:
Dig a small swale (a shallow, sloped ditch) along the uphill side of your fence line. This will catch runoff and redirect it away from your posts.
Lay a bed of gravel along the fenceline to break up water flow and prevent soil erosion around your posts.
For steeper grades, consider a low-profile retaining wall at the base of your fence. It holds soil in place and can create a cleaner aesthetic, especially with a stepped fence. Check local building codes before building, as retaining walls over a certain height (often four feet) may require a separate permit.
Don’t underestimate water. A single heavy rain can expose a post's concrete base if it's not protected. Proactive drainage is the best insurance for your fence.
Long-Term Care for Sloped Fences
Maintaining a fence on a slope requires extra attention. Add these checks to your routine:
Check for Soil Washout: After heavy rain, walk your fence line. Look for areas where soil has washed away from the posts and fill them with compacted soil or more gravel.
Keep the Bottom Clear: Regularly clear leaves and debris trapped along the bottom edge of racked fences to prevent moisture buildup and rot.
Inspect for Leaning: Hills place unique stress on a fence. If a post begins to lean, it signals a potential foundation issue. Our guide on how to repair a leaning fence provides instructions on how to address the problem before it worsens.
Applying the Final Touches
Add these details for a polished, professional finish:
Install decorative post caps to add style and protect the end grain of wood posts from weather damage.
If you've installed a gate, ensure it has enough clearance to swing freely without scraping the ground. You may need adjustable hinges or to set the gate slightly higher on the downhill side.
For any wood fence, apply a high-quality sealant or stain. This acts as armor against moisture and UV damage, preserving its appearance for years.
Building a fence on a slope is a tough but seriously rewarding project. For those in the Ottawa–Gatineau region who'd rather have a perfect result without the weekend warrior stress, FenceScape is here to help. Let our experienced crews handle the tricky parts of your sloped property. Get your free estimate today.
Comments